
Forum |
|

Space
|
Stage 1
|
Stage 2
|

Stage 3
|
Stage 4
|
|
|
|
|
|
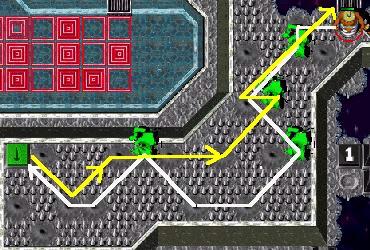
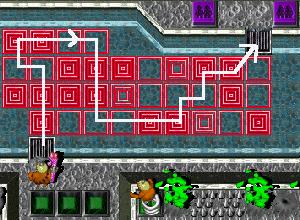
| View the map! |
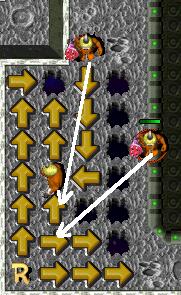
- Start with five bare-handed gruntz

- One bare-handed grunt is immediately free to move
- One bare-handed grunt is immediately free to move
- One bare-handed grunt is trapped within black pyramidz

- One bare-handed grunt is trapped within purple pyramidz

- One bare-handed grunt is 'stuck' with the job of carrying the
Warpstone

- Note:
There are many instancez when a grunt has a
long way to walk, and can do so safely without
constantly being told where to go.
(Click on a destination, and he just goez
there!)
So there are many timez when you may send a
grunt on his way, and actively instruct
another grunt in what to do.
That can really reduce your game timer time!
- One bare-handed grunt
- usez a megaphone
 -- gravity bootz
  , walkz
down, and stepz on the left black one-time
switch , walkz
down, and stepz on the left black one-time
switch 
- usez another megaphone
-- gauntletz
 . .
- pickz up the gauntletz he findz on the
ground.
- Gauntletz grunt
 crossez two
spikez crossez two
spikez  ("Ouch!
These are sharp!") and waitz near the arrowz ("Ouch!
These are sharp!") and waitz near the arrowz    . .
- Bare-handed grunt
- walkz down and stepz on the right black
one-time switch ,
and takez the gauntletz from the
GruntzMachine
- breakz all of the rock crystalz
 he
can reach, and opposite the second enemy
gun hat grunt, getz a beach ball he
can reach, and opposite the second enemy
gun hat grunt, getz a beach ball 
- walkz over the spikez and
breakz all the rock crystalz
- when all rock crystalz are
gone, downz some Zap Cola
 and getz the gravity bootz from the
GruntzMachine
and getz the gravity bootz from the
GruntzMachine
- Gravity bootz grunt
 givez the beach
ball
to the enemy sword grunt givez the beach
ball
to the enemy sword grunt  and walkz
onto the third arrow from the top and walkz
onto the third arrow from the top
- Gauntletz grunt
- walkz to the yellow hold switch

- as soon as the gravity bootz grunt passez the
first two-way arrow
 ,
the gauntletz grunt walkz
toward the silver pyramidz ,
the gauntletz grunt walkz
toward the silver pyramidz  . .
- Gravity bootz grunt killz the two
enemy gun hat gruntz
 and
then hitz the silver timer switch and
then hitz the silver timer switch  and the
gauntletz grunt startz
walking. and the
gauntletz grunt startz
walking.
- There is a delay on the last silver pyramid
during which time you should move the gravity
bootz grunt
- Gauntletz grunt breakz the
four rock crystalz and the


|
giant rock crystal,
revealing |

 
|
two purple multi-grunt switchez and a
green toggle switch .
- Gauntletz grunt and gravity
bootz grunt
each step on a purple multi-grunt switch so the
warpstone grunt
 can reach his
first CheckPoint Switch can reach his
first CheckPoint Switch  . .
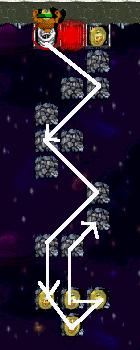
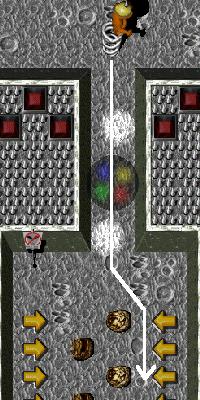
- One of the gruntz stepz on the green toggle
switch and
both cross to the spikez area
- Gravity bootz grunt passez the disco
light and proceedz to the red toggle switch

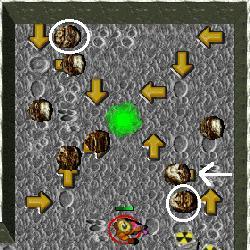
- Gauntletz grunt first breakz
the rock crystal in the
upper left hand corner, collectz a coin #1 and then walkz
down and breakz the rock crystalz there,
pickz up another coin #2,
downz a Bottle of Zap Cola and walkz back
again,
walkz over the pyramidz, passez through the
disco light and breakz all rock crystalz around
the goober straw and the goo puddlez, waitz on
one of the red pyramidz  . .
- Gravity bootz grunt pickz up the
goober straw and suckz up four goo puddlez
 . .
- Drop a new gruntz on the creation pad (getz
the shovel)
- Shovel grunt
 fillz all the
holez fillz all the
holez  (they
are only obstaclez). (they
are only obstaclez).
- Gauntletz grunt breakz the
two rock crystalz and the
|
giant rock crystal,
revealing |
|
two purple multi-grunt switchez .
- Gauntletz grunt and another
grunt step on the purple multi-grunt switchez
.
- Warpstone grunt goez to the
second CheckPoint Switch .
- Gauntletz grunt , shovel grunt
and straw
grunt
 stand
on their CheckPoint Switchez stand
on their CheckPoint Switchez  . .
- Straw grunt
and gauntletz grunt stand on the
green hold switchez
 . .
- Shovel grunt
- passez the rolling rockz, the lava
geyserz
 and
the (lowered) green pyramidz and
the (lowered) green pyramidz  . .
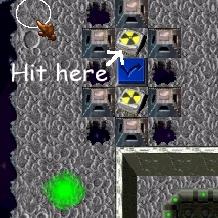
- as soon as he hitz the last pyramid ,
the nearest enemy gun hat grunt startz
shooting.
- turn both gruntz into goo puddlez and
hit the black one-time switch .
- Gauntletz grunt and the straw
grunt walk
through the lowered black pyramidz
 . .
- Gauntletz grunt breakz all
the rock crystalz in the
corner, and then stepz on the raised orange
switch
 ,
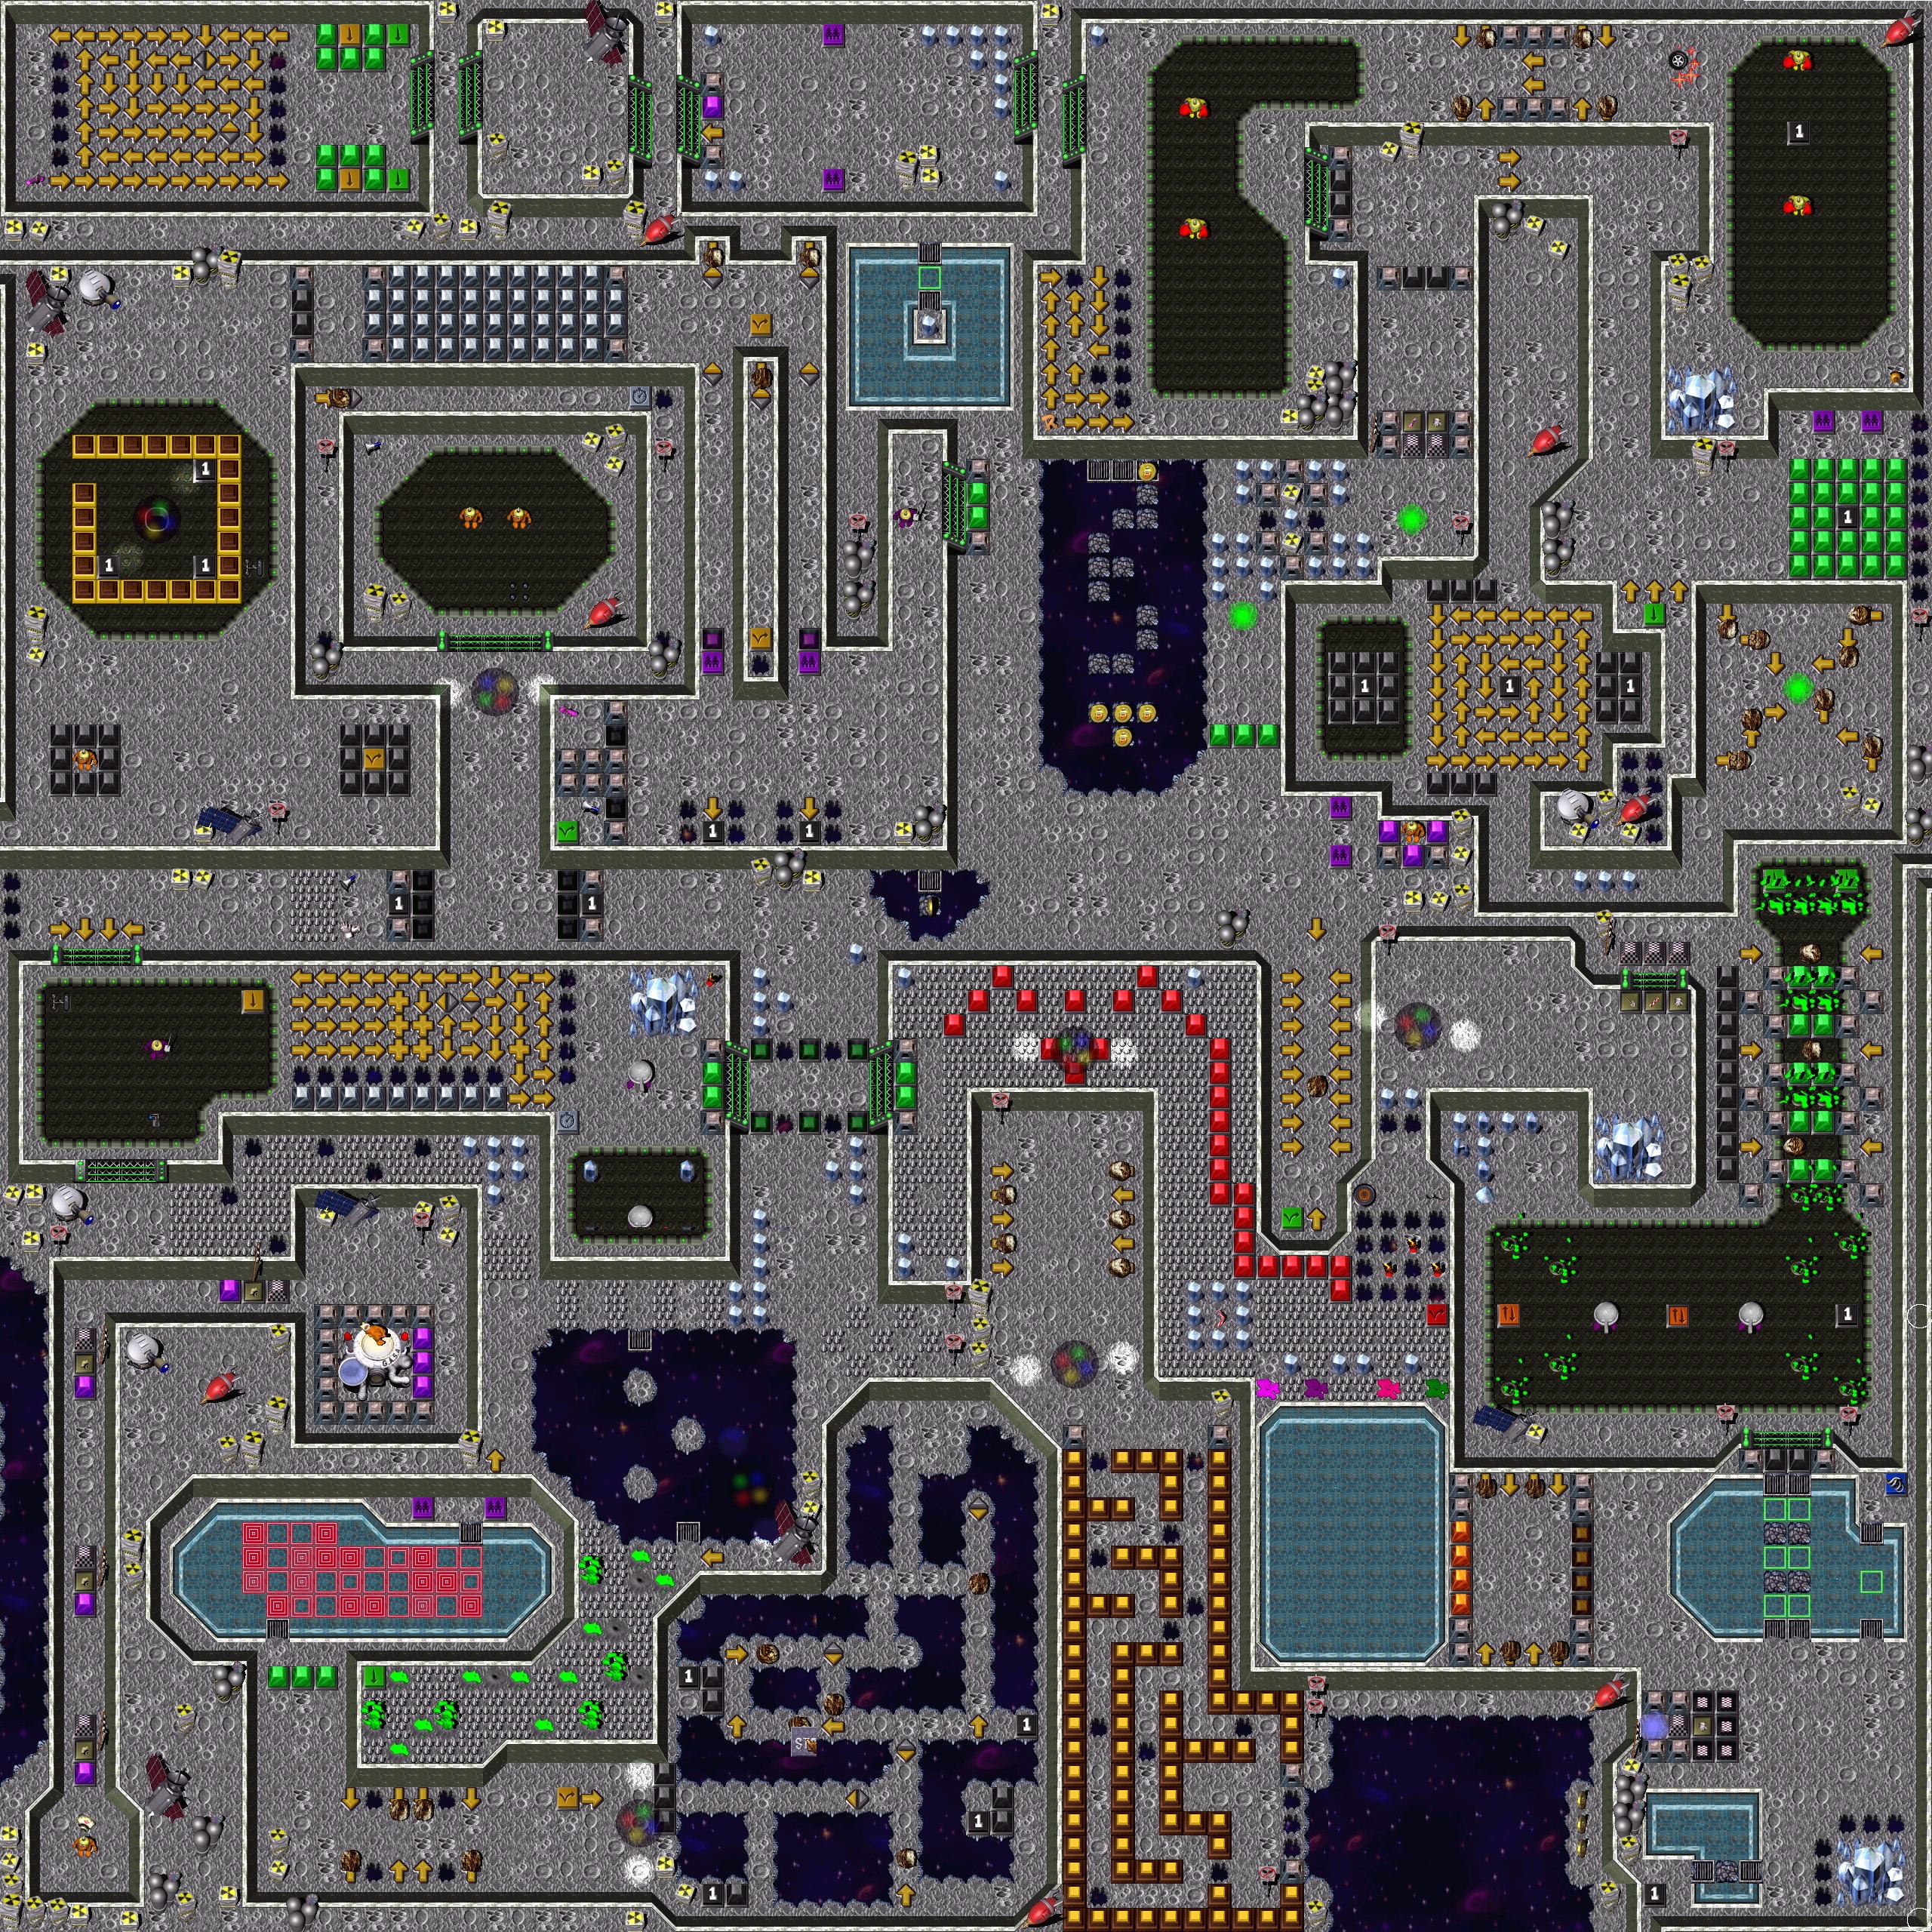
lowering the four orange pyramidz ,
lowering the four orange pyramidz  next to
the pool (and raising the four other orange
pyramidz next to
the pool (and raising the four other orange
pyramidz  and the
other orange switch and the
other orange switch  to ). to ).
- Straw grunt
getz the wingz
- Wingz grunt

- walkz back to the GruntCreationPad
- over the lowered red pyramidz and
- (on nothing but ordinary tilez ) to
the lower right-hand corner of the area
(no flying allowed!)
- fliez
over the pool to stand on one of the
lowered orange pyramidz (7
Wingz unitz used)
- Shovel grunt (standing on the
activated black one-time switch
 ) startz
walking toward the raised orange switch ) startz
walking toward the raised orange switch
- Wingz grunt
- crossez the rolling rockz and arrivez at
the (now lowered) orange pyramidz
- walkz around the pool and makez
a short flight (3 Wingz unitz used) to get
the springz that are on the blue toggle
switch

- Springz grunt
 hopz down to
activate the black one-time switch across
the smallest pool hopz down to
activate the black one-time switch across
the smallest pool
- Gauntletz grunt and shovel
grunt walk
down across the two-lane bridge (several
bridge piecez break on the way).
- Gauntletz grunt breakz the
|
giant rock crystal,
revealing |
|
two purple multi-grunt switchez
surrounded by holez.
- Shovel grunt fillz in one
hole and (after Springz jumpz across to one
purple multi-grunt switch ) walkz
across the mound
 to
stand on the other one to
stand on the other one
- (You don't need the shovel grunt from now on).
- Warpstone grunt goez to the
third CheckPoint Switch .
- Springz grunt goez all the
way back to where the very first rock crystal
was broken, where he is properly equipped to
pick up a coin on a crumbling bridge
 tile
next to a landing area tile
next to a landing area  . .
From there, he hopz over to wait, standing on
one of two purple multi-grunt switchez
- Gauntletz grunt
- satisfiez his CheckPoint Switch
- goez through the blue wormhole
- stepz on the three black one-time
switchez in
the area with the fast spinning disco
light
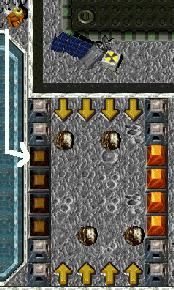
- walkz toward the silver pyramidz
- Bare-handed grunt just
released startz from southeast of the yellow
toggle switch
 and
runz toward the silver pyramidz . and
runz toward the silver pyramidz .
- The yellow toggle switch released a rolling
rock. The rock hitz the silver timer switch and as
soon as the pyramidz go down both gruntz enter
the silver
pyramid maze
- Position one grunt in front of a two-way
arrow
 (facing
the wrong way), the other standz so that the
yellow toggle switch is
between him and the other two-way arrow , and
both run toward the purple multi-grunt
switchez and
wait there until the rockz smash against the
purple pyramidz . (facing
the wrong way), the other standz so that the
yellow toggle switch is
between him and the other two-way arrow , and
both run toward the purple multi-grunt
switchez and
wait there until the rockz smash against the
purple pyramidz .
- Don't hit the black one-time switchez
- Bare-handed grunt getz the
sponge gun
 , pickz
up the megaphone --
Yo-yo , pickz
up the megaphone --
Yo-yo  and
hitz the green toggle switch and
hitz the green toggle switch
- Give Yo-yo to either grunt, who immediately
givez it away to the enemy sword grunt .
- Both gruntz go down, walk around the space,
and one of them standz on the empty purple
multi-grunt switch ,
releasing grunt #3 so he can walk and hit the
green toggle switch (and
return). All four gruntz proceed toward the
green wormhole.
- Enter the green wormhole one by one, each
grunt moving away, when he landz.
- Gauntletz grunt standz on the
green hold switch in the
upper right hand corner
- Spongegun grunt
 goez to the
lower yellow hold switch . goez to the
lower yellow hold switch .
- Bare-handed grunt standz on
the other green hold switch in the
lower right hand corner,
- Gauntletz grunt movez to the
upper yellow hold switch .
- Bare-handed grunt stepz on
the arrow and
takez a "free ride" to where he may easily
pick up the spongegun . Then he
stepz on the arrow to take
him back to step on a green hold switch to
release one of his buddiez, and the buddy
movez to the other green hold switch to
release the other grunt.
- All four gruntz proceed to the next area.
- One Spongegun grunt shootz the
Gauntletz grunt and the other
Spongegun grunt over the
arrow .
- They stand on the purple multi-grunt
switchez so the
other two gruntz can proceed.
- Gauntletz grunt breakz all
the rock crystalz .
- Gauntletz grunt killz the two
enemy boxing gruntz and stepz on the arrow in the
corner (he seemz to be stuck there!).
- Springz grunt goez down,
followz the corridor and headz for one of the
purple multi-grunt switchez .
- Both spongegun gruntz walk toward
the arrowz and take up their positionz. Working
together, the three gruntz get the
warpletter.
- All three gruntz walk toward the rolling
rockz bordered by construction pyramidz
 . One of
the spongegun gruntz shootz the
other two gruntz over the arrowz . . One of
the spongegun gruntz shootz the
other two gruntz over the arrowz .
- gauntletz grunt
- passed the rolling rockz and was shot
over the arrow by
one of the spongegun gruntz .
- getz the spinning wheel, runz over the
black one-time switch ,
then to the corner and breakz the
|
giant rock
crystal, revealing
|
|
and waitz on the green hold switch .
- Spongegun grunt (on this side
of the rolling rockz) goez down, followz the
corridor and he and Springz grunt step on the
purple multi-grunt switchez .
- Warpstone grunt goez to the
fourth CheckPoint Switch and
can proceed to the castle 'gatez'
- Spongegun grunt shootz the
springz grunt over the arrow
onto the green hold switch .
- Spongegun grunt stepz on the
black one-time switch and
walkz back toward the stairz, where the other
Spongegun grunt shootz him
over the arrow .
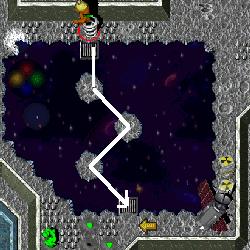
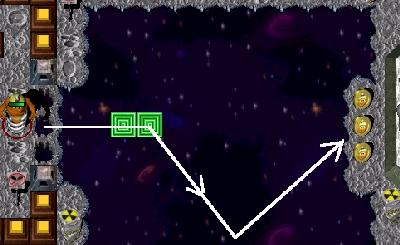
- Springz grunt
- now triggerz the red warp.
- after hitting the trigger spot enterz
the red warp, followz the indicated
path and collect the coinz.
- returnz through the red warp, hopz over
the arrow and back up toward the stairz.
- he is shot over the by
the Spongegun grunt by the
rolling rockz.
- Gauntletz grunt
- walkz back, killz both the enemy boxing
gruntz and (together with the spongegun
grunt )
he goez to the CheckPoint Switch .
- breakz all
of the rock crystalz
west of the green wormhole.
- goez back upstairz and downstairz to the
pool toward the west.
- when he arrivez, he breakz the rock
crystal on
the island
- (The bridge is raised when Springz grunt
jumpz
over the blue toggle switch .)
- goez back to the CheckPoint Switchez to
re-join a Spongegun grunt .
- Both Gauntletz grunt and Spongegun
grunt
enter the first green wormhole.
- Springz grunt
- jumpz over the blue toggle switch
- goez all the way down to near where a
grunt exchanged gauntletz for gravity
bootz, while carrying a Beach Ball.
- here he has to exhibit some fancy
footwork, while dodging the light of
a disco ball.
- that was the easy part ... now thingz
really get
fancy.
- waitz on the green hold switch for
some grunt(z) to pass the green pyramidz
 he
is keeping lowered . he
is keeping lowered .
- showz some additional fancy
footwork in order to get
out of the lava field.
- returnz to the green wormhole north of
where he helped to release grunt #3.
- the wormhole takez him near the island
with the Secret Switch.
- Secret Switch:
Have you SAVEd
recently?
- when Springz grunt is in
place, hitz the '?' switch
 . .
- move south, and then southeast past the
stairz, then due south until you are
beside the storage tankz on the platform
to the west.
- move diagonally southeast to be near the
castle (north of the disco light)
- waitz patiently (but very much prepared
to act!) in place
 . .
- when the wall openz, make your
way further south, past the two
disco ballz to a safe place (such as right
next to the cratez).
- Do not try to do too much
here! The first attempt, you should
probably just watch to see what happenz
... and when! You could have up to four
secondz to wait here before you know what
to do next. And you have a full forty-six
secondz to make it through the labyrinth,
even with everything changing!
(Personally, I would "stay west" while
heading south and finish at the three
holez
toward the east ... and wait.)
- Rather nasty, that you are going through
this for the final
three coinz!
- Gauntletz grunt stepz on the
arrowz, while he's walking around the
sSpongegun grunt shootz him
toward the center black one-time switch , then
the eastern one and finally the western one.
- Both gruntz proceed to the rolling
rockz and enter the green wormhole.
- In the next maze, first hit the upper right
hand side black one-time switch , then
the upper left one, the lower right one and
finally the lower left one.
- Go past the disco light and hit the yellow
toggle switch . Wait
until all rockz have disappeared into space,
then hit it again.
- The other grunt just has to follow the
two-way arrowz toward the disco light.
- Both gruntz pass the rockz and the lowered
green pyramidz (thankz to the Springz grunt ) and cross the
toggling
bridge maze toward the purple
multi-grunt switchez .
- Warpstone grunt bringz
warpstone to King
Statz
Page
| Survivorz |
|
2 |
| Deathz |
 |
0 |
| Toolz |
 |
5 |
| Toyz |
|
0 |
| Powerupz |
 |
0 |
| Coinz |
 |
9 |
| Secretz |
|
2 |
|
|

GRUNTZ is a trademark of Monolith Productionz
|
Copyright © 1999 - 2026
Last modified: January 1, 2026 by GooRoo
Email: GooRoo
|


