
Forum |
|

Space
|
Stage 1
|

Stage 2
|
Stage 3
|
Stage 4
|
|
|
|
|
|
| View the map! |
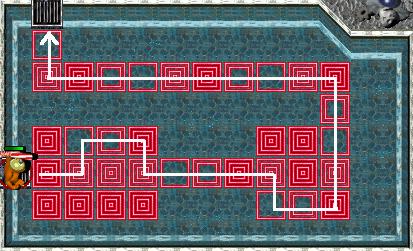
- Start with two bare-handed gruntz
 and a
gauntletz grunt and a
gauntletz grunt  (trapped
behind red pyramidz (trapped
behind red pyramidz  ). ).
- Bare-handed grunt (#1) walkz
down, and standz on the green hold switch
 . .
- Bare-handed grunt (#2)
- walkz down past the lowered green
pyramid

- standz on the red hold switch
 . .
- Gauntletz grunt
- (avoiding enemy gruntz
 ) )
- walkz back a little and breakz all the
rock crystalz
 (some which contain thingz helpful in that
task).
(some which contain thingz helpful in that
task).
- Bare-handed grunt (#1)
- leavez the green hold switch
- pickz up straw
 (Tool #1) and the
baby-walker (Tool #1) and the
baby-walker  (Toy #1) (Toy #1)
- Gauntletz grunt (#3)
- killz the four enemy gruntz
- (watch out for the arrowz).
- Straw grunt

- possibly assistz gauntletz in
battling the enemy gruntz
- suckz 4 goo puddlez
 . .
- returnz to the green hold switch so
that gauntletz grunt can pass
the green pyramid
- Bare-handed grunt (#4)
- enterz onto the GruntCreationPad

- (onto the enemy grunt
 ,
squishing him). ,
squishing him).
- Gauntletz grunt
- walkz back to the beginning, passez the
lava geyserz

- breakz the rock crystalz .
- Straw/baby-walker grunt
- sneakz past the enemy grunt
standing on the green hold switch and
pickz up the coin #1
 behind the
lava geyser . behind the
lava geyser .
- givez baby-walker to the enemy grunt ,
quickly getz the coin
#2
behind the satellite, hitz the checkpoint
switch
 and
walkz down to step on the Black One-Time
Switch and
walkz down to step on the Black One-Time
Switch  . .
- Gauntletz grunt and new
bare-handed grunt stand on
the purple multi-grunt switchez

- Bare-handed grunt (#2) stepz
on the blue hold switch
 . .
- Straw grunt
- enterz the blue wormhole, killz the
enemy grunt

(any way he can ... there is no further
use for Goo  ). ).
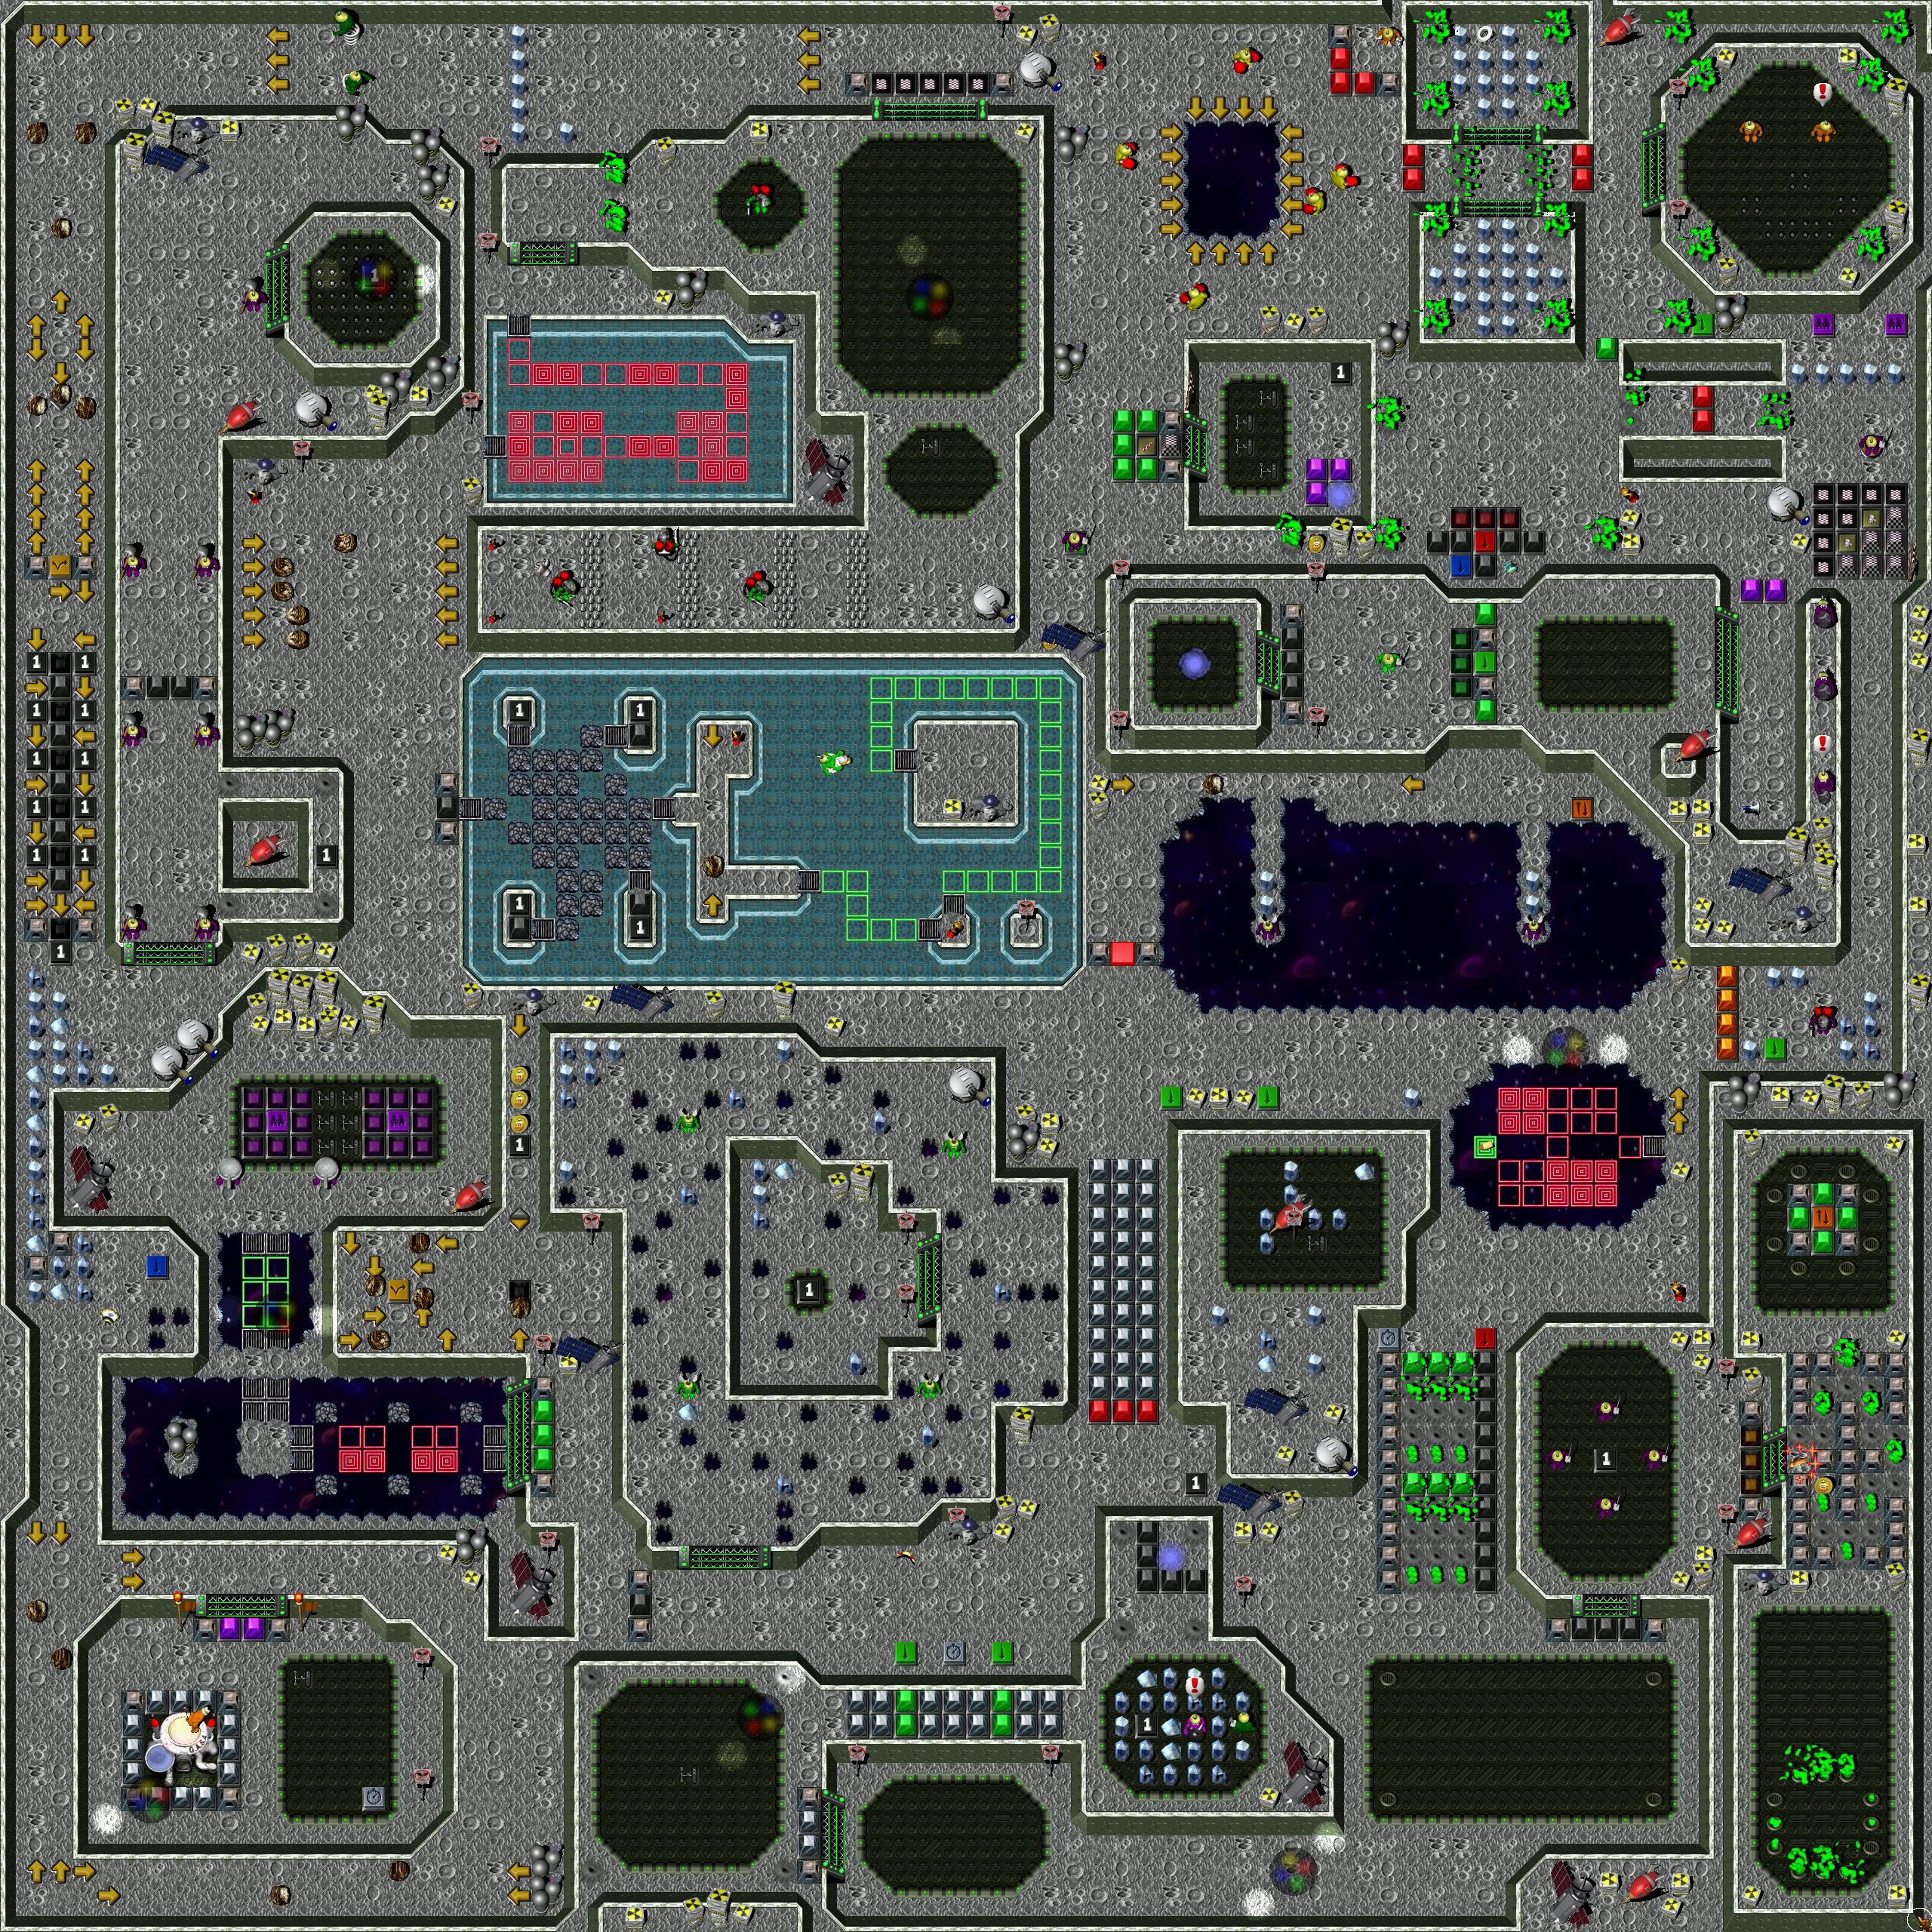
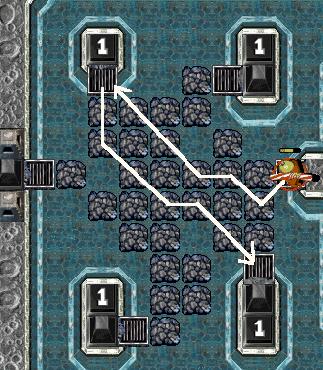
- crossez the crumbling bridge
 maze (here's
how)
maze (here's
how)
- passez the rolling rockz

- crossez the toggling
bridge maze.
- walkz up and killz the four enemy gruntz

- getz the gauntletz
 (Tool #2) (Tool #2)
- (welderz do not leave behind any Goo ).
- Gauntletz grunt (#2)
- walkz back, crossez the three arrowz and
breakz the rock crystalz .
- pickz up the roidz
 (Powerup #1)
- killz the two enemy gruntz
 . .
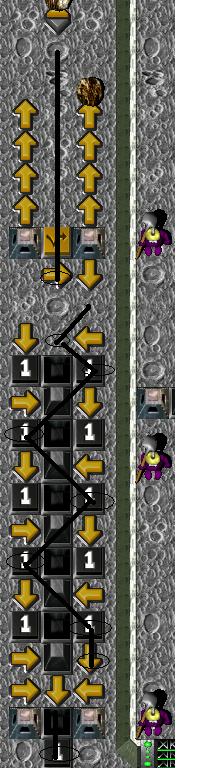
- Tough
timing puzzle! Have you SAVEd recently?
- You have to hit the yellow toggle switch
 as the rolling rock is
rolling away from the two-way arrow
as the rolling rock is
rolling away from the two-way arrow  . .
- walkz down and stepz on the yellow
toggle switch ,
which releasez a rolling rock (which
travelz a little less than twice as fast
as your grunt can move ... so get with
it!)
- runz
to the upper right Black One-Time Switch and
zigzagz downwardz over the other switchez
,
keeping ahead of the rock ,
passing between the two construction
pyramidz
 to
the final Black One-Time Switch .
Whew! to
the final Black One-Time Switch .
Whew!
- breakz all the rock crystalz
(watching out for flying lead from the
enemy grunt
 )
pickz up coin #3
. )
pickz up coin #3
.
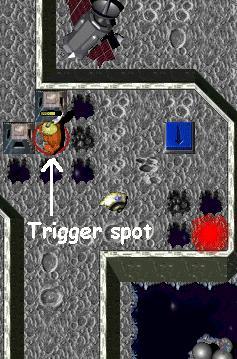
- breakz rock crystal on
the other side of the construction
pyramidz
(this is the red warp trigger).
- walkz back, pickz up the invisibility
 (Powerup
#2), goez upstairz and to the
right, hitz the Black One-Time Switch and
keepz on walking toward the end of the
platform and pickz up the coin #4 behind the
satellite. (Powerup
#2), goez upstairz and to the
right, hitz the Black One-Time Switch and
keepz on walking toward the end of the
platform and pickz up the coin #4 behind the
satellite.
- getz past the enemy grunt
 any way he can, up the stairz to the
center of the platform, waitz on the Black
One-Time Switch
that is there. (He is out of the game).
any way he can, up the stairz to the
center of the platform, waitz on the Black
One-Time Switch
that is there. (He is out of the game).
- Bare-handed grunt (#2)
- (waiting on the blue hold switch )
getz the yo-yo (Toy
#2), walkz down the corridor and
pickz up the megaphone
 -- gauntletz (Tool #3).
- with Yo-Yo
 selected,
walkz up the platform and stepz on the
green hold switch . selected,
walkz up the platform and stepz on the
green hold switch .
- when the enemy sword gruntz spotz him,
step back one step and as soon as he hitz
the green hold switch ,
give him the yo-yo and go to the blue
wormhole.
- pickz up the coin
#5
in the lava geyser
labyrinth, walkz to the other side of the
maze, waitz there.
- Remember the two gruntz () waiting on
the purple multi-grunt switchez , back
at the beginning?
Give the bare-handed grunt the
gauntletz from the resourcez and together they
go to the CheckPoint Switchez  . .
- As soon as they step on the southern
checkpoint switch ,
the nearest enemy grunt
 attacks; step aside and hit the CheckPoint
Switch
again.
attacks; step aside and hit the CheckPoint
Switch
again.
- Both gruntz walk down (ignoring three enemy
gruntz ) and
kill the enemy grunt
 . .
- One grunt stepz on the green hold switch while
the other gauntletz grunt breakz the
rock crystalz and
collectz coin #6
.
- Bare-handed grunt (#2)
- waiting near the lava maze
- stepz on the Orange Up/Down Switch

- goez back through the lava geyser
labyrinth to wait on the stairway next to
the orange pyramidz

- Do not pick up the
invulnerability
 powerup! (Yet.)
- One of the gauntletz gruntz
- passez the disco light
- breakz rock crystal
(can of Zap Cola
 ,
for whichever Grunt needz it) ,
for whichever Grunt needz it)
- walkz forward to use the megaphone
-- shovel
 (Tool #4) hidden
behind the satellite (Tool #4) hidden
behind the satellite
- walkz back and breakz the red brick
 on
the left (and losez his Tool) on
the left (and losez his Tool)
- returnz to swap placez with the
remaining gauntletz grunt
- (stay as near the two yellow arrowz
 as
is safe). as
is safe).
- Gauntletz grunt
- walkz around the open space toward the
second enemy wingz grunt, just ignore the
first one.
- Secret
#1:
- breakz the rock crystalz
and hit the '?' switch
 . .
- when the disco light movez toward
the grunt, avoid the tornado by
walking back and then straight to the
'?' switch .
- When your bare-handed buddy returnz
to safety from the Warp letter
 , press
the orange switch , press
the orange switch
- (The bare-handed grunt ,
waiting near the orange pyramidz , is
now free to act!
- Then make your way back to stand on one
of the two green hold switchez .
- Bare-handed grunt
- followz the path
to the warp letter and back again;
walk fast.
- walkz back across the arrowz
- takez his place on one of the two green
hold switchez .
- Bare-handed grunt (#2)
- (waiting on the stairz)
- pickz up the invulnerability powerup (Powerup #3)
- hitz the Black One-Time Switch
- walkz down and passez the lava geyserz
(and lowered green pyramidz )
toward the silver timer switch
 . .
- stepz on the silver timer switch
- one of your other gruntz passez the
silver pyramidz
 at
the left hand side at
the left hand side
- meanwhile you hit the red hold switch so
he can get through
- do the same thing for the other grunt.
- Gauntletz grunt hitz the
Black One-Time Switch switch
- Bare-handed grunt
- walkz down through the black pyramidz

- passez through the narrow corridor at
the bottom
- waitz in a 'safe' spot.
- The other bare-handed grunt
- pickz up the boomerang
 (Tool #5) (Tool #5)
- turnz an enemy grunt
 into Goo
- waitz on the left green hold switch .
- Gauntletz grunt
- hitz the silver timer switch
twice (once for the stairz, the second
time so the bare-handed grunt arrivez
at the first green pyramidz .
- hitz the silver timer switch for
the third time and immediately proceedz to
the right green hold switch ,
while the bare-handed grunt movez
toward the next set of (lowered, when he
reachez them) green pyramidz .
- Boomerang grunt

- hitz the enemy grunt
 , who blowz
up some rock crystalz ,
the other enemy grunt , who blowz
up some rock crystalz ,
the other enemy grunt  and
himself. and
himself.
- hitz the silver timer switch and
the bare-handed grunt walkz
to the Black One-Time Switch and
on to the blue wormhole.
- Bare-handed grunt getz the
shovel from the resourcez.
- Shovel grunt

- walkz around the castle
- racez two rolling rockz to the
southwest corner
- outwitz two more rolling rockz on his
way north
- waitz near the warpstone.
- Gauntletz grunt
- enterz the platform with the three
remaining enemy gruntz
- (The easiest way to kill them is having
them fly above a hole while they attack
(if your grunt doesn't get blown into a
nearby hole
 ).) ).)
- breakz all rock crystalz ,
hitz the green toggle switch
 in
the upper left hand corner, and the Black
One-Time Switch and
in the same area pickz up a coin #7 . in
the upper left hand corner, and the Black
One-Time Switch and
in the same area pickz up a coin #7 .
- Gauntletz and boomerang
gruntz
- proceed toward the toggling bridge
 (have to zigzag over the
breakable (have to zigzag over the
breakable  partz to get across)
- wait just out of the range of the UFO.
- Shovel grunt
- drawz fire from the nearest enemy gunhat
- stepz on the blue hold switch
long enough for the gauntletz grunt to cross
the bridge
- movez to a safer place.
- Gauntletz grunt killz both
the enemy gruntz .
- Gauntletz grunt and the
boomerang grunt stand on the purple
multi-grunt switchez .
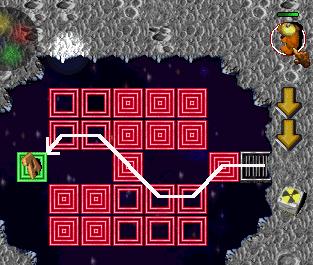
- Secret #2:
- Shovel grunt closez the
holez and
triggerz the red
warp.
- The red warp takez him into the path of
a rolling rock , so
step lively!
- You have to step on the yellow toggle
switch
with four rolling rockz
'guarding it' three timez
- once to toggle the two-way arrow
 to send
the rolling rock to
the Black One-Time Switch
to send
the rolling rock to
the Black One-Time Switch
- again to let it out
to be smashed against the black
pyramid

- a final time so you can get to
the three coinz
(#8 #9 & #10) .
- The return red warp takez him back near
the Warpstone.
- pickz up the warpstone piece
 . .
- Warpstone grunt

- goez back to the castle.
- stepz on the silver timer switch and
enterz the castle at the left through the
center pyramid .
- bringz warpstone to King.
Statz
Page
| Survivorz |
|
4 |
| Deathz |
 |
0 |
| Toolz |
|
5 |
| Toyz |
|
2 |
| Powerupz |
|
3 |
| Coinz |
|
10 |
| Secretz |
 |
2 |
|
|

GRUNTZ is a trademark of Monolith Productionz
|
Copyright © 1999 - 2026
Last modified: January 1, 2026 by GooRoo
Email: GooRoo
|


