
Forum |
|

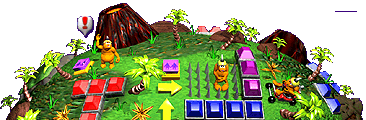
Space
|

Stage 1
|
Stage 2
|
Stage 3
|
Stage 4
|
|
|
|
|
|
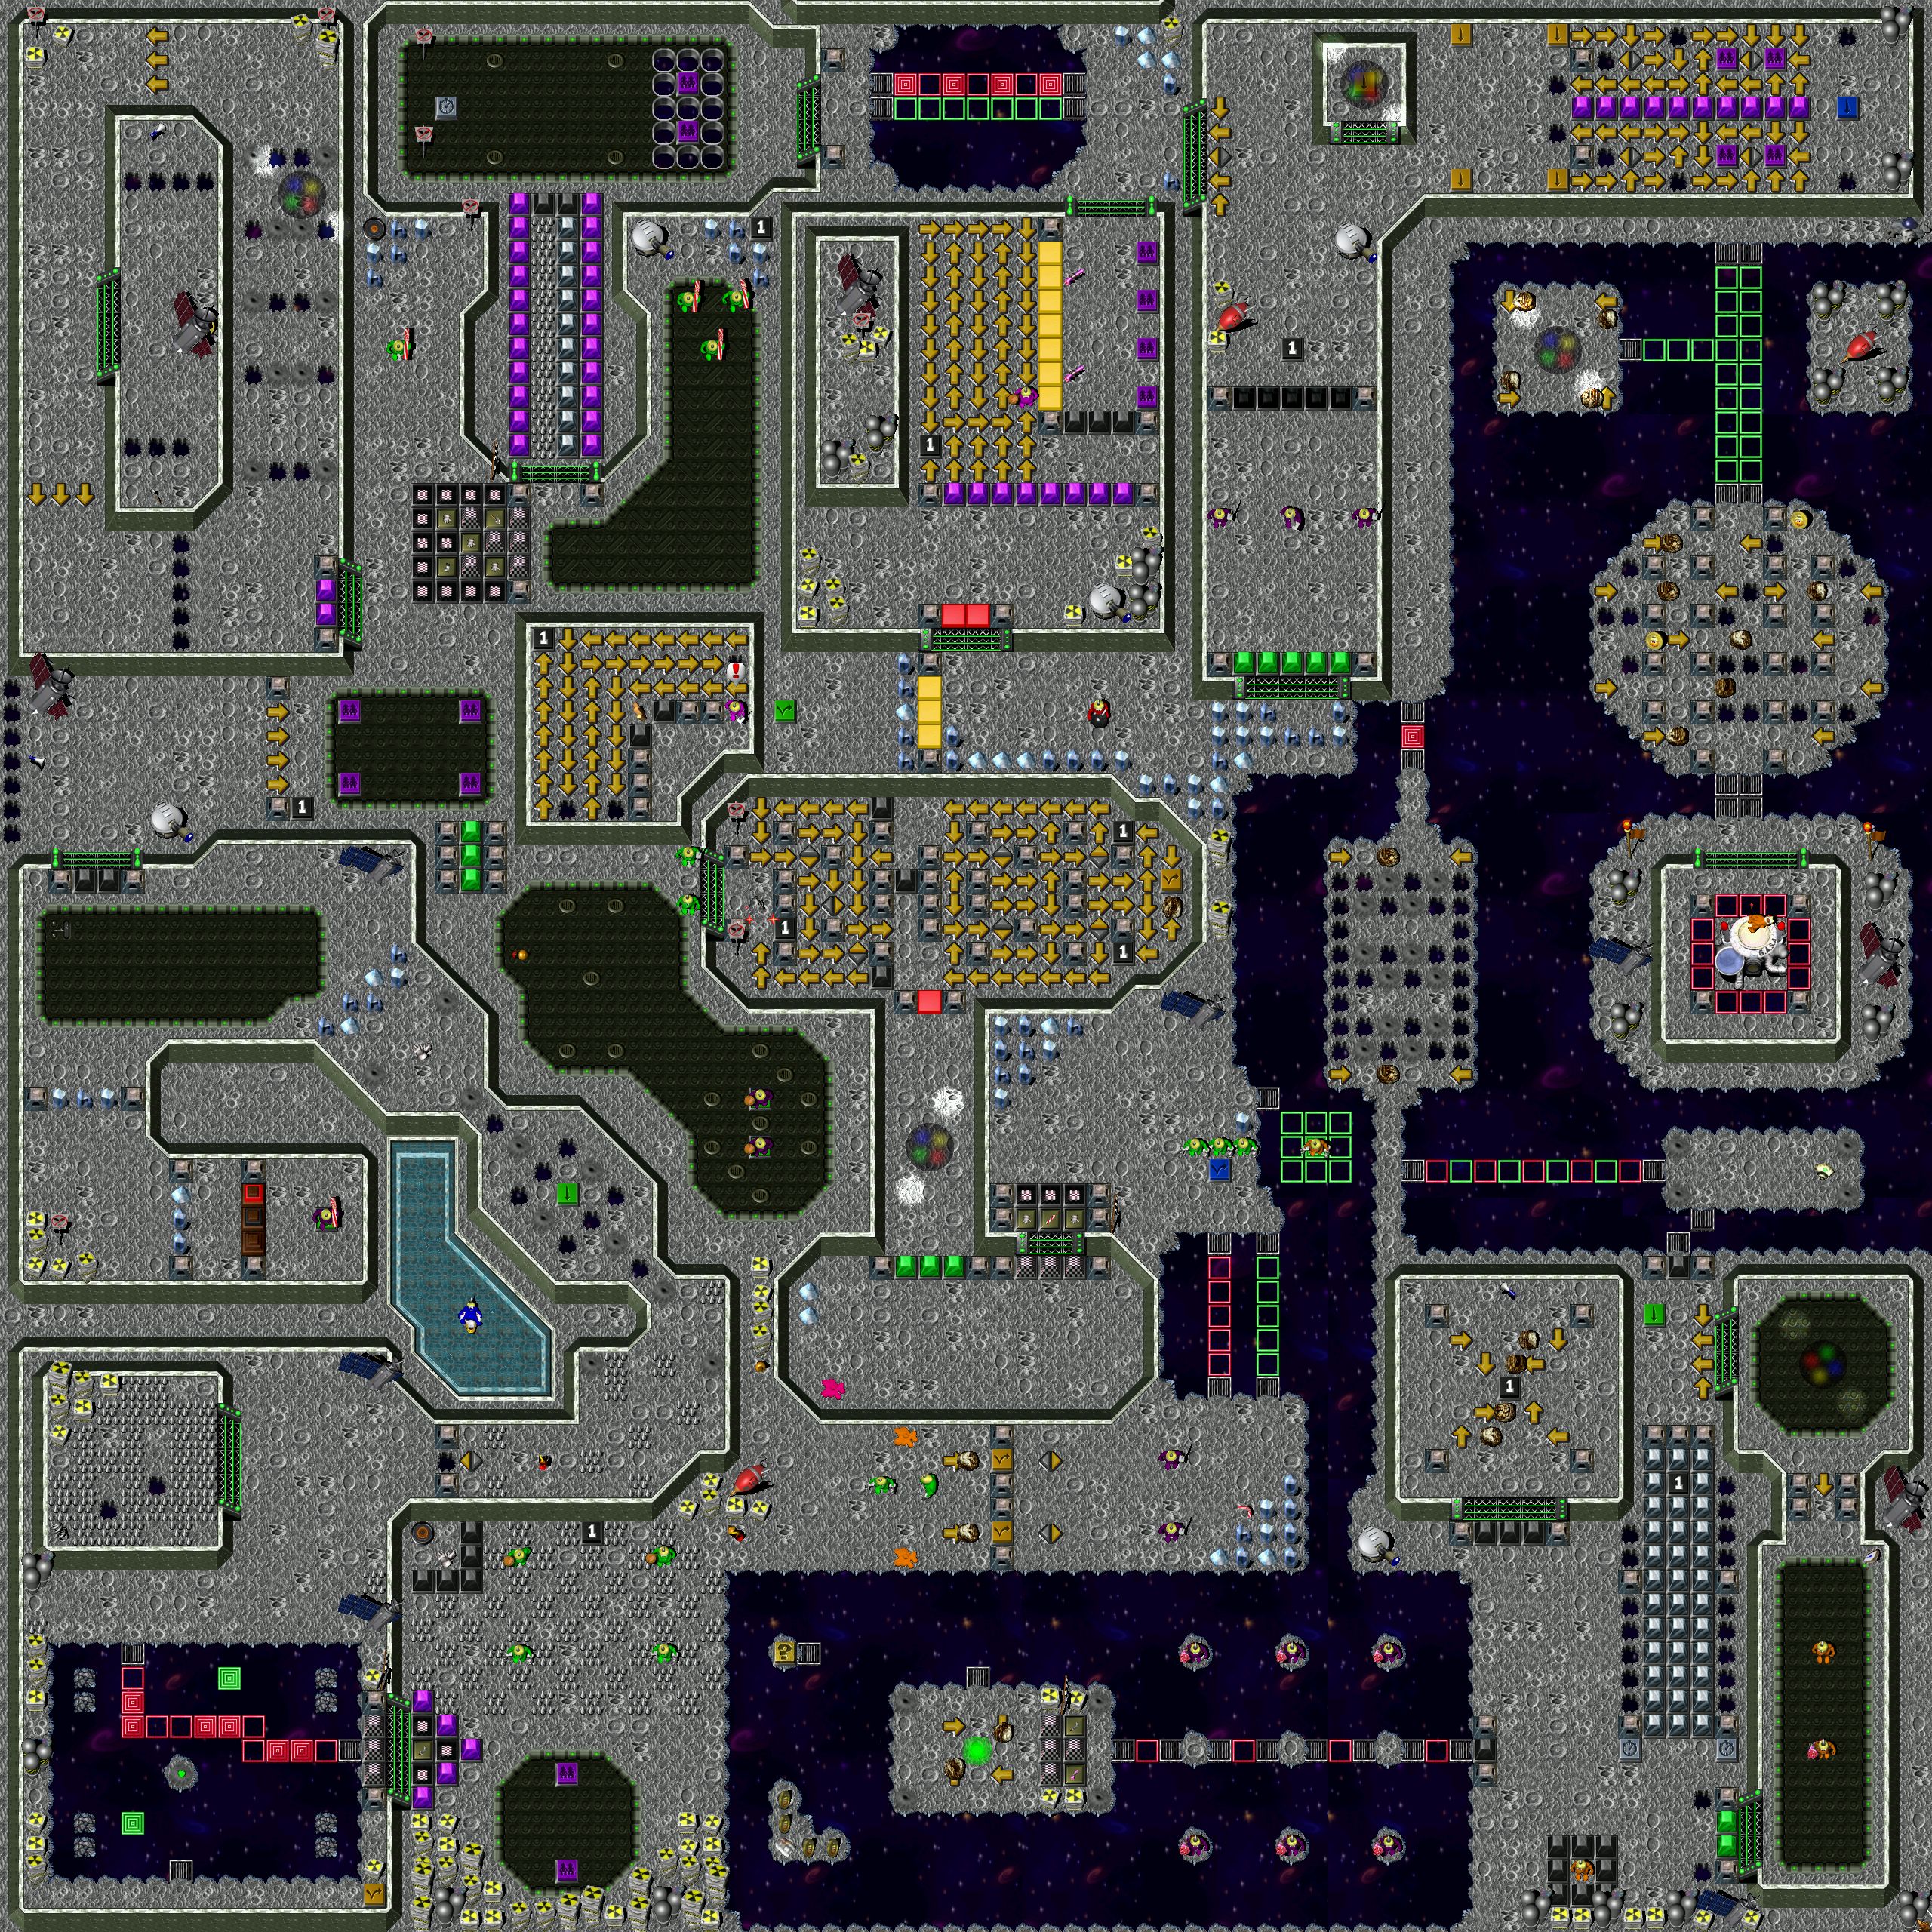
| View the map! |
- Start with a spongegun grunt
 and three
bare-handed gruntz and three
bare-handed gruntz  , two of
them are blocked , two of
them are blocked
- Spongegun grunt
- shootz at an arrow

- the bare-handed grunt stepz
on the arrow
- is shot over the arrow arrow
- Bare-handed grunt walkz down
and standz on green hold switch

- Spongegun grunt
- walkz through green pyramidz

- stepz on right silver timer switch

- walkz through silver pyramidz

- stepz on Black One-Time Switch
 to
release one trapped bare-handed grunt to
release one trapped bare-handed grunt
- Bare-handed grunt stepz on
left silver timer switch
- Spongegun grunt
- walkz out of the silver pyramidz
maze
- walkz to bridge, killz all six enemy
gruntz
 by shooting them into space
- walkz to CheckPoint Switch
 . .
- Bare-handed grunt
- goez and stepz on Black One-Time Switch
- usez Megaphone
 -- sword
  (Tool #1) (Tool #1)
- takez it for himself.
- Sword grunt
 walkz to CheckPoint Switch
- Secret #1:
- (have you SAVEd
recently?)
- One grunt walkz into space towards the
'?' switch
 , ,
(there is an invisible bridge)
- stepz on the switch to raise bridge to
the coinz
- grunt pickz up four coinz (#1 #2 #3 & #4)
 , leave cola , leave cola
- bridge will appear to go back to edge,
wait for it.
- Both gruntz enter the green
wormhole
- Spongegun grunt
- shootz four enemy gruntz
  onto spikez
- they leave four Goo Puddlez
 behind.
- Sword grunt
- killz the two enemy gruntz
- they leave two Goo Puddlez
behind.
- walkz to the CheckPoint Switch .
- Spongegun grunt
- stepz on the two yellow toggle switchez

- releasing rolling rockz which will
squish the two enemy gruntz
 (no
Goo) (no
Goo)
- crossez over a yellow toggle switch
- pickz up straw
 (Tool #2). (Tool #2).
- Straw grunt

- suckz eight goo puddlez

- (enough to bake two new bare-handed
gruntz )
- stepz on Black One-Time Switch
- goez to stand on a purple multi-grunt
switch
 . .
- drop new grunt on GruntCreationPad
 . .
- Bare-handed grunt pickz up
gauntletz
 (Tool #3) and goez to
stand on other purple multi-grunt switch (Tool #3) and goez to
stand on other purple multi-grunt switch
- with purple pyramidz
 now
lowered now
lowered  , sword
grunt standz
on CheckPoint Switch , which
lowerz , sword
grunt standz
on CheckPoint Switch , which
lowerz  the
CheckPoint Pyramidz ahead of him ... and
raisez the
CheckPoint Pyramidz ahead of him ... and
raisez  the
onez behind him ... no going back! the
onez behind him ... no going back!
- Sword grunt
- crossez the toggling bridge
   
- enterz the spiky platform (must step on
four spikez )
- getz the springz
 (Tool #4). (Tool #4).
- Springz grunt

- pickz up coin #5
behind the
satellite near the enemy grunt

- goez back to the bridge, to the hidden
blue toggle switch

- and the yellow toggle switch
- springz back and over the two-way arrow

- waitz on the green hold switch .
- Drop a new grunt on the GruntCreationPad and
all three gruntz, bare-handed grunt , the straw
grunt and
the gauntletz grunt
 cross the two
yellow toggle switchez cross the two
yellow toggle switchez
- Gauntletz grunt breakz a rock
crystal
 ,
setting off a chain reaction that destroyz all
of the crystalz ,
setting off a chain reaction that destroyz all
of the crystalz
- Bare-handed grunt pickz up
the bomb
 (Tool #5) that is
revealed
(Tool #5) that is
revealed
- SAVE:
bomb grunt

- standz in front of the toggling bridge

- ignitez the bomb just before the bridge
risez
- runz over the blue toggle switch
- killz three enemy gruntz
and himself (Death #1).
- Straw grunt
crossez the other bridge to his CheckPoint
Switch
 . .
- Gauntletz grunt
- crossez the other bridge
- breakz a rock crystal
(setz off a chain reaction)
- goez to a CheckPoint Switch
 . .
- Second gauntletz grunt
- getz off the platform, breakz a rock
crystal
(nothing in it)
- breakz another rock crystal
 ,
pickz up coin #6 ,
pickz up coin #6
- goez to the last CheckPoint Switch .
- Both Gauntletz gruntz
- break a rock crystal

- each pickz up a Pogo Stick
 (Toyz #1 & #2). (Toyz #1 & #2).
- Straw grunt
suckz a goo puddle
 (1 of
4 needed) (1 of
4 needed)
- One gauntletz grunt
- walkz north, breakz the red brick
 and
losez his gauntletz and
losez his gauntletz
- you have to hit the three Black One-Time
Switchez in
the arrow
 maze; it's timing
- after you hit the third Black One-Time
Switch ,
pick up the death touch powerup
 (Powerup #1)
- kill the two enemy gruntz
 
- go get the refreshing Bottle of Zap Cola
 . .
- gauntletz grunt and straw
grunt join
bare-handed grunt (still
carrying a Pogo Stick)
- straw grunt
- suckz 2 goo puddlez (2
& 3 of 4)
- waitz near the green pyramidz

- SAVE:
gauntletz grunt
- givez his pogo stick to an
enemy grunt
- who (hopefully) leavez a green hold
switch
- jumpz into an (active) lava geyser

- walkz back to the green pyramidz and
waitz there.
- Bare-handed grunt
- givez his pogo stick to an
enemy grunt
- who (hopefully) leavez a green hold
switch
- jumpz into an (active) lava geyser
- walkz back to the green pyramidz and
waitz there.
- Springz grunt pickz up the
gauntletz (Tool #6).
- Gauntletz grunt
- breakz two rock crystalz
 and
the rest are blown away and
the rest are blown away
- pickz up coin #7
behind the
satellite
- breakz the rock crystalz
- breakz the lower of the three brick
stackz

- killz the enemy grunt

- walkz back and waitz in front of the
black pyramid
 . .
- The other three gruntz pass the (lowered)
green pyramidz and one
of them hitz the Black One-Time Switch
- Gauntletz grunt
- usez Megaphone
-- gauntletz (Tool #7)
- crossez over arrow
 to
join the otherz. to
join the otherz.
- give gauntletz to bare-handed grunt
- Three gauntletz gruntz
- gang up to kill the enemy grunt

- break rock crystalz
- grunt in poorest health drinkz a Can of
Zap Cola

- stand on one of the four purple
multi-grunt switchez .
- Straw grunt
- suckz fresh goo puddle
 (4th
of 4 needed) (4th
of 4 needed)
- standz on the last purple multi-grunt
switch .
- Bare-handed grunt
- enterz the game on the GruntCreationPad
- walkz south and goez upstairz, followz
UFO counter-clockwise
- pickz up coin #8
behind
satellite
- pickz up shovel
 (Tool #8) at the
bottom (Tool #8) at the
bottom
- usez Megaphone
-- gravity bootz
 (Tool #9) (Tool #9)
give the gravity bootz to the straw grunt
- Shovel
 Gauntletz Gauntletz
Gauntletz Gravity bootz
Gauntletz Gauntletz
Gauntletz Gravity bootz

- satisfy their CheckPoint Switchez
 
- gang up to kill the three enemy gruntz .
- One gauntletz grunt breakz a rock
crystal and any
grunt hitz the Black One-Time Switch
- Gravity bootz grunt
- walkz upstairz across ten spikez
(thank you, bootz!)
- hitz the silver timer switch .
- Shovel grunt
- walkz over the silver pyramidz
(one stayz up
 ) )
- fillz two holez
 that touch the two purple multi-grunt
switchez on
each side
that touch the two purple multi-grunt
switchez on
each side
- standz on one of the purple multi-grunt
switchez .
- Gravity bootz grunt standz on the
other purple multi-grunt switch and
your three other gruntz can pass over the
lowered purple pyramidz on the
left hand side.
- One of the gauntletz gruntz
- crossez the moving bridge

- breakz six rock crystalz
- waitz on the blue hold switch
 . .
- Gravity bootz grunt
- pickz up a sponge gun
 (Tool #10). (Tool #10).
- One of the gauntletz gruntz
- pickz up a sponge gun (Tool #11)
- both spongegun gruntz shoot the
enemy grunt
 over the arrowz
  toward the Black One-Time Switch (If
one of your gruntz miss, the enemy club
grunt will return to where he was when you
arrived ... twenty spongez will turn him
into Goo
toward the Black One-Time Switch (If
one of your gruntz miss, the enemy club
grunt will return to where he was when you
arrived ... twenty spongez will turn him
into Goo  .
Since it takez four spongez to get him
where you want him, you only get so many
chancez to get it right ... before he
diez.) .
Since it takez four spongez to get him
where you want him, you only get so many
chancez to get it right ... before he
diez.)
- Put all gruntz except a gauntletz grunt on the four
purple multi-grunt switchez
- Gauntletz grunt breakz a red
brick ...
losez the gauntletz.
- (now) bare-handed grunt makez the
enemy grunt
 blow up the gold brickz
  . .
- Bare-handed grunt walkz back
and tradez placez with the remaining gauntletz
grunt .
- Gauntletz grunt
- breakz all the rock crystalz
- stepz on the green toggle switch
 beyond the gold brickz
- pickz up the invisibility powerup
 (Powerup
#2) and runz past the three enemy
gruntz (Powerup
#2) and runz past the three enemy
gruntz
- stepz on the Black One-Time Switch
- goez to the green hold switch on
the platform with the spotlightz so the
other gruntz can enter this area too.
- Keeping one spongegun grunt back, put
four of your gruntz on the purple multi-grunt
switchez
- When the purple pyramidz are
down ,
the spongegun grunt goez to the
blue hold switch and
waitz there
- back to the very beginning where the grunt
who has been shot over the arrow is
still waiting
He pickz up the Magic Wand  and the
Scroll and the
Scroll  and startz across the bridge
  toward
the lava geyserz toward
the lava geyserz  . .
You don't have a Magic Wand?!? Ooops! Must be
a design flaw.
- he pickz up the warpstone piece
 ,
crossez the moving bridge ,
crossez the moving bridge
and the
rolling rockz  and the
lava geyserz
(picking up two coinz
(#9 & #10) along the way) and
proceedz to the platform with the four rolling
rockz
and a spotlight in the center and the
lava geyserz
(picking up two coinz
(#9 & #10) along the way) and
proceedz to the platform with the four rolling
rockz
and a spotlight in the center
- Secret #2:
(have you SAVEd
recently?)
- Spongegun grunt on the
blue hold switch
- walkz back to the center of the four
yellow hold switchez

- Warpstone grunt
 walkz to
the center of the platform and triggerz
the red wormhole walkz to
the center of the platform and triggerz
the red wormhole
- Spongegun grunt
- enterz the red warp
- shootz the enemy grunt
 onto the arrowz
  so that he arrivez at the Black
One-Time Switch
so that he arrivez at the Black
One-Time Switch
- pickz up the warpletter

- walkz to stand on the blue hold
switch
again, to re-raise the bridge for the
warpstone grunt

- Warpstone grunt
- leavez the platform and crossez the
rolling rockz maze
- bringz warpstone to the King.
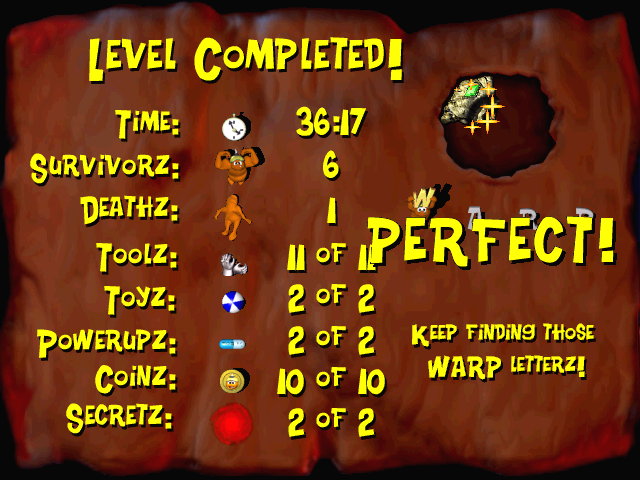
Statz
Page
| Survivorz |
|
6 |
| Deathz |
|
1 |
| Toolz |
|
11 |
| Toyz |
|
2 |
| Powerupz |
|
2 |
| Coinz |
|
10 |
| Secretz |
 |
2 |
|
|

GRUNTZ is a trademark of Monolith Productionz
|
Copyright © 1999 - 2026
Last modified: January 1, 2026 by GooRoo
Email: GooRoo
|


