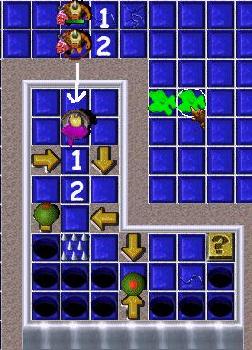
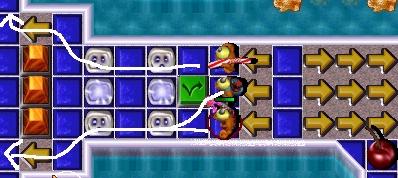
- start with a bare-handed grunt

- bare-handed grunt
- walkz to the right, past the slime

- enterz the top row of yellow arrowz
- usez the megaphone (#1)
 -- rock
  (Tool #1). (Tool #1).
- walkz past first olivez
- hitz enemy rock grunt
 (twenty timez!) to kill him.
- the green pyramidz
 will drop
  ,
enterz the blue wormhole. ,
enterz the blue wormhole.
- walkz across the timed bridge
    to
the blue wormhole. to
the blue wormhole.
- walkz to the left, getz the toyer
grunt's
 attention, then walkz as quickly as
possible around, and stepz on the Black
One-Time Switch
attention, then walkz as quickly as
possible around, and stepz on the Black
One-Time Switch  ,
then enterz the blue wormhole. ,
then enterz the blue wormhole.
- will end up back by the bridgez, walkz
across, usez megaphone (#2)
-- straw (Tool #2).
- takez rock from GruntzMachine
(Resourcez).
- Rock grunt

- killz an enemy grunt
 . .
- enterz blue wormhole.
- killz two enemy gruntz .
- usez megaphone (#3)
- jack in the box
 (Toy #1). (Toy #1).
- takez straw from GruntzMachine
(Resourcez).
- Straw grunt

- suckz 4 goo puddlez
  
- new grunt enterz on upper right
GruntCreationPad

- new bare-handed grunt
stepz on the Black One-Time Switch
next to him, causing three black
pyramidz
 to drop
  . .
- stepz on CheckPoint Switch
 ,
enterz blue wormhole. ,
enterz blue wormhole.
- endz up in upper left square 'island'
(the one with the cherry).
- suckz a goo puddle
 (#1
of 4). (#1
of 4).
- there are four of these 'islands', each
with a single goo puddle
 ; you
must go to each one by entering the green
wormholez to suck 4 goo puddlez . ; you
must go to each one by entering the green
wormholez to suck 4 goo puddlez .
- lower left green wormhole takez you to
"pepper shaker" island.
- upper left green wormhole takez you to
"salt shaker" island.
- upper right green wormhole takez you
to "strawberry" island.
- for the purpose of this walk-through,
we will go clock-wise.
- Walk into upper left green wormhole, to
"salt shaker" island.
- suck a goo puddle
 (#2
of 4). (#2
of 4).
- upper left green wormhole takez you
back to "cherry" island.
- upper right green wormhole takez you
to "strawberry" island.
- lower right green wormhole takez you
to "pepper shaker" island.
- Walk into lower right green wormhole, to
"pepper shaker" island.
- suck a goo puddle
 (#3 of 4).
- upper right green wormhole takez you
to "strawberry" island.
- lower right green wormhole takez you
back to "cherry" island.
- lower left green wormhole takez you
back to "salt shaker" island.
- Walk into upper right green wormhole, to
"strawberry" island.
- suck a goo puddle
 (#4
of 4). (#4
of 4).
- lower right green wormhole takez you
to island with a green wormhole and a
blue wormhole.
- lower left green wormhole takez you
back to "pepper shaker" island.
- upper left green wormhole takez you
back to "salt shaker" island.
- Walk into lower right green wormhole, to
island with a blue wormhole.
- go through the green wormhole
(to "cherry" island) if you have not
baked a new grunt;otherwise, go through
the blue wormhole.
- new grunt enterz on lower left
GruntCreationPad
- new bare-handed grunt
stepz on the Black One-Time Switch
next to him, causing three black
pyramidz
to drop .
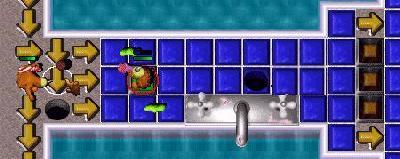
- enter the blue wormhole and end up near
a jack-in-the-box CheckPoint Switch
 south of the Orange Up/Down
Switchez south of the Orange Up/Down
Switchez   . .
- takez jack-in-the-box from GruntzMachine
(Resourcez) to exit, suckz goo puddle
 (#1 of 4).
- walkz up, killz Post Guard enemy grunt
 , suckz
goo puddle (#2
of 4), and stepz on green toggle switch , suckz
goo puddle (#2
of 4), and stepz on green toggle switch  . .
- walkz down, stepz on lower right Orange
Up/Down Switch ,
walkz to the right, stepz on green toggle
switch .
- walkz back, stepz on upper left Orange
Up/Down Switch ,
walkz to the left, givez jack-in-the-box
to enemy sword grunt
 . .
- stepz on green toggle switch ,
exitz back to middle.
- stepz on lower left Orange Up/Down
Switch ,
walkz down past dropped green pyramidz ,
suckz goo puddle
 (#3
of 4). (#3
of 4).
- usez megaphone (#4)
- pogo stick
 (Toy #3). (Toy #3).
- walkz to the left, to the island, suckz
a goo puddle
 (#4 of 4).
- new grunt enterz on upper left
GruntCreationPad
- new bare-handed grunt
stepz on the Black One-Time Switch
next to him, causing three black
pyramidz
to drop .
- Tough
stuff! Have you SAVEd recently?.
- walkz along the blue tilez to the right,
use the yellow arrowz to avoid the olivez,
stepz on CheckPoint Switch
 ,
and enterz the blue wormhole. ,
and enterz the blue wormhole.
- endz up back by the bridgez in the
middle
- takez pogostick from GruntzMachine
(Resourcez).
- givez pogostick to enemy grunt

- suckz 4 goo puddlez
   . .
- new grunt enterz on lower right
GruntCreationPad
- new bare-handed grunt
stepz on the Black One-Time Switch
next to him, causing two black
pyramidz
to drop .
- stepz on CheckPoint Switch ---
he is now stranded.
- the four new bare-handed gruntz are
released
- two bare-handed gruntz walk up,
past the yellow spongegun enemy gruntz; one
takez the super speed
 (Powerup #1), the
other stepz on the silver timer switch
(Powerup #1), the
other stepz on the silver timer switch  . .
- powerup grunt runz to the right, past the
silver pyramidz, stepz on the Black One-Time
Switch , pickz
up the spongegun
 (Tool #3), and usez the
megaphone (#5) -
club (Tool #3), and usez the
megaphone (#5) -
club  (Tool #4). (Tool #4).
- the remaining gruntz walk to the right, past
the dropped black pyramidz.
- Spongegun grunt

- walkz down the stairz, avoiding slime,
usez megaphone (#6)
- shield
 (Tool #6), walkz up
to step on blue toggle switch (Tool #6), walkz up
to step on blue toggle switch  . .
- usez another megaphone (#7)
- timebombz
 (Tool #5) (Tool #5)
- shootz the enemy grunt
to the griddle.
- Club grunt
 ,
two spongegun gruntz and shield
grunt ,
two spongegun gruntz and shield
grunt  cross
electrical outletz cross
electrical outletz  to
CheckPoint Switchez to
CheckPoint Switchez    . .
- Two spongegun gruntz 'gang up' to
kill six enemy gruntz
   . .
- Shield grunt takez timebombz
from the GruntzMachine (Resourcez).
- Timebomb grunt

- blowz up the sugar cubez
    . .
- getz Coin (#1)
 . .
- usez megaphone (#8)
- shovel
 (Tool #6). (Tool #6).
- Club grunt
takez shovel from the GruntzMachine
(Resourcez).
- Shovel grunt
 fillz holez fillz holez   ,
working with Timebomb grunt . ,
working with Timebomb grunt .
- Timebomb grunt
- blowz up all sugar cubez .
- stepz on the yellow hold switch
 to
the right to release the rolling olive,
which will flip the green toggle switch . to
the right to release the rolling olive,
which will flip the green toggle switch .
- pickz up the welder's kit
 and
the Go-Kart and
the Go-Kart  in the
corner. in the
corner.
- What! They're not there? Must be another
Gruntz Version
1.0 'bug'.
- All four gruntz go to CheckPoint Switchez
  . .
- Timebomb grunt
- walkz to the left, blowz up two sugar
cubez ,
pickz up Coin #2
, goez
through the electrical outletz ,
and blowz up


|
the
giant sugar cube pile,
revealing
four Purple Multi-Grunt
Switchez  |


|
- Timebomb grunt standz on
blue hold switch
 . .
- Shovel grunt crossez the
bridge
   to get
the straw (Tool #7). to get
the straw (Tool #7).
- Straw grunt
suckz at least four goo puddlez , and you
bake a new grunt, entered on the
GruntCreationPad near
the King's Fortress.
- Spongegun grunt walkz on
bridge to the
left, shootz enemy shield grunt
 into
the blue wormhole; he will end up in area with
'?' Switch into
the blue wormhole; he will end up in area with
'?' Switch 
- All four gruntz go to Purple Multi-Grunt
Switchez .
- the bare-handed grunt that is
over by the fort pickz up the warpstone piece
 and
waitz at the entrance to the King's Fortress.
(Yes, you can complete the puzzle now, but you
won't get a "PERFECT!" score.) and
waitz at the entrance to the King's Fortress.
(Yes, you can complete the puzzle now, but you
won't get a "PERFECT!" score.)
- Straw grunt
and Timebomb grunt wait near the
three rowz of three arrowz (facing
the wrong way).
- Both spongegun gruntz walk to the area just
above the '?' Switch .
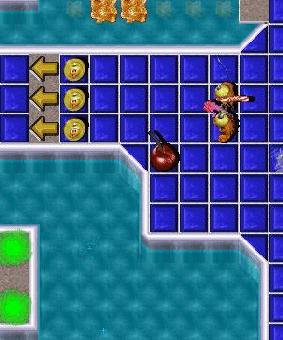
- Secret #1:
- What you need to do is shoot the shield
gruntz onto the '?' Switch
- To move the shield grunt around use the
keyboard selection (Ctrl-#) and target
selection shortcutz ("T") for rapid
targeting. The two sponge gruntz must
shoot immediately one after another. It's
all a matter of proper timing!
- Position two Spongegun gruntz ready
to deliver a "one-two" nudge. The
#1 grunt firez at the square in the path
of the rolling olive
 ,
while the #2 grunt firez directly at the
shield grunt. ,
while the #2 grunt firez directly at the
shield grunt.
- SAVE each
time the shield grunt reachez a 'safe'
square
(the '2' square).
- Re-position two Spongegun gruntz ready
to deliver the "three-four(?)"
nudge. The grunt in the #4 position
firez at the square in the path of the
rolling olive, while the #3 grunt firez
directly at the shield grunt.
- SAVE each
time the shield grunt reachez a 'safe'
square
(the '4' square, this time).
- Re-position two Spongegun gruntz ready
to deliver the "five-six" nudge.
This is the last tight timing step in
the solution.The grunt in the #6
position firez at the square in the path
of the rolling olive, while the #5 grunt
firez directly at the shield grunt.
- SAVE each
time the shield grunt reachez a 'safe'
square
(the '6' square, this time).
- The southern grunt shootz the shield
grunt to the '7' square.
- The northern grunt shootz the shield
grunt to the '8' square.
- When you have the shield gruntz one
square away from the '?' Switch ,
and no longer need the second Spongegun
grunt , send
one Spongegun grunt to the
arrowz .
- You need to have the Straw grunt , Timebomb
grunt , and
Spongegun grunt ready
to walk
through the nine Arrowz .
- The southern grunt shootz the shield
grunt from the '8' square onto the '?'
Switch .
- When the Spongegun grunt shootz
the enemy shield grunt to step on the
'?' Switch ,
it will cause the three rowz of yellow
arrowz up and to the left to disappear.
Each gruntz movez forward to pick up one
of the three Coinz
(#3, #4 & #5)
 ,
and continuez walking to the left. ,
and continuez walking to the left.
- All three gruntz pass
over electrical outletz to the Orange
Switchez .
- Straw grunt
- stepz on the upper left Orange Up/Down
Switch to
drop the orange pyramidz
 to
the left. to
the left.
- Then have the Spongegun grunt shoot
the enemy sword grunt into a
hole .
(Or have Timebomb grunt light a
charge next to him).
- Secret #2:
- Spongegun grunt then
needz to walk to the left to stand on the
green toggle switch in
the middle of the slime.
- Straw grunt walkz the
yellow arrowz; when he getz near to where
the Spongegun grunt is
standing, the Spongegun grunt has to shoot
him to keep him from falling into
the hole; he needz to continue walking
down.
- The red warp will appear; Straw grunt enterz it, pickz
up three Coinz
(#6, #7 & #8) ,
enterz return red warp, pickz up
warpletter.
(He's stranded there.)
- The last
coin:
- Timebomb grunt and
Spongegun grunt go down
to the area with two rolling olivez.
- Very
tough stuff! Have you SAVEd
recently?.
- Spongegun grunt crossez
to the first safe spot near the
(satisfied) CheckPoint Switch
 . .
- Timebomb grunt walkz to
the marred tile
 and
usez the Arrow and
usez the Arrow  to
survive the passing of the two rolling
olivez. Those rolling olivez should be
moving from right to left when the next
step is taken. to
survive the passing of the two rolling
olivez. Those rolling olivez should be
moving from right to left when the next
step is taken.
- Spongegun grunt followz
the rolling olivez to stand with Timebomb
grunt
between him and the Arrow ,
and shootz at the Arrow .
- Timebomb grunt
- stepz on the Arrow
just as the sponge arrivez, and is
propelled to the blue wormhole.
(Spongegun grunt ,
alas, does not survive.)
- arrivez where the original grunt
started the game ... with seven sugar
cubez
still unbroken ... Coin #9 is under one of them!
- Warpstone grunt
 bringz
warpstone to King bringz
warpstone to King
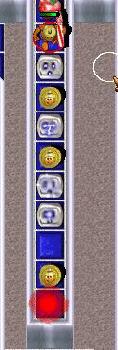
Statz
Page
| Survivorz |
|
5 |
| Deathz |
 |
1 |
| Toolz |
|
9 |
| Toyz |
|
2 |
| Powerupz |
|
1 |
| Coinz |
|
9 |
| Secretz |
 |
2 |
Cheatz
for completing all 4 levelz:
MPUSETHE FORCE
MPHIGHLANDER
MPINDIANAJONEZ
|


