
Forum |
|

Shrunk
|

Stage 1
|
Stage 2
|
Stage 3
|
Stage 4
|
|
|
|
|
|
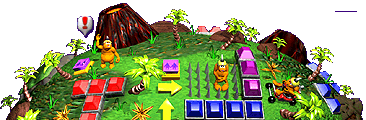
| View the map! |
- Start with 2 bare-handed gruntz
 and a
gauntletz grunt and a
gauntletz grunt  trapped
within purple pyramidz trapped
within purple pyramidz 
- Bare-handed grunt pickz up
squeak toy
 (Toy #1). (Toy #1).
- Bare-handed/squeak toy grunt
- walkz down to the middle of the outletz

- usez megaphone
 -- gauntletz
  (Tool #1). (Tool #1).
- Gauntletz/squeak toy grunt
- killz two enemy gruntz

- breakz sugar cubez
 in
the area in
the area
- Bare-handed grunt
- pickz up Welder's Kit
 from the Landing Area
  . .
- What! No Welder's Kit?!?
- Must be another Gruntz
Version 1.0 'bug'.
- pickz up toob
 (Tool #2). (Tool #2).
- Toob grunt
 enterz water, and getz enemy grunt
  to
follow him back to the countertop. to
follow him back to the countertop.
- Toob grunt
and gauntletz/squeak toy grunt gang up to
kill enemy grunt .
- Toob grunt
- enterz water and goez and stepz on Black
One-Time Switch

- then goez to other island and usez the
megaphone
- wingz
 (Tool #3). (Tool #3).
- exitz water by the green pyramidz
 and
losez toob and
losez toob
- when Wingz/squeak toy grunt
 lowerz the
green pyramidz lowerz the
green pyramidz  ,
pickz up shovel ,
pickz up shovel  (Tool #4). (Tool #4).
- Shovel grunt

- digz up a mound
 (if
he's thirsty) (if
he's thirsty)
- fillz in a hole
 (or
three ... only one is required) (or
three ... only one is required)
- Gauntletz/squeak toy grunt takez the
wingz.
- Wingz/squeak toy grunt walkz as far to
the south as he can, then fliez to the green
toggle switch
 by the
frying egg by the
frying egg
- Both gruntz walk to the CheckPoint Switchez
  . .
- Wingz/squeak toy grunt getz enemy grunt
 as
far away from the orange switchez as
far away from the orange switchez  as
possible (near the Spice bottle would be
good), and givez him the squeak toy as
possible (near the Spice bottle would be
good), and givez him the squeak toy  . .
- One grunt stepz on the lower right orange
switch
- Both gruntz
- walk past the lowered orange pyramidz
 ,
and kill the enemy grunt ,
and kill the enemy grunt 
- drinkz a Bottle of Zap Cola
 (if he's thirsty)
- walk around, and stand on the purple
switchez
 to
release the gauntletz grunt. to
release the gauntletz grunt.
- Gauntletz grunt breakz sugar
cubez , stepz
on green toggle switch
- One grunt exitz the area and stepz on upper
orange switch .
- All three gruntz walk up, past
the lowered orange pyramidz , to the
next area.
- Shovel grunt fillz holez
 , one to
reach a Tool, and another (if anyone needz
health) to reach some Zap Cola . , one to
reach a Tool, and another (if anyone needz
health) to reach some Zap Cola .
- Wingz grunt
pickz up bricklaying toolz
 (Tool #5). (Tool #5).
- Shovel grunt and Gauntletz
grunt
kill enemy grunt .
- Shovel grunt digz up a mound
,
fillz in the hole for
more Zap Cola
 . .
- Gauntletz grunt standz on
green hold switch
 . .
- Shovel grunt and Bricklayer
grunt
 walk
past the (lowered) green pyramidz to
enter rolling olive area. walk
past the (lowered) green pyramidz to
enter rolling olive area.
- Shovel grunt walkz to the
right (perhapz cutting the oddz from three to
one, to two to one) and standz on red switch
 . .
- Bricklayer grunt walkz past the
(lowered) red pyramidz
 (perhapz cutting the oddz from three to one,
to two to one) to step on the Black One-Time
Switch .
(perhapz cutting the oddz from three to one,
to two to one) to step on the Black One-Time
Switch .
- Shovel grunt and Bricklayer
grunt walk
back past the green pyramidz .
- All three gruntz, Gauntletz , Shovel and Bricklayer
- go to the CheckPoint Switchez
  . .
- gang up to kill the 2 enemy gruntz
- two gruntz (not Shovel ) can drink a
Bottle of Zap Cola
(if he's thirsty).
- One grunt (Shovel is a good
choice) stepz on the silver timer switch
 . .
- Another grunt goez through the silver
pyramidz
 , and
standz on the red hold switch . , and
standz on the red hold switch .
- Other two gruntz walk through the dropped
red pyramidz .
- Shovel grunt digz up the
middle mound .
- Gauntletz grunt breakz top
brown brick in the stack of brickz
 . .
- Shovel grunt pickz up bomb (Tool #6).
- Bomb grunt
 runz to yellow brick
  to blow
it up. (Death #1) to blow
it up. (Death #1)
- Gauntletz gruntz breakz brown
brick
 , stepz
on Black One-Time Switch . , stepz
on Black One-Time Switch .
- Both remaining gruntz walk up past
the black pyramidz
 . .
- Gauntletz grunt
- pickz up the monster wheel
 (Toy #2) (Toy #2)
- breakz sugar cubez ,
pickz up Coin #1

- givez monster wheel to enemy grunt
 . .
- Bricklayer grunt buildz brick to stop
rolling olivez.
- Gauntletz grunt breakz brick
his
buddy laid, then another brick
 ... and
losez his gauntletz. ... and
losez his gauntletz.
- Both Bare-handed grunt Bricklayer
grunt and
walk through.
- Bare-handed grunt
- walkz around slime to the right, down,
and the left
- killz enemy grunt

- by walking onto outletz path ,
and stopping on safe spot (leavez no
Goo puddle
 ) )
- or even with his bare handz
(leavez useless Goo puddle ).
- walkz through rest of outletz
- pickz up gauntletz (Tool #7).
- Gauntletz grunt
- breakz sugar cubez
- stepz on Black One-Time Switch .
- enterz blue wormhole, breakz sugar cubez
- pickz up Coin #2
- walkz back through the slime to the
sugar cube by the rolling olivez
- breakz the sugar cube to
reveal the '?' switch
 . .
- Secret #1:
- The easy way:
bricklaying grunt standz
between the two setz of holez surrounding
coinz (#3 and #4).
- Gauntletz grunt
- stepz on '?' switch .
- The hard
way:
- followz the changing
Construction Pyramidz
 -->
--> 
- towardz (and across) the
electrical outletz
to reach the spot where
- bricklayer
standz in The
easy way:.
- the holez above whichever grunt
will disappear.
- walk up to the coin, but don't pick it
up.
- WAIT until the hole under the coin fillz
in
- then pick up Coin
#3
- walk down as quickly as possible.
- The same thing will happen for the lower
set of holez
- so go get Coin #4
.
- Move both gruntz to the area near the
stairway.
- See the megaphone
down there?
- Eventually, someone will have to use that
thing, so you may enter the hazardous area
and do it now, or wait until later.
- Since Gauntletz is faster
and stronger than Bricklayer , he is the
better choice to do battle with the three
enemy gruntz
 . .
- Gauntletz grunt
- walkz up to the left, through the
outletz ,
and down
- Secret
#2:
- standz just below the Black One-Time
Switch
- the red wormhole
 will
open, enter it will
open, enter it
- walkz through the yellow arrowz, and
let the spongegun grunt shoot you onto
the Coin #5
square
- then let him shoot you onto the
lower row of arrowz
- walk to the right to get the
warpletter

- enter red wormhole to
return.
- (exitz the area near the fort)
- Bricklayer grunt
- walkz to the left and killz the three
enemy gruntz
- usez the megaphone
-- squeak toy (Toy #3)
- ... (if that wasn't done earlier)
- buildz a brick by
the fort to stop the olive.
- Gauntletz grunt
- getz the squeak toy from Grumley, the
GruntzMachine keeper
- givez it to the enemy grunt

- pickz up warpstone
 . .
- Warpstone grunt
 bringz
warpstone to King bringz
warpstone to King
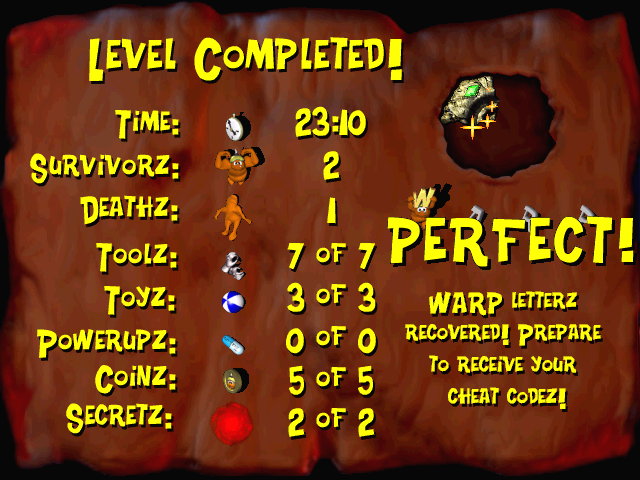
Statz
Page
| Survivorz |
|
2 |
| Deathz |
 |
1 |
| Toolz |
 |
7 |
| Toyz |
|
3 |
| Powerupz |
 |
0 |
| Coinz |
|
5 |
| Secretz |
 |
2 |
|
|

GRUNTZ is a trademark of Monolith Productionz
|
Copyright © 1999 - 2026
Last modified: January 1, 2026 by GooRoo
Email: GooRoo
|


