Forum |
|

Rollerz
|

Stage 1
|

Stage 2
|

Stage 3
|

Stage 4
|
|
|
|
|
|
| View the map! |
- Start with one gauntletz grunt
 , pick up
resurrection scroll , pick up
resurrection scroll  , use it,
revive two bare-handed gruntz , use it,
revive two bare-handed gruntz 
- Two bare-handed gruntz
 each drink
a Bottle of Zap Cola each drink
a Bottle of Zap Cola  and step on purple switchez
- Gauntletz grunt

- walkz past purple pyramidz

- breakz dice
  ,
revealing two toobz ,
revealing two toobz 
- takez the place of one bare-handed grunt
 so he
can get a toob. so he
can get a toob.
- Toob grunt
 takez the place on a purple switch
  of the
bare-handed grunt of the
bare-handed grunt  , so that he
can pick up his toob , so that he
can pick up his toob
- Gauntletz grunt

- walkz down, breakz
- stepz on the '1' switch
 revealed
- Pool #1:
- Gauntletz grunt
 and both
toobz gruntz and both
toobz gruntz  go to bottom
pool, one toob grunt go to bottom
pool, one toob grunt  lurez enemy
grunt lurez enemy
grunt  onto the landing area, and all three
gruntz 'gang up' to kill enemy grunt
- One toob grunt
 stepz on
yellow hold switch stepz on
yellow hold switch 
- Gauntletz grunt
 walkz up,
past beginning area, breakz dice walkz up,
past beginning area, breakz dice   (one containz a Can of Zap Cola), walkz up
a bit further and breakz another die
  (the other three dice
  only reveal spikez
  ),
walkz through spikez ),
walkz through spikez  ,
stepz on '1' switch ,
stepz on '1' switch 
- Pool #2:
- Both toobz gruntz
 go to the
next pool up, each drink a Bottle of Zap
Cola go to the
next pool up, each drink a Bottle of Zap
Cola  and 'gang up' (see tacticz of Pool #1) to
kill enemy grunt
  ,
one (in better health) usez the megaphone
-- pogostick ,
one (in better health) usez the megaphone
-- pogostick  , other
(poorer health) drinkz a Bottle of Zap
Cola , other
(poorer health) drinkz a Bottle of Zap
Cola  and stepz on yellow hold switch
- Gauntletz grunt

- takez pogostick from the
GruntzMachine (Resourcez)
- walkz past two-way Arrow
 ,
avoiding missilez from enemy gruntz ,
avoiding missilez from enemy gruntz 
- givez pogostick to enemy grunt
 (who jumpz into a hole
  ) )
- stepz on CheckPoint Switch

- retreatz to a safe place until
two-way arrow
 is switched
  . .
- Pool #3:
- Both toobz gruntz
 go to next
upper pool. go to next
upper pool.
Tacticz are a bit different here:
one toobz grunt  (the leader)
goez from landing area (the leader)
goez from landing area  to
purple multi-grunt switch to
purple multi-grunt switch  (pmgs) to landing area
lurez enemy toob grunt  into chasing him and returnz to the pmgs
(and smirkz, when enemy grunt is squished
by the rolling 8-ball
  ) )
stepz on the green toggle switch 
other toobz grunt  standz on
first purple switch standz on
first purple switch 
lead toobz grunt  standz on
yellow hold switch standz on
yellow hold switch 
gauntletz grunt  goez past
two-way Arrow goez past
two-way Arrow  ,
stepz on '1' switch ,
stepz on '1' switch 
- Lead toobz gruntz
 standz on the
other purple switch standz on the
other purple switch 
- Gauntletz grunt
 walkz
past purple pyramidz walkz
past purple pyramidz  ,
standz in front of green pyramidz ,
standz in front of green pyramidz 
- Pool #4:
- Both toobz gruntz
 go to next
upper pool, 'gang up' (see tacticz of Pool
#1) to kill enemy grunt go to next
upper pool, 'gang up' (see tacticz of Pool
#1) to kill enemy grunt 
the toobz gruntz  in better
health stepz on the blue toggle switch in better
health stepz on the blue toggle switch 
the other toob grunt  drinkz the
Bottle of Zap Cola drinkz the
Bottle of Zap Cola
- Gauntletz grunt
 walkz
across bridge walkz
across bridge   
drinkz Bottle of Zap Cola (if he needz it)
crossez next bridge and breakz dice  ( (  are
only obstaclez) are
only obstaclez)
the Bottle of Zap Cola that was revealed
is for whichever grunt is most in need of
the refreshment. (Perhapz after some more
work is done.)
- Gauntletz grunt
 pickz up
'roidz powerup pickz up
'roidz powerup  ,
killz four enemy gruntz ,
killz four enemy gruntz  ,
breakz all dice ,
breakz all dice     (careful ... some are explosive!)
- One toobz grunt
 exitz pool
(following gauntletz), losez his toob. The
other grunt will be left behind. exitz pool
(following gauntletz), losez his toob. The
other grunt will be left behind.
- Gauntletz grunt
 and the
bare-handed grunt and the
bare-handed grunt  go to
CheckPoint Switchez go to
CheckPoint Switchez   . .
- Have you
SAVEd recently?
- Both gruntz walk past six rolling 8-ballz
 , avoiding
the two spot-litez (there are a couple of
'safe' spotz to stand) , avoiding
the two spot-litez (there are a couple of
'safe' spotz to stand)
- Bare-handed grunt
 usez
megaphone usez
megaphone  behind
  tree
-- shovel tree
-- shovel  ... takez
it when it is cranked out. ... takez
it when it is cranked out.
- Gauntletz grunt
 (carefully!)
breakz dice (carefully!)
breakz dice 
- Shovel grunt
 digz up moundz digz up moundz  , pickz
up coin #1 , pickz
up coin #1  ,
uncoverz '?' switch ,
uncoverz '?' switch 
- Secret #1:
- One grunt (no tool requirementz) needz
to be positioned just below '?' switch
 , at
the edge of the lake , at
the edge of the lake
- The other grunt stepz on '?' switch

- grunt walkz (quickly!) across the path
appearing over the water
- walkz back to the edge of the lake
- walkz across the path diagonally to
the coinz
- pickz up four coinz (#2 #3 #4 &
#5)

- walkz back to the edge of lake
- wait
- walk across path appearing over the
water
- follow the path down
- wait
- then walk up and across path to the
right to get back on shore
- The
Labyrinth:
- Shovel grunt
 stepz on/off
red hold switch stepz on/off
red hold switch 
- Gauntletz grunt

- enter maze, walkz south (with shovel
grunt
 cooperating) to step on green toggle
switch
- returnz to entrance, walkz east,
breakz die

- takez freeze scroll
 (Toy #1) (Toy #1)
- breakz die
 ,
stepz on '1' switch ,
stepz on '1' switch 
- returnz near the entrance and standz
on red hold switch
 . .
- Shovel grunt
 enterz maze,
takez over on red hold switch enterz maze,
takez over on red hold switch 
- Gauntletz grunt

- usez freeze scroll
- killz two Defenderz
 and one Object Guard
- leavez warpstone where it is, for
now
- walkz around fort to lower left
corner by yellow arrow

- Secret
#2:
- Red wormhole
 will
open will
open
- Gauntletz grunt
 quickly walkz up, to the left, into
red wormhole
- landz on springz ... and now needz
to go through holez
 ,
spikez ,
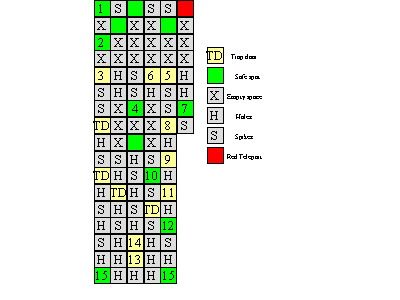
spikez  and trapdoorz maze to pick up coin #6
 and
warpletter and
warpletter 
- Springz grunt
 In the
following diagram, follow the numeric
sequence, making sure that your grunt
stopz only on green
squares. Other squarez in the
sequence are trap doorz, so time your
jumpz accordingly. Also, this sequence
will take you to either the coin or
the warpletter; after you get one, you
will have to spring back up and then
spring down to get the other. In the
following diagram, follow the numeric
sequence, making sure that your grunt
stopz only on green
squares. Other squarez in the
sequence are trap doorz, so time your
jumpz accordingly. Also, this sequence
will take you to either the coin or
the warpletter; after you get one, you
will have to spring back up and then
spring down to get the other.
(This is the actual maze, showing the
path.)
Reverse the sequence to get out of
this maze , and then enter the red
wormhole to return. (You'll have to
lose the springz.)
-

- Bare-handed grunt
 pickz
up warpstone pickz
up warpstone 
- Warpstone grunt
 bringz
warpstone to King bringz
warpstone to King
Statz
Page
| Survivorz |
 |
3 |
| Deathz |
 |
0 |
| Toolz |
 |
4 |
| Toyz |
 |
3 |
| Powerupz |
 |
1 |
| Coinz |
 |
6 |
| Secretz |
 |
2 |
|
|

GRUNTZ is a trademark of Monolith Productionz
|

Copyright © 1999 - 2026
Last modified: January 1, 2026 by GooRoo
Email: GooRoo
|


