 )
)
Club #3
 and grabz a bit of liquid refreshment
  .
.Much healthier now, he is ready for anything ... then he pickz up a Coin
 (Coin #5).
Crossez over one of the Arrowz
 , and carefully pickz up the Toy
  (Toy #2).
There are three enemy Gruntz
 in sight, each one better armed than he is.
He (following your intelligent orderz) can easily dispose of all three ... but don't!
You are all alone over here, and there are some thingz, well, that "just takez two".
Find a good place to give that toy away to one of those guyz.
There's something glittering over in that stormy area
 ... investigate!
"Well, these could come in handy", you say, as you slip on the Gauntletz
(Tool #3).Then he pickz up a Coin
(Coin #6).
Bare-handed #1
 (RP) have gone down
  on the plateau to the northeast ... investigate!
You stand on a lowered Silver Pyramid
 (SP) for a while, then notice that the RPz behind you have come back up ! Trapped! Is there any way out?

Gauntletz #3
 south of you; thingz you should break
  (for a "PERFECT!" score); and thingz that you may break

 and all six Brickz in the immediate area.
All of that effort will only put a single Coin
(Coin #7) in your cofferz. Gauntletz #3 pickz up the Coin (Coin #8) in the middle of eight Jumping Golf Ballz.Then he findz a way through another horde of Jumping Golf Ballz to a Blue Toggle Switch
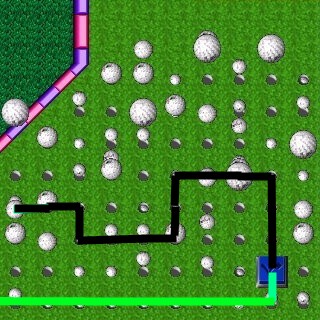
 (BTS) and back out again.
Moving back north, you see another Coin
(Coin #9) enticing you atop a YHS  .
.Are you ready for this? Have you SAVEd recently? That paltry sum has special consequencez.