 #1
#1 , just for entering the game!
Noticing that you landed on a Blue Toggle Switch
 (BTS), you should be curious about what Toggled Griddle Bridge Tile
  was changed.
(Every mini-puzzle will have at least one BTS
that needz to be activated.)You didn't notice what happened when you landed here?
Perhapz you should jump on it again, paying more attention to what goez on around you.
Now that you see what happenz when you step on this BTS
, where do you go from here?Some of the directionz you may move lead you into a "loop-de-loop" scenario, with no one to get you out of it!
Perhapz other pathz may lead you to a dead-end ... unless you have the proper Tool to create an escape route.
One choice even takez you immediately out of this tough decision area!
(You see that you can readily get back in, so that choice should be rather attractive to you.
 )
)What is that flashing in the corner to the northeast? Investigate it! A Coin
!You experiment to see what the Black One-Time Switch
 (BOTS) will do, and find a Megaphone
  on it that callz for a Tool. You see that it could be immediately useful ... but perhapz it might be even more valuable later. In this puzzle, you will find that it payz off in the long run to not be hasty about using a Tool/Toy/PowerUp when you first may acquire it.
But you wander over to a place where that Tool might be useful and spy a broken Tile
 .
.Hoping to acquire a more useful Tool, you return to the Arrowz maze, and select the most promising path.
Chosen correctly, you arrive at a Coin
on a Yellow Toggle Switch  (YTS).
You see a path that will lead you to another YTS
on which another Megaphone awaitz. Next to it is another YTS with a Coin . You don't like the choicez you have from here, so you experiment with jumping on and off YTSz . When you see a path leading to a place where the latest Tool is useful, you hop onto an Arrow and take a little ride. When you arrive, you select an item from the GruntzMachine.
 #1
#1 Break one (but choose wisely, as you may not get a second chance)! A good choice will allow you to reach another Megaphone , and give you more optionz of what to do next.
#1
Break one (but choose wisely, as you may not get a second chance)! A good choice will allow you to reach another Megaphone , and give you more optionz of what to do next.
#1 #1, but don't exchange your Tool for another until you are absolutely certain that there is nothing more you can do with the Tool you already have. Are there no more Holez
 or Moundz
 within your reach? No? Well it seemz you are free to pick up that other Tool.
#1
within your reach? No? Well it seemz you are free to pick up that other Tool.
#1 .
.A ticking sound
 tellz you it would be wise to be ... somewhere else.
The good thing is, a lot of the heavy work is being done for you!
That worked so well, you should do it again.
There is just one more breakable object
 within your reach, so you break it and pick up the item you uncover. Then you take a trip through the Blue Wormhole
  (BW).
(BW).I hope you are not claustrophobic, because there is simply no room to maneuver (safely) here!
So give yourself a bit of "elbow room". Ah! Now that could be useful!
#1 yieldz a prize . But the three Holez to the north are merely obstaclez, unlike the two Holez in the northeast corner of this area. Go get the Coin on the BTS  and then go pick up the Megaphone just past a Goo Puddle
  and fill in those two Holez and use your 'Magic Shovel' again. What do those former Gruntz suggest to you? Right! Get a new Tool from the GruntzMachine.
 #1.
#1.The Goo Well is now full, and a new Grunt
is baked ... but leave him in the oven a while.
 #1
#1Oh, come on! A little bending and plastering won't hurt (much).
The Designer even provided you with a performance enhancer!

And selecting the place to do your handiwork carefully will provide you with clear sailing to the BW
you see. Naturally, you will want to pick up the Coin on the BTS .Is there anything else you should do before you take the plunge?
Perhapz it is time to see about another Tool.
 #1!" followed closely by "Ouch!" as you are on the receiving end of a cannonball launch. There's a guy
  shooting at you ... and reloading!
Retaliate! Then grab some refreshing Zap Cola
 , and other prizez and look over your surroundingz.
Those five disGruntledz


 south of you could be trouble in the future. Is there anything you can do about them now?
(You'd be surprised about what you could accompish with that "bent piece of wood"!)
Then dive through the return Red Wormhole
 (RW).
(RW).Yeah! More enemy Gruntz
to eliminate from afar!A really efficient throw will reduce the health of four Gruntz with each use.
Earlier, you did some sucking. Now would be a good time to introduce a helper into the game!
There is one more Grunt
within reach, so remove him before you dive in the BW .You find yourself (once again) under fire from an enemy Grunt
 when you land.
With a bit of luck, and some wise positioning, you can eliminate that opposition without ever coming under fire from him again.
Then (try as you might) you find that you are unable to reach any other enemy Grunt.
Why don't you see if Grumley has something you can use?.
Time to check the GruntzMachine again.
#2 near four Goo Puddlez
  .
.Even without any Tool, you can use that MegaPhone
 . Is the new Object useful to you?
No? Then perhapz there is another Tool available in the GruntzMachine.
No? Well, it seemz you must wait for assistance from a buddy.
#2 #3 baked, introduce him into the game on the GruntCreationPad nearest you.Then stand on the eastern-most Green Hold Switch
 (GHS).
Have him get a Tool from the Gruntzmachine, and put him to work ... immediately. When your buddiez clear a path through 'The BrickYard', you will want to follow them (but not too closely, which may hamper their effortz) and perform any 'clean up' work ... such as picking up any Coinz
they may leave behind, or unsightly Goo Puddlez .
#1 #4, introduce him into the game. Have him get a Tool from the Gruntzmachine, and put him to work ... immediately.
 #3
#3 (GTS) and determine the true nature of all the Brickz
  within your reach. If you were efficent, you notice that there are lowered Green Pyramidz
  (GP) just south of your GooberStraw buddy. Go stand on the one due south of him. When Grunt #4 is introduced into the game, he will operate the same GTS you stood on to investigate the true nature of some Brickz , and will provide you with a path to a Megaphone and a Coin . With a bit of help from Grunt #4, you will be able to scope out a few more Brickz , which may be of benefit later. Then (with his help, again) go up and join him, aiding him in clearing a path through 'The BrickYard', by revealing any Explosive Brickz
  or Gauntlet-breaker Brickz that would thwart the team's effortz to solve this maze.
There will come a time when it is simply not possible to reveal the true nature of Brickz
, because a Tool is revealed that a Grunt must pick up. Since it should be obvious that Gauntletz are still required to get out of 'The BrickYard', the Spy Gear will have to go. Then Gauntletz is on his own, so it would be wise to SAVE before he breakz any more Brickz .
#4 near GooberStraw #2 and Spy Gear #3. Make yourself useful by stepping on a GTS .You will be told to jump (onto the GTS
), so stay close.When Grumley crankz out some Gauntletz
 ... put them on!
#4 nearest you.
... put them on!
#4 nearest you.Then (with the assistance of your buddy with the Spy Gear
) clear a path through 'The BrickYard', collecting Coinz , popping Roidz as needed, activating any BTS you may find, and pick up a Scroll  that will come in handy a bit later.
It would be wise to break every revealed Brown Brick
you can reach, in case something strange happenz when a Grunt standz on the Foundation Tile  revealed.
Knowing that every BTS
needz to be activated (as well as needing to acquire every Coin in order to achieve a "PERFECT!" score), a Gauntletz-breaker Brick  will have to be broken.
Just make sure that everything possible is done with those Gauntletz before giving them up! Someone needz to use a Megaphone
... but some Sugar Cubez  prevent access to it.
| And there is a big pile of Sugar Cubez |         
|
that may contain something interesting. |
#3Wasn't there a special Brick
called for earlier ... that you didn't know how to use?Is this the time you should use it? Perhapz it is time to see about another Tool.
 #3
#3Or you could merely fly away to safety ... productively.
Like to the BTSz
in the middle of the Griddle to the north.Once you have activated all of them that you can reach (which should be all of them!) and collected your pay
, go 'retire' to stand on the Purple Multi-Grunt Switch  PMGS
#4 with Kitchen Slime
PMGS
#4 with Kitchen Slime  racing around it, and dive in.
 #4
#4At a certain point in your hop through the Spikez
 , an enemy Grunt
  startz chasing you.
What can you do about this?
Is there something you can give him, something you can use to freeze him in one place?
You notice that there is a certain distance beyond which he will not go away from his 'post'.
Each time he returnz, you hear a click. What happened?
Yes, it would help if that Bridge Tile was raised
 , instead of submerged
  , wouldn't it?
With everything in its proper state, all you need to do is make your way (safely) through the Spikez maze, picking up Coinz
and activating BTSz .You then make your way to the Question Mark Switch
 (QMS) with a Coin on it.
#4
(QMS) with a Coin on it.
#4"Hey, buddy! You'd better hurry on over here and help me out!
These enemy Gruntz
have intentionz that are hazardous to my health!"When your buddy has taken care of the onez who started coming after you, you check the GruntzMachine to see what is there that might be useful.
#1The enemy Gruntz
seem to forget about your Bare-handed buddy, and concentrate on you, instead.Using your GooberStraw
 like a quarter staff, you begin to systematically turn enemy Gruntz into Goo Puddlez
  (each in a different place!), and whenever you have the chance, you suck them up.
You stay away from the big ugly enemy Grunt
 , because you know that you are no match for him.
 #4 is a typical bully.
Knowing you have a more powerful weapon than he possesses, he wantz no part of you.
So you let him have a round ... and then have to dodge a missile coming your way.
Employing 'Hit & Run' tacticz, you avoid the pink missilez and then come back to finish off the enemy Grunt
.You retreat to a place where you cannot be pushed around, and let your buddy with the GooberStraw take care of the rest of the enemy Gruntz
.Then you head south and do a little "one on one" with the enemy Grunt
 down there.
You may be able to do more long-range damage, but it may not be wise to get carried away with your power. Why don't you check out the GruntzMachine for something more useful?
 #5 you can reach.
Which one will take you where your Tool will be most useful?
If you chose correctly, a ball of flame is heading your way, so step lively!
Put that 'butter knife' to work on the three Gruntz
 before you stop to collect any Coinz and before you go through the BW .
Just out of curiosity, have you SAVEd lately? (Now would be a good time to do so.)
Then "once more, into the breach!" You trade a stab for the whack
 you receive, and then you do it again. "Boy, do I need that Zap Cola!" It's not much, being only a Can , but it helpz.
Then you pick up the MegaPhone
and call for something of no use to you.There's another big ugly in the area, so you trade a stab for the whack
you receive and run for the Bottle of Zap Cola  . One more whack, and one more stab, and "the coast is clear".
You remember that the first ugly
Grunt stumbled around a bit when you "cut him deep" the first time, so decide to check if he un-did some of the work you accomplished.You look around, and see a 'special' Bridge Tile ... different from all of the otherz.
Is it raised
? Great! No, it's submerged ?Then step on that BTS
again before you go through the BW .Now you can only "cool your heelz" for a while until something useful comez your way.
 #6 you can reach!
Your presence could be much more valuable to the team if you remain where you are, and see if you can manipulate that Red Toggle Switch
 (RTS) to help out a buddy.
#4, and reveal a QMS .
(RTS) to help out a buddy.
#4, and reveal a QMS .Before you step on it, you notice a Hole
with four Arrowz pointing at it (all the other Holez are 'naked') and decide to use your Shovel a bit over there.The Hole
becomez a Mound , so you continue digging."Look at that! Another QMS
!"(Time to SAVE, so that you may determine who stepz on the Switch, and who does something about what happenz.)
In truth, either Grunt can get the Coin
on the QMS pointed to by the Arrowz and activate the mini-puzzle's obligatory BTS , collecting some more pay . #1 on a QMS and take advantage of some temporary Tilez to go after the Goo Puddle  that was formerly an enemy Grunt .
Then you satisfy a CheckPoint Switch
 , collecting your pay .
Next, take care of this mini-puzzle's obligatory BTS
, collecting some more pay .Then you dive through the BW
.
#7 to choose from: for one, your unshielded feet won't last long; for the other you are as well-equipped as you can be ... for now."Eeny, meenie, miny mo ...", you pick one and dive on through.
You land where an enemy Grunt
is pacing around a Coin resting on a BTS .Circling around him are a couple of Kitchen Slimez
... you don't want to touch them!"Boy, I sure could use a GooberStraw here!"


Even without that Tool, there are some thingz you can do here while you are waiting for help. There are three Coinz
you may pick up, if you are careful.You wisely avoid trying to acquire the Coin the enemy Grunt
is guarding.
#1
 and Green
  Pyramidz, lotz of Strawberriez and a number of Sugar Cubez


 . You, dear solver, may do thingz the hard way (with the Rolling Olive
  toggling those Red Pyramidz), or you may solve it an easier way (by enlisting the aid of another Grunt ).
Broad hint: it will be quite impossible to acquire the Warp letter
 doing thingz "the hard way".
Hard way, or easy way, your task is to make your way around in the area until you can deliver the Toy you are carrying (you are carrying one, aren't you !?!) into the handz of the Grunt already in the center area.
Along the way you will acquire fifteen Coinz
(#75 through #89).Then you finish policing up the area and look for something else you can do here.
If your "work ethic' is good enough, you will be rewarded with eight more Coinz
(and if you used good teamwork), the Warp letter .Of course, if you don't search hard enough for more work to be done, you will be unable to complete this puzzle! Because only by acquiring the eighth Coin
will you be teleported back to the starting point ... at the southern end of the Big Griddle.| There is a lot of white there |         
|
a lot of breaking you will need to do. |
Another Tool will be revealed, and you are the only one around to use it.
#1 or two in strategic placez and then look into the GruntzMachine for the perfect tool  to complete the puzzle. #6
 , it is time to do the job only you are properly equipped to do.
A 'purist' will release the Rolling Olive
before diving through the last BW , but once Gauntletz has departed the area, it is really not required to do so.You see a Megaphone
and the ubiquitous BTS , with a Coin ... and a BW ... without getting slimed , you do what needz to be done here.Now this is more like it! This is the terrain for which you are admirably prepared to conquer, acquiring various prizez
 and using MegaPhonez to call for itemz of no possible use to you.
(There are seven other memberz of your team, you know ... you may be helping them out!)
There seemz to be some sort of equipment malfunction
 here, so watch your step!
Well, at least this Grunt's job is done!
 #5
#5 !
!The 'interview' with the two Club Gruntz already has this Grunt feeling rather puny, so it would help if he could avoid taking any more 'hitz' ... even if from a Bare-handed enemy.
Perhapz that interesting object nearby would lessen his exposure to "enemy action"?
"I feel just like Lamont Cranston! Nudge that enemy Grunt
 onto that BOTS .
Yeah, it did allow me to get that Coin
.Now nudge him over there, onto the other BOTS
.Big deal! That didn't help much.
Better nudge him onto that BTS
, just in case nobody can get down there.Whoopz! Now he seez me. I'd better make trackz ... away from here."
It seemz there isn't much that this Grunt can do right now, except collect a Coin
and use that Megaphone .Did you hear a grinding noise? Perhapz somebody should have taken something out of the GruntzMachine before you asked Grumley to put something into it!
After some time, you notice that one of the Purple Pyramidz
 (PP) has lowered
  , and you may now move out from here. So you take a dive through the BW .
Just before you get there, you hear another Wormhole opening up.
"I wonder where that takez you?"
You walk over and collect the Coin
atop a (wonder of wonderz!) BTS .You rummage through the GruntzMachine and come up with something useful.
 #5
#5 between you and the Warpstone piece
  .
.Which onez do you break? Have you SAVEd recently? If so, starting breaking Brickz!
If you lose your Gauntletz
, restore from that last SAVE and try again.If you lost your life ... and there is still a Brick
 preventing anyone reaching the Warpstone piece ... restore from that last SAVE and try again.
If you lost your life ... and there is nothing but a Foundation
tile before the Warpstone piece ... success! (The King will remember you fondly.  )
)
 #8
#8 .
.So you did ... and now you're flying through a Red Wormhole
(RW), to land on the Landing Area  of a large Pool of Water.
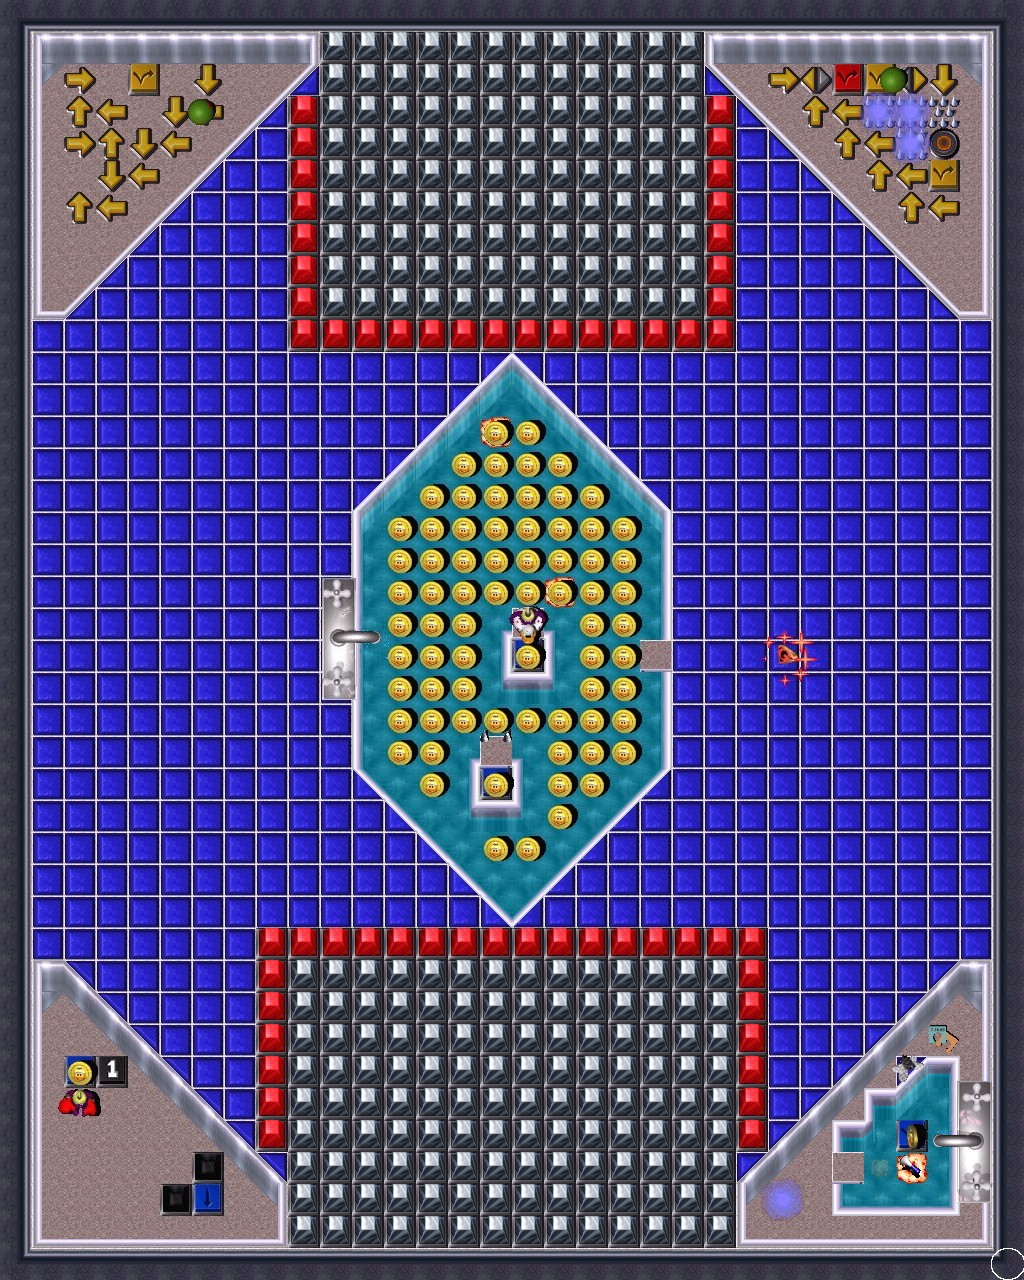
"Wow! This must be King Solomon's Mine!"
You see about six dozen Coinz
here, with an enemy Grunt  apparently standing Guard over them. "I don't like this!
I didn't sign up to take part in a championship flyweight match ... to the death!"
When faced with such a situation, there are a number of thingz you can do:
- Run! (But not very productive.)
- Fight! (With no guarantee of coming out the winner, in such an even match.)
- Cheat! (Do you have something with which you can keep the guard busy?)
- Find some protection! (Like that wedge
 over there.)
 - Or do several of the above, like #3 (to pick up a few of those Coinz ); then #4 followed closely by #2.
. Or is it? Some of those Coinz seem to be without any visible meanz of support. Ah! But there are a couple of BTSz you can reach that might raise up  some assistance to solve that problem.
At some point during the collection process, you hear a RW
opening up.So you make your way to it and dive through.
Another Coin
and another BTS ... and a Megaphone .You wait a bit, to see if Grumley is cranking out something you can use, before you dive through the BW
.You're glad you grabbed it, as a big ugly
advancez on you."Here!
 Take it! Just leave me alone!" you cry as you head for the Coin and the BTS ... and the BW to whisk you away from here.
Now, if everyone on the team has performed to the very best of their abilitiez, you are able to acquire all of the remaining Coinz
in the Pool.You may go through the return RW
if you wish, but it is really not necessary.
#1If every Grunt has done what was required of them, the path will be complete to the area of the King's Fortress.
 #1, and then Waltz into the King�s Fortress.