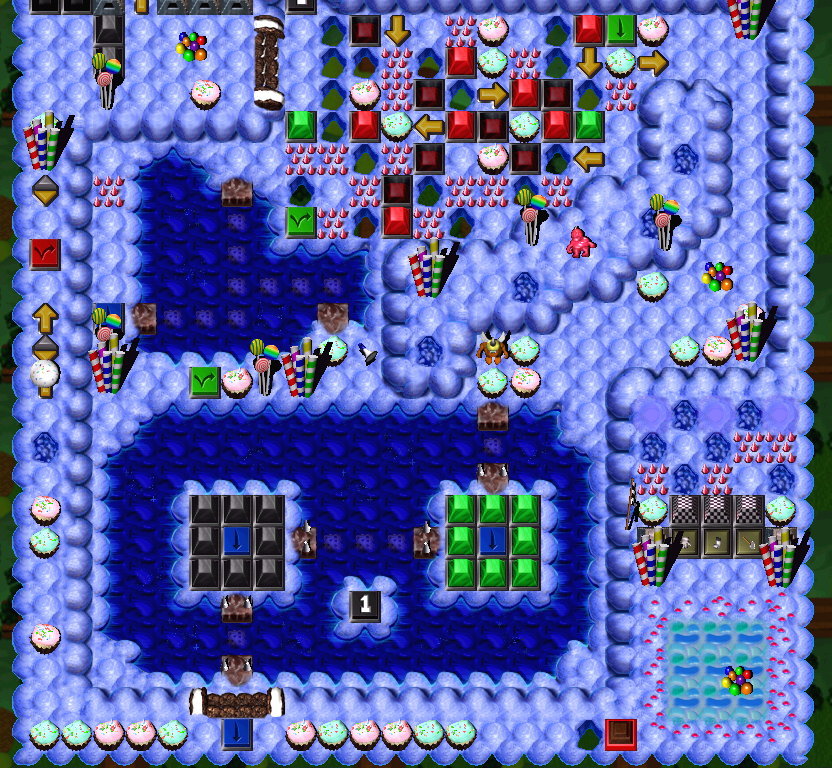
 Gauntletz #3, Gauntletz #3,
 Toob #1 and Toob #1 and
 Springz #4 Springz #4 |
- Gauntletz #3
- Breakz the cupcakez
 and getz the Coin and getz the Coin  (#10) and the Can of Zap Cola (#10) and the Can of Zap Cola  . .
- Waitz until Toob #1 createz a Bridge connecting three Landing Areaz
    via BHS via BHS  (#1). (#1).
- Goez across the Bridge, breakz the cupcake
- usez the Megaphone
 (#2 -- Shovel) (#2 -- Shovel)
- walkz over to replace Toob #1 on the BHS (#1) until relieved.
- Springz #4
- Makez his way through the RPz
  to the GTS to the GTS  (#1) to the south and then to the GHS (#1) to the south and then to the GHS  to the east. to the east.
- Standz there until all of the other team memberz are past him.
- Toob #1
- Paddlez across the water and standz on the BHS (#1) until relieved.
- Note: It could be grunt #4 who doez the following.
in that case, all referencez to grunt #1 and grunt #4 should be swapped from now on.
- Paddlez back across the water and waitz near the used-up BOTS
 to the north. to the north.
- Takez the Shovel
 (Tool #8) from the GruntzMachine (Resourcez). (Tool #8) from the GruntzMachine (Resourcez).
|
Gauntletz #3,
 Shovel #1, Shovel #1,
Springz #4 and
 Wingz #2 Wingz #2 |
- Gauntletz #3
- Movez to the square above the spikez to open the RW
 . .
- Breakz all the cupcakez he can reach (mostly obstaclez, one explosive), including the onez to the south, freeing Wingz #2.
- Waitz near the revealed SS
 . .
- Stepz on the SS .
- Movez down close to the Landing Area and waitz.
- Walkz across the very short Bridge to stand on one of the GPz
 near BHS (#2). near BHS (#2).
- Walkz across the longer Bridge to wait on the Landing Area near BHS (#3).
- Walkz across the very short Bridge to break one cupcake
 in each direction. in each direction.
- Walkz west, then north, and breakz three more cupcakez.
- After Shovel #1 fillz in a Hole
 , breakz off the top two (Brown) layerz of the stack of Brickz , breakz off the top two (Brown) layerz of the stack of Brickz   , leaving just a Red Brick , leaving just a Red Brick  . .
- Shovel #1
- Goez through the RW
- Digz up the Moundz
 , fillz in the Holez , getz the Coinz (#11 & #12) , fillz in the Holez , getz the Coinz (#11 & #12)
- Goez through the return RW
- Fillz as many holez as possible in the RPz area.
- Goez across the Bridge, and walkz over to replace Gauntletz #3 on the BHS (#1).
- Movez to the east end of the closed-off area containing the 4 Moundz .
- Enterz the plateau, digz up/re-fillz the Moundz and retrievez the 2 Coinz (#13 & #14).
- Movez down to the Landing Area and waitz.
- Walkz across the very short Bridge and across the longer Bridge to stand on one of the BPz
 . .
- Crossez the short Bridge and walkz to fill the hole by the stack of Brickz .
- Walkz back to dig up/re-fill a Mound (and make room for Gauntletz #3 to go to work).
- Dig up/re-fill the Mound north of where the bootz were and get the Coin (#15).
- Wingz #2
- Walkz (no flying allowed!) over to where Shovel #1 is waiting on the BHS (#1).
- 'Relievez' Shovel #1 ... until relieved himself.
- Fliez to the GTS southeast of him.
- Fliez across the water to the BOTS
 in the water in the water
- Fliez to the BHS inside the BPz .
- When the other three team memberz join him on the same island, fliez south to stand on the next BHS .
- Pickz up the Gravity Bootz
 (Tool #9). (Tool #9).
- Springz #4
- Movez down to the Landing Area .
- Bouncez across the very short Bridge to wait on the Landing Area on the small island.
- When the GPz
 are lowered , standz on the BHS (#2). are lowered , standz on the BHS (#2).
- Bouncez across the longer Bridge and relievez the grunt on the BHS (#3).
- He is the very last one to cross the very short Bridge and pickz up the bomb
 (Tool #10). (Tool #10).
|
 Bomb #4,
 Bootz #2
 .
. .
. .
. Previous section Next section