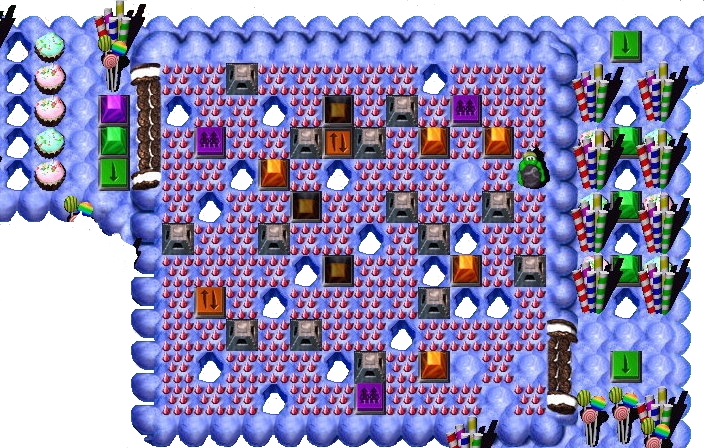
 Shovel #1, Shovel #1,
 Gauntletz #3 and Gauntletz #3 and
 Bootz #2 Bootz #2 |
- Shovel #1
- Digz up/re-fillz the Moundz
 , uncovering three Kegz of Zap Cola , uncovering three Kegz of Zap Cola 
- Downz a Keg of Zap Cola

- Enterz (first in line) one of the BWz
 . .
- VERY IMPORTANT: Goez north, standz on a lowered GP
 and fillz the hole and fillz the hole  near the King's Fortress. near the King's Fortress.
- Headz to the lower left section where Bootz #2 is waiting for him.
- While grunt #1 is keeping GPz
 lowered , fill in Holez , dodge missilez from the enemy grunt lowered , fill in Holez , dodge missilez from the enemy grunt  , move to fill in the next ... repeat until all four Holez are now Moundz , and then go stand on the lower GHS , move to fill in the next ... repeat until all four Holez are now Moundz , and then go stand on the lower GHS  . .
- Remain standing on that GHS until gruntz #1 and #3 have made it through the corridor.
- You cannot avoid walking on Spikez
 Tilez, but you can avoid standing on one any longer than absolutely necessary! Tilez, but you can avoid standing on one any longer than absolutely necessary!
- (But avoid even walking on Spikez as much as you can.)
- Fill the Hole beside the Orange Pyramid
 (OP) in the lower right. (OP) in the lower right.
- Move over one Spikez Tile to stand on the lowered OP to the northwest.
- Fill in the three Holez here.
- Move over one Spikez Tile to stand on the next lowered OP to the north.
- ( Shovel #1 should wait there a while)
- Fill the Hole below the (inactive) Orange Up/Down Switch
 #2 (OU/DS). #2 (OU/DS).
- Stand on the Mound .
- While the enemy grunt is standing on the PMGS
 , stepz on the OU/DS , stepz on the OU/DS  #2. #2.
(This will trap the enemy grunt , since he will not walk on the Spikez .)
- When the nearest OP
 is lowered , stand on it, and start filling in Holez ... end standing on a PMGS ; is lowered , stand on it, and start filling in Holez ... end standing on a PMGS ;
- When the GP is lowered , move ahead to the line of Holez .
- Gauntletz #3
- Downz a Keg of Zap Cola
- Enterz (second in line) one of the BWz .
- VERY IMPORTANT: Breakz the cupcake
 beside the Purple Pyramid beside the Purple Pyramid  (PP). (PP).
- Headz to the lower left section where grunt #2 is waiting.
- When grunt #2 has left for his next task, it is your turn to go to work.
There are six cupcakez nestled among the Candy Canez ... break them!
Collect a Coin  (#16) for all of your hard work. (#16) for all of your hard work.
- Move far enough south to no longer draw the attention of the enemy grunt .
(You have a long wait here, while a path is cleared.)
- Cross the Spikez field, break any cupcake and stand on the GHS .
- Bootz #2
- Downz a Keg of Zap Cola
- Enterz the last BWz .
- Headz to the lower left section where the GHS is guarded by the enemy grunt .
- Waitz out of range of any missilez until help arrivez.
- 'Feintz' toward the Hole , drawing an errant missile from the enemy grunt , then standz on the GHS .
- He should be able to remain standing there until Shovel #1 has filled the last Hole and reached the next GHS .
(The enemy grunt's attention should be on Shovel #1 until then ... then Bootz #2 has to move!)
- You'll know when it is time to leave ... either when a missile is heading your way, or when the lowered GPz become raised while you are still standing on the GHS .
(Meanz Shovel #1 is standing on the other GHS .)
- Move down the (now) safe column, up the stairway and next to the OU/DS #1 on the far west side.
- When Shovel #1 is standing next to the OU/DS #2, step on the OU/DS #1.
- Then lure the enemy grunt to the PMGS .
- Move to the OU/DS #1 again.
- Move to the lower PMGS .
- When the GP is lowered , move ahead to the line of Holez .
|
 Previous section Next section