 #1
#1Holez
 to the north, so that’s out.
It appearz you will have to explore the Quicksand Pit to the south.
What’s this?!? Those Stepping Stonez
 aren’t made of very sturdy stuff, eh?
“This’ll take some fancy footwork!” Want a hint on where to go, and what route to take?
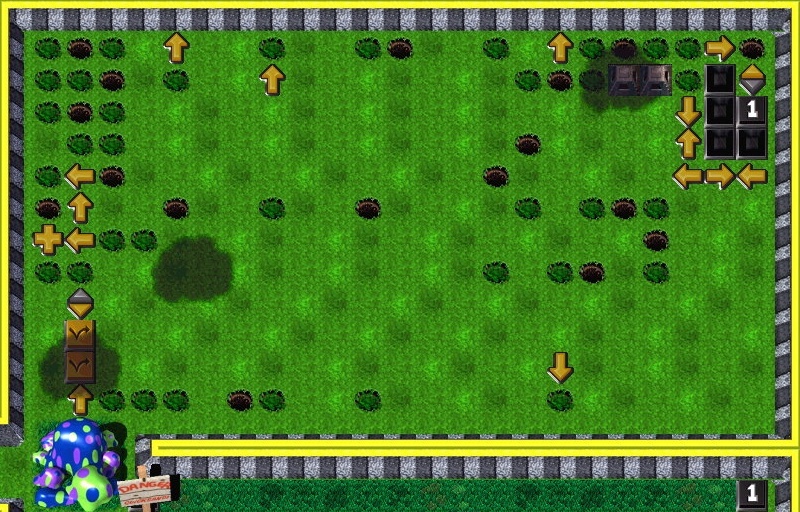
Investigate that CheckPoint Switch
 (CPS) near a Black One-Time Switch
  (BOTS)!
Those enemy Gruntz
 are going to try to knock you off the Stepping Stonez , so use all three eyes; one for the path ; one
for the western Grunt ; one for the eastern Grunt . What’s that? You only have two eyez!?! That could be a problem!
are going to try to knock you off the Stepping Stonez , so use all three eyes; one for the path ; one
for the western Grunt ; one for the eastern Grunt . What’s that? You only have two eyez!?! That could be a problem!When you reach dry land, your troublez aren’t over, you know.
Those shooting Golf Ballz are your next hazard … and the enemy Gruntz
are still
shooting at you! You need to find a way between the Golf Ballz toward the south, where there is a chance you can get out of the range of the enemy Gruntz .You made it?!? Decisions, decisions.
Do you go get the Toob
 you can see, or is there something else you should do first?
The Giant Mushroom blockz your path to the east, so it would help if you had some TimeBombz
 . Oh yes, that’s right … or some Gauntletz
  !
!Do you see either Tool anywhere you can reach?
Across the water, via another one of those Bridgez made of less-than-sturdy Stepping Stonez
 , there is a set of Gauntletz on a Blue Toggle Switch
  ( BTS).
That lookz promising! “Hey, Charlie! Duck your head!”
That disgruntled Grunt
 is throwing thingz at you.
Since it comez right back to him, it lookz like he’s going to throw it again!
You can’t go back, so you’d better choose a safe route to pick up those Gauntletz
(Tool #1).
 #1
#1That enemy Grunt
is going to sling that thing at you, you know that, don’t you?You can either try to waltz right by him and back to that Giant Mushroom, or turn ‘im into a puddle of Goo
 . Remember what I said about needing teammatez?
That enemy Grunt
is also 1/4th of a teammate! Is that a broad hint, or what?Eventually, you will have to go break that Giant Mushroom.
        
|
Pick up the Coin  (Coin #1) that was revealed. (Coin #1) that was revealed. |
       
|
You aren’t carrying a Toy, so it is safe to pick one up, should you find one.
Coinz? Warp letterz? Pick them up!
But never take your eyez off your opponent, even when bowing (er. Picking something up).
(Quote from Bruce Lee.)
Someone shooting at you? Can you avoid him? No?
Nowhere you can go from here, is there … except towardz the Grunt
shooting at you.He’s protected by some multi-colored Mushroomz


 , though, and shooting Golf Ballz in front
of those Mushroomz; time it right, and you can break a Mushroom … and then start breaking a Grunt head! Hint: a Mushroom towardz the side of the enemy will give you a safe place to stand, when next he shootz at you. Look at that!
, though, and shooting Golf Ballz in front
of those Mushroomz; time it right, and you can break a Mushroom … and then start breaking a Grunt head! Hint: a Mushroom towardz the side of the enemy will give you a safe place to stand, when next he shootz at you. Look at that!Another puddle of Goo
to use sometime in the future, when a handy-dandy GooberStraw  becomes available.
One of those Black Pyramidz
 (BP) blocking movement to the east is down
  , as well.
And a CPS
 has
been satisfied! A lot accomplished, for such a small part of this puzzle! Always keep in mind what was said above above thingz you might find (or uncover); don’t exchange something you have for something else (until what you have is no longer useful to you). “Is there anything I can break?”
There doesn’t seem to be anything reachable … except if you go along the east side of the Quicksand Pit, it lookz like there are some Mushroomz you might just barely be able to reach.
Hep, hep, hep two three four … yep, march yourself on up there, and see what kind of damage you can do. Whoa!
That thing started ticking! Back off, bro’. Once the smoke clearz, what more can you see to do here? What’s the saying?
has
been satisfied! A lot accomplished, for such a small part of this puzzle! Always keep in mind what was said above above thingz you might find (or uncover); don’t exchange something you have for something else (until what you have is no longer useful to you). “Is there anything I can break?”
There doesn’t seem to be anything reachable … except if you go along the east side of the Quicksand Pit, it lookz like there are some Mushroomz you might just barely be able to reach.
Hep, hep, hep two three four … yep, march yourself on up there, and see what kind of damage you can do. Whoa!
That thing started ticking! Back off, bro’. Once the smoke clearz, what more can you see to do here? What’s the saying?“These Gauntletz are good for just about everything … except going to the bathroom!”
And/or for filling in Holez
or digging up Moundz  .
.It lookz like you need to find another Tool, if you’re going to make any more progress in this puzzle. Do you see anything that lookz promising?
- You can’t go east; BPz block you in that direction.
- You can’t go west; you can’t breathe Quicksand.
- You can’t go north; those Holez look pretty deep.
- That leaves south; and you can’t swim!
(Tool #2), and hit the water!
 #1
#1 with a set of Springz
  on it.
But as you paddle your way down towardz that Tool, an enemy Grunt
 decidez he wantz to fight!
(How do these guyz always manage to get in the first punch?)
Even if you start out with full health, you’re going to go down first. Zap Cola
 !
!My Toob (don’t have a kingdom … or need for a horse) for some Zap Cola
!It might be a good idea to make for that six-pack (less one) on that little island.
Try to chug-a-lug a can
between your opponent’s punches, while getting in a swat or two every now and then of your own.Keep in mind that your enemy
is 1/4th of a new buddy. Save that Goo  !
!One down, one to go.
Turning an enemy Grunt
into Goo while he is in the water won’t preserve his Goo for the oven, so take care where he is when you deliver the final blow.If you are a “contender”, your health will be in the green; a “wannabe”, your health will be in the yellow; a “fall guy”, your health will be in the red.
(Try for “contender” … it will make the next few puzzle a lot easier.)
When you can, go get those Springz
(Tool #3).
 #1
#1 with your (new) name on it.
Then see what you can do about that other enemy Grunt that tried to divert you from the straight and narrow (well, safe, anyway) path while you were crossing the Quicksand Pit, and doing your “Crazy Legs Hirsch” imitation through the shooting Golf Ballz.
The way you choose to fight will depend on the state of your health when you choose to enter the fray.
with your (new) name on it.
Then see what you can do about that other enemy Grunt that tried to divert you from the straight and narrow (well, safe, anyway) path while you were crossing the Quicksand Pit, and doing your “Crazy Legs Hirsch” imitation through the shooting Golf Ballz.
The way you choose to fight will depend on the state of your health when you choose to enter the fray.
- Green: just stand next to him and bash away.
- Yellow: hit, and duck away whenever you can.
- Red: hit, and avoid being hit at (almost) all costs!
.“Must not have the right stuff.”
You have no idea what you need, with that Goo
smeared all over the CPS , but you know that it isn’t Springz .Maybe it requirez a GooberStraw
… no, it definitely requirez a GooberStraw, if for no other reason than to clean up the CPS so you can see what you really do need.Wow! Those BPz
are down that were blocking your way to the east!It’s decision time again.
Do you take the easy path to the east, and exchange your Springz for that Shovel you see lying on the ground just past the staircase?
Or do you see what’s behind curtain #2 … near where you got those Springz in the first place?
(Monty’s audience is shouting “Take the curtain! Take the curtain!”)
It’s a bit tricky, getting from the last Bridge Stone that is now solid
 , to the Landing Dock of the Arrowz maze, via the Toggling Bridge Stonez
  .
.When’s the last time you SAVEd your game?
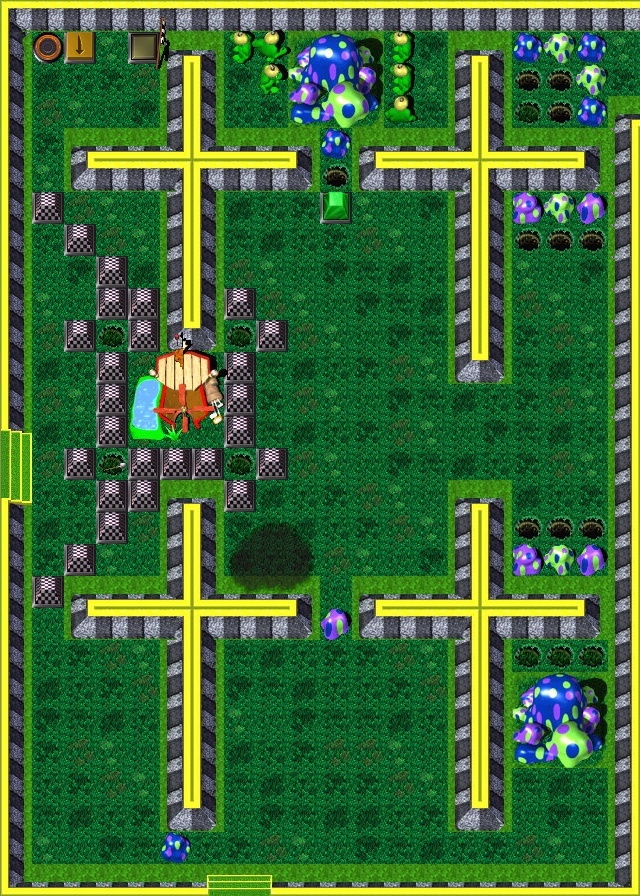
Where do you go from here? Maybe a picture would help?
You will need to make your way through those Arrowz to activate Yellow Toggle Switchez
 (YTS), and a BOTS , and pick up Zap Cola and Coinz (Coinz #3 and #4) along the way. If you find a Secret while you are at it, it will make thingz much easier for your later!
Those Springz will have to go, though … fortunately you won’t have any choice in the matter, as to when to get rid of them.
(YTS), and a BOTS , and pick up Zap Cola and Coinz (Coinz #3 and #4) along the way. If you find a Secret while you are at it, it will make thingz much easier for your later!
Those Springz will have to go, though … fortunately you won’t have any choice in the matter, as to when to get rid of them.What you do from there will depend on whether you find the Secret, or not.
(Let’s just assume you find the Secret, shall we?)
#1 (RW) openz under you and takez you a short distance away ... where you are immediately the target of a flying object!
Take out the enemy Gruntz
with a few(? ... twenty (each!) is few?) judicious punches, picking up the occasional Coin (Coinz #5, #6, #7, 8, #9 and #10), or Warp Letter  , or some refreshing Zap Cola as you make your way to the exit RW .
What’s this?!? You entered via a RW
, but there’s a Blue Wormhole  (BW) between you and the RW !
There’s a Hole
 blocking your way to the east, and you know there is nothing to do, nowhere to go to the south.
Forget the west … there is no exit in that direction at all! So the BW
it is, then.Perhaps this is a good time to SAVE?
Whee! That was a trip! And you landed right on that Yellow Hold Switch
 (YHS) you tried so hard to avoid earlier, when you found the Secret!
Watch what happens now … it is important to how easy (or hard) the rest of the puzzle will be.
(YHS) you tried so hard to avoid earlier, when you found the Secret!
Watch what happens now … it is important to how easy (or hard) the rest of the puzzle will be.That Rolling GolfBall
 (RGB) takes a different route now.
Once you step off that YHS
, there is no way to go back to it, so choose your timing well.- If you choose the right time to step off, the nearest Red Pyramid (RP) will be raised
 and the RGB will exit the puzzle, stage left (the 'Easy' way to finish);
 - step off when the nearest RP is lowered
 (and the RGB exitz the puzzle) and it will be impossible to finish the puzzle;
 - or step off and keep the RGB in the game, going back and forth across the Red Toggle Switch
 (RTS) and you will be playing "the hard way".
(Tool #4).
#1Once you step onto the (correct) Arrow, there is nothing you can do to alter your fate.
If your timing was correct, the RP is down
, and you won’t be squashed against it, but will be able to continue and break the Mushroom blocking your way out of the Arrowz area.There is no absolutely correct way of proceeding from here.
However, it should be obvious that you need to break the Giant Mushroom blocking access into three different areaz!
There is also no absolutely wrong way to proceed … except if you exchange your Gauntletz for another Tool before you have broken everything that you can reach, while you are still all alone in this puzzle.
Hint: you won’t be alone for much longer.
After you have broken everything you can reach with this set of Gauntletz, you should have acquired six Coinz
(Coinz #11, #12, #13, 14, #15 and #16) and uncovered a CPS  . Then it is time to go get the Shovel
  (Tool #5) you saw near the King’s Fortress.
 #1
#1The same instructions apply with this Tool as they did to the Gauntletz.
Do not exchange the Shovel for another Tool until you have filled in every empty Hole
you can reach, and dug up (almost) every Mound  , to find out what is in it.
There are some enemy Gruntz
on which you can use the hard end of your tool on, to convert them into (future) usable Goo Puddlez .You may safely pick up any Coinz
(Coinz #17 through #25) you find, or Zap Cola (if you need it), but don’t pick up any Toolz, or step on any Switchez!When you are in the Thundercloudz area, SAVE often. Do you know where to dig?
There are some Moundz
that you should not dig up!Remember, there is a RGB
at the south central part of the map that is caught between an Arrow  and a Two-Way Arrow
  that is currently facing in the reverse direction of the other Arrow.
Take note of the direction that the RGB
will travel when (if?) released.Your mission, should you decide to accept it
 is to cause that RGB to roll over a BOTS in the northeast corner of the Thundercloudz area.
(SAVE, then test what happens if you activate the BOTS yourself.) Hint: it is perfectly safe to fill in every Hole , and dig up the Mound again, to leave an ordinary Tile.
Now, start Shoveling!
is to cause that RGB to roll over a BOTS in the northeast corner of the Thundercloudz area.
(SAVE, then test what happens if you activate the BOTS yourself.) Hint: it is perfectly safe to fill in every Hole , and dig up the Mound again, to leave an ordinary Tile.
Now, start Shoveling!There are a couple of CPSz
with your name (er, Tool type) on it, so be sure to satisfy those as well.Are you sure that every Hole
you can reach is properly filled in (and the Moundz dug up again, in case there was something in the dirt you used to fill in the Hole)?If so, it is time to exchange that Shovel for something else.
Another Shovel? “I don’t think so, Tim.”
Better go get that GooberStraw
(Tool #6) you dug up somewhere.
 #1
#1There are a number of Goo Puddlez
 you can reach (Goo Puddlez 1 through 15) that you created while you carried all of those previous Toolz (and even a few while Bare-handed!), so you need to re-trace your stepz, and suck up each and every one of them.
By the way, this is the last Tool that the original Grunt should have, so be sure to give any other Toolz you come across to newly-baked
Gruntz.When you are not in a dangerous situation, bake three new Gruntz, and get them to work!
#2 area, you will have to first satisfy a CPS .
Fortunately (for you), the switch does not have any special Tool requirement on it, so you’ll do.
Go get the Gauntletz
(Tool #7) north of the Quicksand Pit where your buddy entered.
#2 right in front of you … so break it!
Ooopz! Red Brickz
break Gauntletz !Pick up the Gauntletz
(Tool #8) next to the Foundation Tile  .
.Keep going in that direction, breaking two more Brickz
 , pocketing a Coin , and satisfying another CPS until you reach an area you cannot pass.
Step out of the way, and wait for assistance.
#3 (Tool #9) just south of the King’s Fortress, where your buddy defeated all of those enemy Gruntz
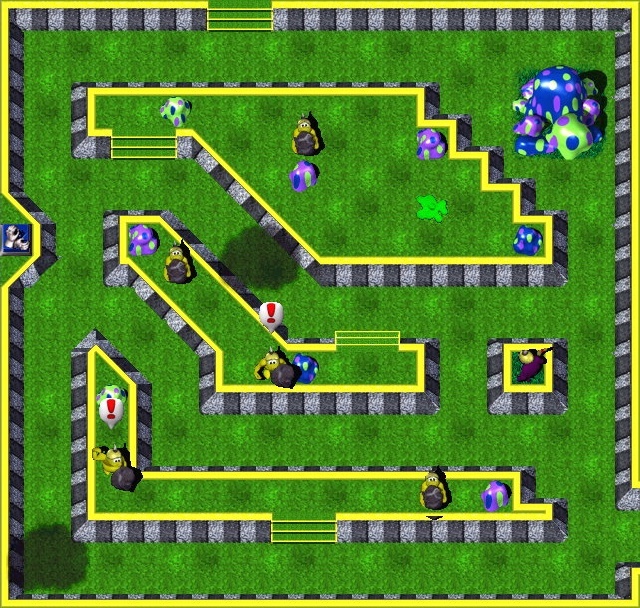
 .
.
 #3 is flinging that stick at you! Well … fling back!
Hit and Run tactics would be wise to use here.
Then go back up to the far north, where six enemy Gruntz
 are milling around in a small area that used to contain a Giant Mushroom.
       
|
which probably has been changed to look like this | 
|
into six puddlez of Goo  .
.Then go back down to the south and east, to where there is a pesky enemy Grunt
.If Grunt #1 did his job properly, one of the enemy Gruntz
is now a Goo puddle on his plateau … a victim of ‘friendly fire’ from another enemy Grunt … himself whacked too many timez on the head with a Shovel.So turn the other enemy Grunt
nearest the CPS into a Goo puddle !Then go down and take care of the enemy Grunt
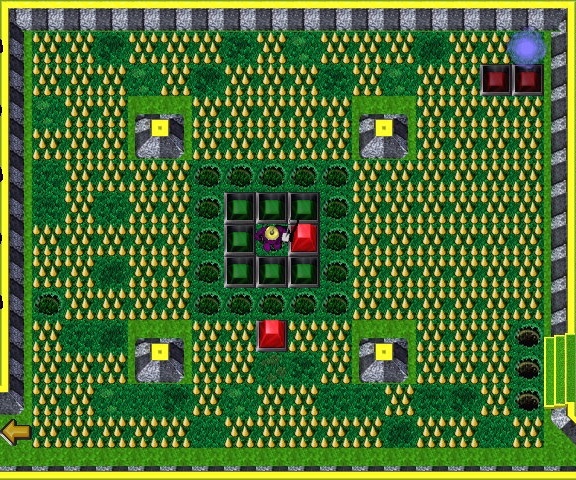 standing in the middle of a ring of Green Pyramidz
  (GP).
(GP).That’s about all you can do right now, so go stand just above the Yellow Toggle Switch
(YTS) just southeast of the colored ring near the Thundercloudz area … but don’t touch that Switch … yet!
#4 (Tool #10) just south of a CPS . Go get it!
#4 #27 through #32).
If Grunt #1 did everything correctly, those RPz
are all lowered .If his work was shoddy, thingz are considerably more difficult for you, as you must time not only the Shooting Golfballz, but the RP going “up
, no down , no up !”What? You got hit by a bolt of lightning!?! Oh yeah, I guess I should have warned you about that … the Shooting Golfballz (and maybe the RPz) are not the only hazard you face in that maze. When you make it back out of the maze, go up and help Gauntletz
#2 out, in the area north of the Quicksand Pit.He needz a few Holez
filled in, so he can reach the next breakable object. Teamwork!
#5 (Tool #11) at the northwest corner of the southern Quicksand Pit.
They have your name on them.
(Tool #11) at the northwest corner of the southern Quicksand Pit.
They have your name on them.
 #5
#5It’s a good thing there is another set of Wingz
(Tool #12) there.Put them on, and continue your journey. Boy, what shoddy workmanship … they just fell off.
Put on another set of Wingz
(Tool #13), and go get the Coin (Coin #40), and activate all of the BTSez you can reach.Satisfy the CPS
 with your Tool on it, and find a safe place to wait for your buddies.
#6
with your Tool on it, and find a safe place to wait for your buddies.
#6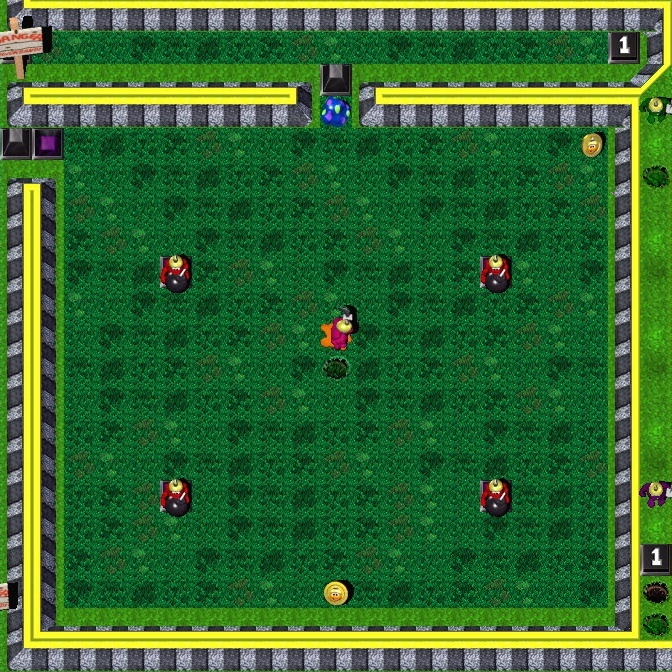 .
.GooberStraw
#1 needz to fill the Goo Well a time or two before you may leave.Almost due south of where he entered the puzzle there is a set of Springz
(Tool #14).
#6 (BW).To reach it, you cannot avoid jumping on Spikez
 ... and lose the tool.
#6
... and lose the tool.
#6 (STS) ... and better start moving!
Rushing from designated place
, via lowered Silver Pyramidz  (SP), to place , you collect four Coinz (Coinz #33, #34, #35 and #36), and pick up a Sword
  (Tool #15).
 #6
#6 .
.(much) Later, someone locatez another STS
, which providez you with a path through lowered SPz to a GHS  , where you spend the rest of the game.
#2 (discovering that one of them was not what it appeared to be , but instead a Red Brick , breaking your Gauntletz).
, where you spend the rest of the game.
#2 (discovering that one of them was not what it appeared to be , but instead a Red Brick , breaking your Gauntletz).Fortunately, your buddy dug up another set of Gauntletz
(Tool #18) for you, and you can break the Mushroom  , and grab any prizez you may find.
You then carefully make your way around the Quicksand Pit to find something else to break … like those Mushroomz to the east and southeast of the King’s Fortress.
When everything has been broken that you can reach, go and join your Boomerang #3 Grunt buddy.
#4 blocking your Gauntletz buddy’s path to the Mushroom in the northwest corner of the map.
, and grab any prizez you may find.
You then carefully make your way around the Quicksand Pit to find something else to break … like those Mushroomz to the east and southeast of the King’s Fortress.
When everything has been broken that you can reach, go and join your Boomerang #3 Grunt buddy.
#4 blocking your Gauntletz buddy’s path to the Mushroom in the northwest corner of the map.When you are finished there, there are some Holez
just to the east of the King’s Fortress that look untidy. Clean them up!Start filling in those Holez
, and (if necessary) dig up the Moundz until they look like ordinary Tilez … or something that your Shovel won’t work on anymore.You’ll find a STS
there. Press it, if you’d like to see what it does.Then go and join your buddiez, Boomerang
#3 and Gauntletz #2, until more help arrives.
#1 #3, Gauntletz #2 and Shovel #4 Gruntz, but make sure you are not in the path of that RGB once it getz turned loose!Any of these Gruntz may step on the YTS
, releasing the RGB  .
.You should be the last one through that narrow opening (currently blocked by a BP
), but there is room to maneuver, should the four of you be out of order.(Actually, only Boomerang
#3, Gauntletz and Shovel #4 need to go in that way. Two of them may replace the two northern enemy Gruntz  on the Purple Multi-Grunt Switchez
  (PMGS), while Shovel #4 digz up the last piece of this particular sub-puzzle.)
Boomerang
#3 should be first, so he can dispatch a few enemy Gruntz 
 .
.Then he activatez
 the BOTS , lowering the BP into the area to the south ... and re-raising the BP everyone entered through!
Gauntletz
second, to break the Mushroom  blocking the way to the south.
Shovel
#4 third, to dig up what is in the Mound an enemy Grunt is pacing around … he won’t be there, courtesy of your Boomerang #3 buddy.Your job is to clean up the mess

 !
#2 have a short fuse.
!
#2 have a short fuse.If one of them lightz his fuse, step lively, then! Whew! That was close!
Better if you enter carefully, and let your buddy
do his long range 'thing'.You might as well pick up the loose change
(Coin #37) you see in the corner, then take the place of the guy with the short fuse on a PMGS .
#3 in the next area to the east. Then step on the BOTS to clear the way south.The two northern enemy Gruntz
on the PMGSez only require one fling to remove them (and you may be able hit the other enemy Grunt with the same fling!).Then finish off the enemy Grunt
doing the pacing.Then go stand on either vacant PMGS
.(You and Gauntletz will be relieved later, but this is a good place for the two of you right now.)
#4 that the enemy Grunt was marching around.A Coin
(Coin #38)! And a BOTS , as well!Take a stroll down south to get the other Coin
(Coin #39).Look! The way is clear to get out of this place.
With a little bit of fancy footwork, you may arrive at the exit, only to find it blocked, once again … by a Purple Pyramid
(PP). Don’t fret … your buddiez Gauntletz and Boomerang #3 will take care of that little problem.
You have just been promoted to team leader … for a team of two … you and GooberStraw #1. Lead the way, leader!Set GooberStraw
#1 ‘at ease’ at the Landing Dock  into the Quicksand Pit, and you go take care of the Moundz in the area where an enemy Grunt was on guard. Pick up the Warp Letter
  or Zap Cola
  (if you need it), but leave any Toolz you find right where you found them.
Then across the Quicksand Pit, into the area where your Boomerang
#3 Grunt buddy disposed of three enemy Gruntz 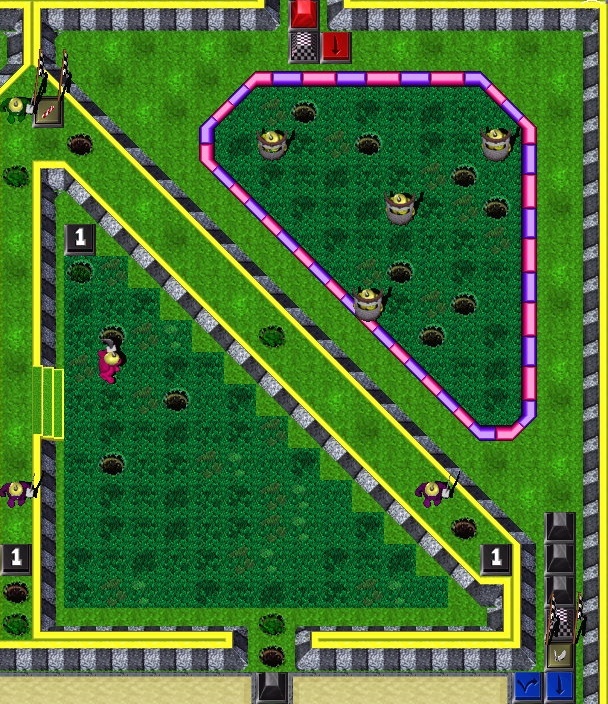 .
.You fill in any Holez
and dig up any Moundz you may find, and set GooberStraw #1 to making good use of that candy-striped tube, so there’s material for more Gruntz.
You, Gauntletz and GooberStraw #1 may have to gang up on an enemy Shield Grunt, in order to completely clear the way to the Red/Green Pyramidz maze … but that shouldn’t be too tough for Gruntz of your (collective) experience!
#1 left behind from Boomerang’s handiwork, and one by the unfortunate who ran afoul of the enemy Grunt .Whenever you have enough Goo to bake a new Grunt, do it!
You will need one Bare-handed
Grunt #6 to relieve Boomerang, and then Gauntletz;one Bare-handed
Grunt #7 to help with the Red/Green Pyramid maze,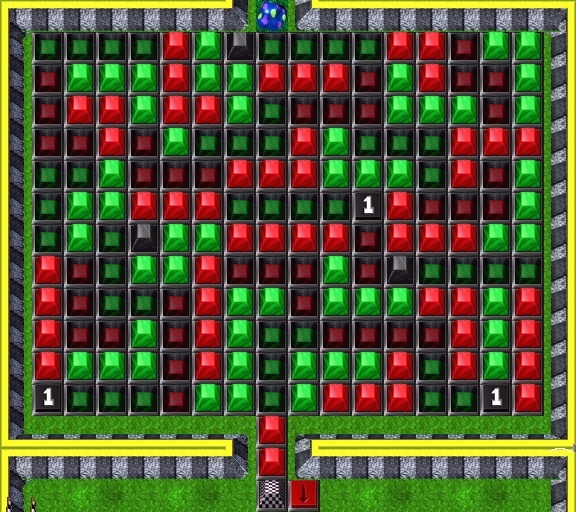
and one Bare-handed
Grunt #8 to eventually put on the Springz.One Grunt will ultimately carry the Warpstone … you should have several to choose from. It wouldn’t hurt to have a Bare-handed
Grunt #9 to act as a ‘gofer’ (or to get the Springz), saving the Gooey legz of the other Gruntz. So always keep an eye out for any Goo you can put into the well.
Follow your leader (Shovel #4) into the next theater of action.
#5 #4 and GooberStraw #1 buddies!
If there isn’t a storm front approaching, go stand on that Blue Hold Switch, to give them a faster, straighter path across the Quicksand Pit. When both of them are safe, you may return to that safe place you found for yourself … no one is expendable in this puzzle. We need every Grunt we can bake, to make it possible to get the Warpstone to the King!
Whenever another one of your buddies needz to cross the Quicksand Pit (in either direction), go stand on that Switch. At all other timez, stand in your safety zone.
#3 #4 and GooberStraw #1 are puzzling out how to get by the guy with the ‘butter knife’.
Come on, be a pal, and make it easy on them! When Sword has been turned into Goo, and Shovel #4 and GooberStraw #1 have properly used their Toolz to ‘police the area’, go up the stairs and find a spot where you can wreak havoc on three of the four enemy Shield Gruntz in the next area to the east. Then you can either go into that area and finish the last Shield Grunt, or just return to the vicinity of the King’s Fortress.
#7to make RPz that are down
go up , and RPz that are up to go down .After Gauntletz
#2 and Shovel #4 have done their jobs, you will be given the task of learning the Bricklaying trade. (If RPz are going up and down without your assistance, Shovel #4 will probably get re-trained instead.)
#8.Guess what you get to do after making it to that Switch?
That’s right … just stand there, posing for posterity, like a statue.
Your job is (well) done!
#2 at the far exit/entrance of the Red/Green Pyramid maze;it is your job to break it!
In order to do that, you must make your way through the maze, finding safe placez
 to stand, whenever Pyramidz are up (blocking your path)
until they go down
(again), and you can move further along in the maze.While this can be done with a RGB
toggling those RPz , it will be much easier if Grunt #1 solvez the Arrowz maze correctly, and removez that RGB  from the picture.
Then a friendly Bare-handed
(#7?) can control the RPz by stepping on and off the Red Hold Switch  (RHS), so all you have to worry about are the GPz .
Once you have broken that Mushroom
, just stand there and wait.
Going back through that maze could be hazardous to your health … besides, you will be needed north and west of here. So save your gooey feet(?) and wait for assistance in clearing the way to the north. #4 blocking the way into the area where all of those RGBz 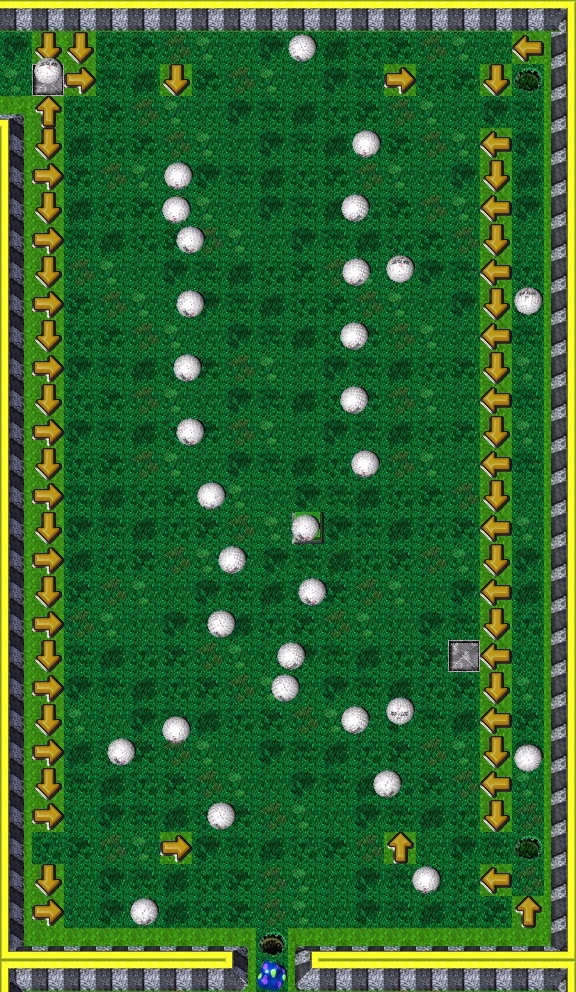 are crisscrossing every space! Then dig up the Mound and pocket the Coin (Coin #47).
Well, not every space ... there are a few places where you can see aren’t in the path of dangerous objectz. How can you make use of those ‘safe’ spots?
You can see some Moundz
along the right edge of the map … could they contain anything of value? Better find out!“Hey, Charlie! Duck your head! Oooops. A little bit late on that one Charlie. Oooh, I bet that smartz.” Eyes in the back of your head would help here.
You need to find a safe place to stand, so that you have enough time to dig up whatever is in that Mound
. Dig, then retreat to safety.What you do next depends on how successful Grunt #1 was in solving the Arrowz maze.
The intended solution is for the RPz
to be in a steady state … until a Grunt stepz on a RHS . In that case, swap placez with the Grunt controlling the RHS at the other entrance/exit to the Red/Green Pyramid maze (who should be Bare-handed #7).Bare-handed
#7 will pick up the Bricklaying Toolz  (Tool #16), and find a couple good placez to ply his new trade.
The more difficult solution requirez that you re-train as a Bricklayer.
#1 #3 turned some enemy Gruntz  into Goo puddlez .
Once you suck those up, your job is done in this area with that ‘crazy straw’.
There are six Goo Puddlez
waiting for your big mouth near the King’s Fortress, so you might just as well amble on up there, to be handy, when the way is clear to the Goo. (#7, or #4), so get to it!
You’ll have to find a time and place
when you can do so safely, and there are dozenz of hazardz to avoid, or the next sound you hear could be your own Goo being scattered around so much as to be not recyclable! There really is no need to build more than one Brick 
 on any foundation, so take a little walk while you recover your strength for the next task.
When it is safe to do so, make your way along the right edge of the map to the very northeast corner, then across the top to where you can see another brick-laying foundation Tile
… under another RGB ! Just one more Brick , and you can rest.“Oh, my back!” Step aside, and wait for your buddy, Gauntletz
#2.
#2When you are done with that, you may return to the region of the Green Toggle Switch, and make sure it is in the state where the Green Pyramidz nearest you (northern exit/entrance) are down. If you’d like, you can take out any frustrationz you may have on that Brick on the eastern side of the large open area.
Then make your way through the maze (easy now, eh!?!) and across the Quicksand Pit and back to the vicinity of the King’s Fortress.
(#7, or #4)
#2 toward the west.He will uncover a Shovel
(Tool #17). It’s yours, so pick it up, and make yourself useful!
(#7, or #4), and (if necessary) dig up the Moundz until they look like ordinary Tilez … or something that your Shovel won’t work on anymore.Your effort will bring the small reward of two Coinz
(Coin #49 and #50).You will also find a STS
there. Press it, if you’d like to see what it does.Then wait for your chance to press it when it really countz!
Once you have made that action count, it is time to hoof on over to the vicinity of the King’s Fortress, in order to help out with the PMGSez
. #4 (or #7) and dig up the Mound near the lowered Green Pyramidz.Explosive, dude! There goes the Giant Mushroom, blown into smithereenz.
But it revealed another Hole near the top edge of the map, so your work isn’t done yet.
You need help to get past those PPz
. “Could someone please get those PMGSez for me?”
surrounding the King’s Fortress.Neither Shovel
#4 nor GooberStraw #1 should be one of the four … they are needed on the other side of the PPz that will be lowered when those four PMGSez are occupied.Oh, by the way. The two PMGSez
on the east side of the King’s Fortress are not exactly safe placez to stand.The area is well known for violent Lightning and Thunder stormz … electrifying!
If that Thundercloud is heading your way, find another place to cool your heelz!
You can always return to your Switchez when the storm passez.
#1 #4 (or #7) into the area beyond the PPz , and suck up the Goo from the six disgruntled onez , so you can bake some more Gruntz. (Or you can save a lot of time by just picking up the Warpstone Piece  when it is revealed by the turning of Shovel’s Tool, and finish the job yourself. After all, you started this whole quest!)

 (now) in plain view at the Northwest edge of the map with a picture of a Warpstone on it.
It appearz that you are going to be lugging that big piece of Rock a wayz. All the way there, and all the way back.
It was necessary, because that CPS was what lowered
(now) in plain view at the Northwest edge of the map with a picture of a Warpstone on it.
It appearz that you are going to be lugging that big piece of Rock a wayz. All the way there, and all the way back.
It was necessary, because that CPS was what lowered  the CheckPoint Pyramidz
  (CPP) surrounding the King’s Fortress. Now you should probably just waltz right into the King’z Fortress.