| Grunt |
What to do, what to do? |
 Gauntletz #1 Gauntletz #1 |
Go find something you can break, and break it!
Is there anything else around that you can (now) break?
Break it ... until nothing remainz in the area to be broken.
You may (painfully) pick up a Coin  (Coin #1). (Coin #1).
Do you need anything you found under what you broke?
Is there another Tool lying around anywhere? Pick it up!
|
 Springz #1 Springz #1 |
Now that you can jump over single instancez of Holez  , Spikez , Spikez  and the like, where can you go? What can you see of interest? and the like, where can you go? What can you see of interest?
Away off to the northwest, there is a Black One-Time Switch  (BOTS) � which lowerz (BOTS) � which lowerz  some Black Pyramidz some Black Pyramidz  (BP) that are far out of sight, and just beyond it, a Coin (Coin #2). (BP) that are far out of sight, and just beyond it, a Coin (Coin #2).
That seems to be a good place to start.
And to the far northeast in that same area there is another Coin (Coin #3). Go get 'em!
Of course, then you have come back. Back to where, though?
Not where you picked up those Springz  , certainly, since you know there is nowhere you can go with the King's Fortress barring the way to the south, and you without a Warpstone , certainly, since you know there is nowhere you can go with the King's Fortress barring the way to the south, and you without a Warpstone  ! !
Back to the western edge, then south holdz the most promise for you. Wait a second!
There is a set of Gauntletz down there, but no way to get there, without losing the Springz!
So? Lose the Springz , and pick up the Gauntletz  , and get off those Spikez as soon as possible. , and get off those Spikez as soon as possible.
|
| Gauntletz #1 |
Some refreshing Zap Cola  will restore health lost by walking on those Spikez . will restore health lost by walking on those Spikez .
Then there are those three Rockz    barring your way further south ... so break them! barring your way further south ... so break them!
Get the Coin (Coin #4) that is uncovered. Hey! Someone'z shooting at you! Better duck!
Check out the path you need to follow through those Green Pyramidz   (GP) going "up , no down , no up ". (GP) going "up , no down , no up ".
There are a few "safe" spotz, as long as you don't get hit by flying missilez.
Unless you are rather unlucky, that belligerent enemy grunt  will get squished by a GP rising up on him while he is trying to attack you. will get squished by a GP rising up on him while he is trying to attack you.
So just look for the placez to go within the maze, and once there, where you need to go next.
Once out of the maze, you should leave that can of Zap Cola alone, unless your skillz at ducking leave something to be desired. You may need it later.
Look around now, and see if there is anything you can reach to break. Then go break it.
Anything worthwhile under it?
Easy version: a BOTS with a Coin (Coin #23) on it.
Normal version: a Question Mark Switch  ... wonder what that doez? In either version of the puzzle, stepping on that Switch will provide you with a way to get at those Coinz (Coinz #5 thru 9) surrounded by Construction Pyramidz ... wonder what that doez? In either version of the puzzle, stepping on that Switch will provide you with a way to get at those Coinz (Coinz #5 thru 9) surrounded by Construction Pyramidz  that spell out the rest of "GooRoo" (you are standing inside the "G"). After you get the Coinz , where do you go next? that spell out the rest of "GooRoo" (you are standing inside the "G"). After you get the Coinz , where do you go next?
The Tar Pool seemz to be necessary to cross ... but not right now.
First go to the far southwest corner, and step on that BOTS .
Then (carefully) make your way northeast to the Gauntletz CheckPoint Switch  (CPS) near the BeachBall (CPS) near the BeachBall  (2 minutez and 30 secondz solving (2 minutez and 30 secondz solving  time is added here). time is added here).
When the CheckPoint Pyramidz  (CPP) go down (CPP) go down  , get the BeachBall . , get the BeachBall .
Walk through the Construction Pyramidz to just south of the Purple Multi-Grunt Switch  (PMGS). (PMGS).
When the enemy grunt  startz chasing you, retreat to the space immediately left of the PMGS , and when he stepz on the PMGS , hand him the BeachBall . startz chasing you, retreat to the space immediately left of the PMGS , and when he stepz on the PMGS , hand him the BeachBall .
Then go get the Coin (Coin #10), and step on the BOTS .
Now go down to the Tar Pit!
Easy version: the Crumbling Bridge Tilez  may be used over and over again, so you can wait on the (not so) Crumbling Bridge Tile just before each of the Toggling Bridge Tilez may be used over and over again, so you can wait on the (not so) Crumbling Bridge Tile just before each of the Toggling Bridge Tilez   (TBT) until you can cross to the next safe Tile. (TBT) until you can cross to the next safe Tile.
Normal version: the Bridge Tilez you can see all the time are "safe" only for a limited amount of time, so a SAVE would be wise here.
You need to time your arrival at the Crumbling Bridge Tile immediately before each TBT so that the TBT is just coming back up, and you can step on it and to the next Crumbling Bridge Tile (or the Landing Dock  ) safely. ) safely.
SAVE at each stable Bridge Tile  and the BOTS , unless you don't mind redoing sectionz over (and over, and over) again. and the BOTS , unless you don't mind redoing sectionz over (and over, and over) again.
Go stand on the Gauntletz Checkpoint Switch (you earn 2 minutez and 30 secondz more solving time ) and free your Springz grunt buddy.
Move to the Blue Warp  (BW), but do not enter it until Springz has passed the Purple Pyramid (BW), but do not enter it until Springz has passed the Purple Pyramid  (PP) (held down (PP) (held down  by the enemy grunt on the PMGS ). by the enemy grunt on the PMGS ).
|
| Springz #3 |
Now that you are free to move from your Pyramidz prison, make your way to each of the two Blue Toggle Switchez  (BTS) and then to the Blue Hold Switch (BTS) and then to the Blue Hold Switch  (BHS) you see north of you. Your job is done once you arrive at the BHS . (BHS) you see north of you. Your job is done once you arrive at the BHS .
|
| Gauntletz #1 |
Step into the BW , and be on your
toez! You will be teleported near the enemy grunt ... close enough that he will attack you again.
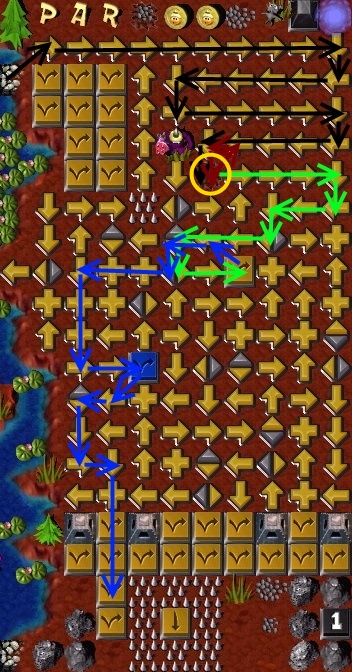
| Step on the westward-facing Arrow as fast as you can! |


|
If you are quick enough, the enemy grunt won't detect you before you make it out of his detection range.
In Easy version that will be more important than in Normal version.
If the enemy grunt attackz (followz) you, step diagonally to the southwest (lowered) CPP , and when the enemy grunt enterz the center of the Arrowz, step onto the nearest Arrow ( or ) ... and squish him!
Proceed to the southern end of the GPz maze (where you came out), and go back through to the safe Tile  due north of your exit point from the GPz maze. due north of your exit point from the GPz maze.
Time to cross the water (representing The Sea of Galilee) to get to the eastern shore.
You need to find your way through the Arrowz maze to the Rockz you can see to the southwest.
Do I need to draw you a picture?
To paraphrase Dr. McCoy of Star Trek "I'm a logician, (insert your name here), not an artist".
This lookz a lot more difficult than it really is ... on your way from the northwest entrance to the southwest exit don't touch anything you aren't positive needz touching!
Oh, by the way, it would help if you would bludgeon that enemy grunt  into Goo into Goo  on your way through the maze. on your way through the maze.
Through the maze? Start breaking Rockz ! (Keep on your toez, though  ). ).
Whatever is revealed, the rule is:
- if it's a Coin (Coin #11), take it;
- if it's a Tool, only take it if you need it ... otherwise let another Grunt have it;
- if it's a Toy (or a Scroll), take it if you don't already have one".
Easy version: step on the BOTS and free your Bare-handed  buddy. buddy.
Normal version: step on the Question Mark Switch and be prepared to move (someone) quickly! In either version, the "someone" to move is the Bare-handed Grunt ... to the BTS , and thence to the Shovel  . .
Finally, there is a BOTS far to the east, surrounded by five Rockz � one of them containz a Coin (Coin #12); break it and step on the BOTS .
|
| Bare-handed #2 |
Pick up the Shovel after stepping on the BTS just outside your prison.
|
 Shovel #2 Shovel #2 |
Before the Labyrinth
Easy version: go to the BW .
Normal version: your Gauntletz grunt buddy goez to stand on the Yellow Hold Switch  (YHS) (surrounded by Spikez !) ... and thingz begin to pop! (YHS) (surrounded by Spikez !) ... and thingz begin to pop!
Your next destination is to pick up that Jack-In-The-Box  , and immediately give it to the enemy grunt , and immediately give it to the enemy grunt  . .
While he is turning the handle, get the Scroll  nearby, and read the Spell. nearby, and read the Spell.
While the enemy grunt is helpless ... whack him!
Then go stand on the Green Hold Switch  (GHS). (GHS).
|
| Shovel #2 |
Within the Labyrinth
When your Gauntletz grunt buddy unfreezez, send him through the maze to the nearest BOTS , drinking some refreshing Zap Cola  on the way to restore his health. on the way to restore his health.
Then return him back to take your place on the GHS while you (Shovel) go through the Construction Pyramidz maze with BPz and GPz barring your way from time-to-time. Sometimez, someone else  (wandering around in a random manner) stepz on a BOTS for you, but usually you will have to do the work yourself. (wandering around in a random manner) stepz on a BOTS for you, but usually you will have to do the work yourself.
You can't trust that someone, though, so dispose of him as you are passing by.
Dig up a Mound along the way and pocket aCoin (Coin #14)
Satisfy your CPS  and earn another 4 minutez and 30 secondz of solving time . and earn another 4 minutez and 30 secondz of solving time .
Now that the BP blocking the exit from the maze is down, it's a walk in the park ... not!
You won't even make it out of the maze before you are attacked.
Not very bright, is he  ... attacking you with his bare handz, while you are carrying that big ol' Shovel !?! (Retreat back over the (lowered) GP to rid yourself of him.) ... attacking you with his bare handz, while you are carrying that big ol' Shovel !?! (Retreat back over the (lowered) GP to rid yourself of him.)
|
| Shovel #2 |
West of the Labyrinth
Proceeding back north, you are once again attacked by an enemy grunt similarly unarmed � nevertheless, if you can get away from him until your stamina is restored so you can whack again (and again) ... do it! Where do these guyz keep coming from, anyway?
Ah, hiding in the Treez, you see. Once again, use "Hit and Run" tacticz in battling your enemy. (Returning to the Tree south of you will take you far enough away so that he doesn't chase you anymore.) When you recover your stamina, attack him again.
Repeat until well mixed ... er, all four enemies have been eliminated.
Then go dig up that Mound  you see to the north. you see to the north.
Get a Coin (Coin #15), and step on Switchez until there is nothing else to do here.
Sure could use some refreshing Zap Cola !
Those guyz pummeled me within an inch of my life!
Wasn't there a Bottle of Zap Cola just outside the maze? Sure was ... go get it!
|
| Shovel #2 |
West of the Jordan River
Then cross over the Bridge   to dig up the Mound you see on the western shore of the river (the Jordan River). to dig up the Mound you see on the western shore of the river (the Jordan River).
Easy version: Pick up the Coin (Coin #16) by standing on the BOTS , which lowerz the BP so you can go back to the "GooRoo" area, and use that Shovel on the two Holez and a Mound you saw in the lower part of the "R".
(You will be able to return to the river, and go north past the PP , if the enemy grunt  your buddy gave the BeachBall to is still standing on the PMGS . your buddy gave the BeachBall to is still standing on the PMGS .
If not, you have to go the long way ... through the Spikez /Holez maze, across the Bridge to the Arrowz maze, and back to cross the river near where you were originally imprisoned.)
Normal version: Pick up the Coin (Coin #16) on the Question Mark Switch and be prepared to move quickly.
Follow the temporary Arrowz to the two Holez and a Mound within the outline of the "R", and use that Shovel!
You acquire a Coin (Coin #17).
You have to get back to the Shovel CPS  by going the long way around ... through the Spikez /Holez maze, across the Bridge, through the Arrowz maze � where you should be able to dig up a Coin (Coin #18), and then to your CPS . by going the long way around ... through the Spikez /Holez maze, across the Bridge, through the Arrowz maze � where you should be able to dig up a Coin (Coin #18), and then to your CPS .
|
| Shovel #2 |
Near the King's Fortress
About that area where the enemy SpongeGunz Grunt was when Gauntletz started through the maze the first time ... there was a Mound near where he was standing. Check it out!
Then get to your CPS . When Warpstone Grunt joinz you, and the CPP are lowered , dig up the Mound in the Rolling Rock's  path, and watch it go kerplunk! path, and watch it go kerplunk!
Fill in the Hole , and get the Coin (Coin #19).
Easy version: go through the BW (BW), and dig up Moundz and get Coinz (Coin #18 through #21), Toyz, whatever. To return, step onto the Arrowz to take you to the Mound in the center of the Arrowz maze. Dig it up, and get the Coin (Coin #18 or #22). You're done!
Normal version: move a Grunt to the far western space just south of the King'z Fortress ... where something wonderful happenz.
|
| Gauntletz #1 |
Break the Rockz to the south of the King's
Fortress, and get whatever you find in them.
|
 Warpstone #1 Warpstone #1 |
Easy version: move to the Warpstone Checkpoint Switch  (you can probably make it across the Red Pyramidz). (you can probably make it across the Red Pyramidz).
Normal version: move first to the Island where your buddy, the Springz grunt ,
is standing, then to the Warpstone Checkpoint Switch .
|