
 .
.
 #2 and SpongeGun
  #3:
#3:SpongeGun
#3 stepz on the Question Mark Switch  (QMS)
(QMS)This allowz him to shoot the enemy Grunt
 off the Yellow Toggle Switch
  (YTS) he is standing on, onto one of the Arrowz
  , so that he returnz and togglez the YTS .
This will trap the RO
 between an Arrow and a Two-Way Arrow
  facing in the opposite direction.
(Later on, a Grunt will be able to collect the six Coinz
 the RO has been passing over.)
Oh! Remember that Toy you have been lugging around for a while? Give it to your buddy ... the one who "needs this".
Now it is time to choose a BW
 , and go through it.
If you have chosen the correct BW
, you will be able to reach this place (where the Green dot is).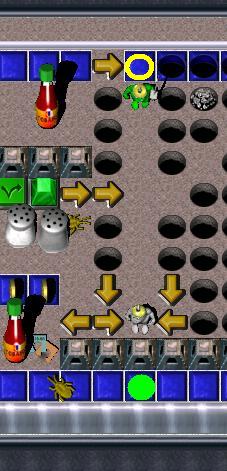
Use your pink gun to shoot the enemy Grunt
 toward the other enemy Grunt
  .
.(They are not on the same team, and the enemy Grunt
will give a Toy  to the other enemy Grunt .)
If the Toy breakz before the enemy Grunt
fallz into a Hole  , restore your last SAVEd game and try again.
Then move on to stand on the three GHSez
 , to squish the ROz against the GPz
  .
.(Your buddy will thank you for that!)
When Shovel
#2 finishez the job of filling in Holez , etc., you may go through your BW .
 Grunt #1 ... Shovel Grunt #2 and SpongeGun #3