“STARGATE – OMG, WE GOT KP”
Walkthrough by Oldone
1.
Our team begins empty-handed in a dirty gully. There seems to be no where to go but if we search, we’ll find some BOTs and the way into the gate. We gate into an area where Graniel lands on springz and the rest of us are trapped on a platform with a griddle in the middle. Thingz seem very out of proportion here. Almost as if we’d been shrunk. Looking carefully we can see Talc’s gun, Col. Graniell’s gauntletz, and Capt. Crater’s shovel. So let’s get them and move on.
One bare-hand stands on the BHS while the Colonel gets the gauntletz and coinz. After a little work, we find a welder’s kit that Talc believes will come in handy to get rid of that gun hat that’s been plaguing him. As soon as he’s done that, he goes for the spongegun and sends another enemy to a purple switch that’s just begging for someone to stand on it. Now Capt. Crater can get the shovel and take care of all the holez and moundz. Capt. Crater/shovel goes through the electrical outletz and fills the hole, refreshes himself, and then notices more work to be done in this area. Perhaps Graniel and his springz can help. Graniel then goes back through the spikez, picks up the coinz and then spyz a new tool that’s been dug up.
Capt. Crater/shovel goes through a nearby wormhole followed by Talc/gun. The Captain seems nervous: “This is kinda small. I hope there’s enough room for the Colonel and Graniel.” Talc replies, “I am certain that the creator has allowed for all contingencies. There is no need to worry.” Immediately he notices an enemy trying to enter the space and sends him off to the arrows. The Colonel and Graniel join them and together begin to enlarge the space until they can all move about more freely.
Capt. Crater takes a rest on the stairz while the rest of the team wanders up near the sink. The Colonel/gauntletz goes back and joins the Captain and Talc does a little target practice on the nearby enemy.
Graniel can’t resist inspecting what appears to be an alien toy box. He notices that the team has to go all the way around this area in order to approach the return wormhole, but picks up a coins and a new tool on this way out of these red pyramidz. Now he’ll be able to reach the opposite side of the sink. Oh goody – more exploring. The Colonel and Captain finish policing the area, while watching for the strange objectz falling from the sky that Graniel had warned them about. Then everyone takes a ride to the wormhole.
2.
Back at the gate, the Colonel/gauntletz takes a little time to clean up the area, and manages to find his way around the edge of this gully. Good thing he found a bottle of cola.
Going through the gate, it seems we should have come through in some special order but I guess we’re OK as long as we stay put until everyone is here. We have enough room to switch around. What is it with these tight little spaces. Once the checkpoint pyramidz are down, the Colone/gauntletz takes pint and checks the area ahead. There’s work to do here but Takc should wait until they get the red pyramidz moving properly and come through that way. After Col. Graniellbreaks rockz, he steps over the bottom arrow to fight the enemy and save his goo. He messages back for Graniel/toobz and Capt. Crater to come through the silver pyramidz. Graniel looks around the area and senses that Capt. Crater is going to need that alien toy that he found, so he gives it to him and then heads over to the switch in the water. Capt. Crater/shovel gets the coins in the water, which also takes him for a little ride.
Once the Captain has released the ball and lowered the orange pyramid, Talc can come through, picking up the coin on the way. The Captain then gives the toy to the enemy he encounters. Don’t fight him! Just follow him closely until he runs into a hole. Meanwhile, Graniel/toobz gets the straw and sucks up the goo to create a helper to stand on a purple switch. They all go through the warp.
The Colonel again takes point with Capt. Crater close behind. Talc follows and Graniel picks up the wings. The two of them encourage the enemiez to meet and fight it out. Shoot one to the arroz (more if you like and are able) and when they’re done, the Colonel and Captain go into the area to clean up (although I think this area is messier than when we started. No, we don’t need the goo!) The Colonel loves the side trip! Now we ride the arrowz and head back to the gate.
3.
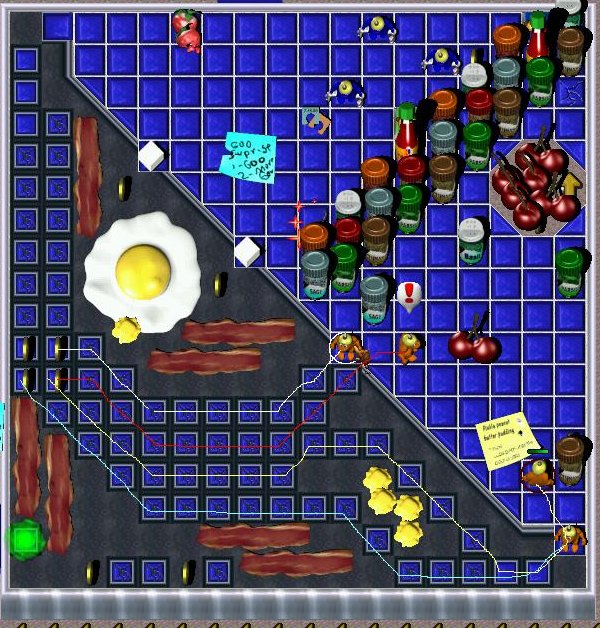
After gating to the next area, Graniel and Capt. Crater have a small dialogue: “Graniel, with all due respect to your love of gadgetz, you cannot make it through that crumble bridge area with those wingz. I know how much you love them, but you have to trust me on this. You need the springz.” Drat! Graniel forgoes the wingz and picks up the springz. He goes down, picking up the 5 coinz and leaving the last crumble tile, jumps to the blue tilez above the enemy spongegun. While dodging ballz, he helps his buddiez get through the green pyramidz, then heads back to the last bridge tile and onto the arrowz. Now he can pick up his precious wingz, and fly to the landing at the end of the pool. (Be careful not to fly over any holez or spikez!) Talc shootz the enemy to the arrow and shovel goes into the area for the goodiez. The first team member over the bridge will run into a RW which sends an enemy to the bridge. Graniel can simply drown him. Now all go through the blue warpz.
After checking the area carefully (perhapz you’ll find something interesting behind those cherriez), send two team memberz over the upper landing to the staging area. Line them up one behind the other and the far left. Select both and click on the last tile before the landing. Deselect and walk them over the landing. One of them gets the “touch of death” (Graniel would absolutely love this little bit of technology) and attracts one enemy at a time to get them out of the way. When the power has worn off, get the two zap colaz. Send the other two team memberz to the staging area. This looks a little tricky, but it really isn’t so hard. This time one grunt stands immediately below the bridge and the other stands on the lower left tile. Select both and click on the top crumble tile. As soon as the top grunt reaches it, click on the middle solid tile. Deselect and carry on. Send Capt. Crater/shovel around the edge. Go to the gate.
4.
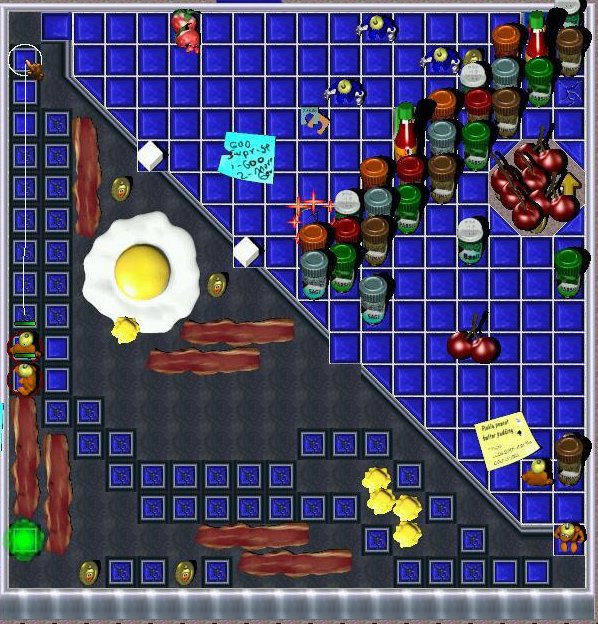
This area seems closed but Talc is pretty shrewd and finds the SS(?). He presses the BOTs and shoots the enemy gunhat in the corner into the hole. Shoot the second gunhat to the green pyramidz to get squished.
The Colonel now breaks the first two giant rocks and avoiding the spongegun, breaks the one on the left. Between him and Capt. Crater/shovel they clear the way to the green pyramidz. Graniel, who is now bare-handed gets the gun and sends the enemiez to the switchez (purple first). He manages to take a little side trip also.
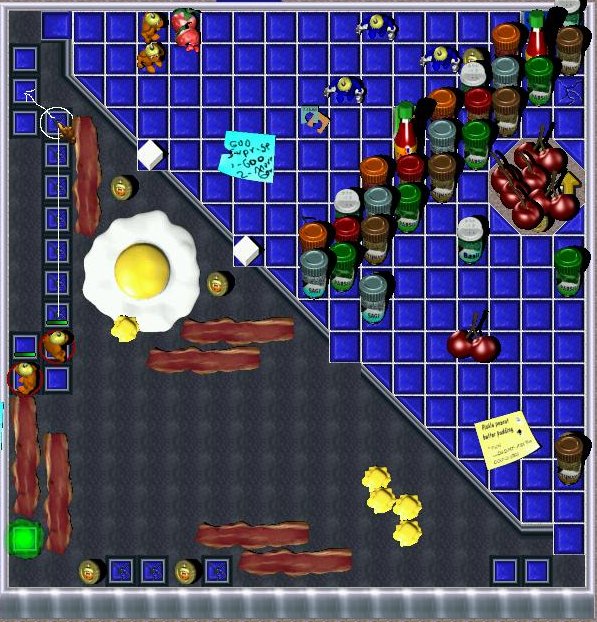
Capt. Crater goes through the green pyramid and then through the silver pyramidz and into the only wormhole he can reach. We’ll call it # 4. (We’ll number them top right and left #1 and #2, bottom right and left #3 and #4.) One of the spongegunz picks up the beach ball and goes through the silver pyramidz straight over to wormhole #3. The Colonel/gauntletz goes to #2 and the remaining sponge to #1. Each one goes through their area and into their individual warpz to meet back at the gate.
The Colonel/gauntletz now has a long walk to make, so send him on his way along the right up-pointing arrow. Capt. Crater/shovel take the arrow on the left. Talc and Graniel go through the wormholez, and quickly stand on the purple switchez before the enemiez arrive. When the Colonel and Captain arrive at the end of the arrowz, they also stand on the switchez.
You’re almost home. Congratulations! You should have a perfect!