 #1
#1 to reveal a set of Springz, and another Cupcake
  to the north and pickz up a Coin
  (Coin #1), and returnz to pick up the Springz
  (Tool #1). #2
 to reveal ... nothing, and another Cupcake
  to the north and pickz up a set of Wingz
  (Tool #2).
 #1 (Coin #2) ... without using any Crumbling Bridge Tilez
  in the path of the Rolling (Malted) Milk Ball
  (RMB), and continuez south to stand on a Purple Multi-Grunt Switch
 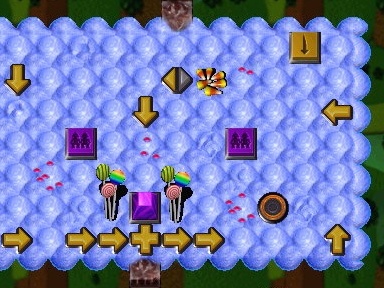 (PMGS).
When there is no longer any reason to stand there, jump on down and locate another Tool (#4).
 #2
#2 and fliez to the west side Bridge tile
  where the Coin was, and down to the other Landing Dock
  ... without using any of the central Bridge tilez . He may then move down and blow away a couple of enemy gruntz
  .
.The timing is extremely critical here, so a SAVE is strongly suggested!
It is not that you need to do something that is tightly timed, but that RMB
must make it across the rapidly toggling  Automatic Bridge to the south ... and you can't control it.
Once you step on that Yellow Hold Switch
 (YHS), the RMB ... startz rolling!
When you see the RMB
, step off the YHS and move to the other PMGS  .
.Did you notice what else happened when you and your buddy occupied the two PMGSz
... besidez the one Purple Pyramid  (PP) the RMB had to pass over, to get to the automatic Bridge? You did! Good for you ... you know that there is a good reason for that GruntCreationPad
  on that floating island. That meanz you need to acquire a GooberStraw
  somewhere ... and some Goo Puddlez
  to suck up!
If any of the four automatic Bridge tilez is open
 when the RMB arrivez ... you lose!
Unless you are an extremely lucky individual, you will restore that SAVE slot several timez before the RMB
makez it across the Bridge. You made it!?! SAVE again!!!Your Wingz are getting weak, so fly down and pick up a replacement set
(Tool #3).Two short flightz, to a stable Bridge tile
, and to another Landing Dock , and you are on "terra firma" again.Pass by the Birthday Candlez
 down to the Landing Dock and get the Coin (Coin #3) on the small island in the water.
Some of the Goo Puddlez you may find could still be rather solid


 .
.Of the three enemy Gruntz below, one
 will leave no Goo behind, no matter what you do.
One wearz armor
that reducez your effectiveness ... if you could even hit him!See if you can't blow the other one
away , while your buddy is busy elsewhere.With no enemy Gruntz still solid, move down south and fly over to pick up the Warp letter
 .
.Then go back north and pick up the Shovel
 (Tool #5) your buddy uncovered a while ago.
#1 to reveal a Shovel, and pickz up a couple of Coinz (Coinz #4 and #5).
(Tool #5) your buddy uncovered a while ago.
#1 to reveal a Shovel, and pickz up a couple of Coinz (Coinz #4 and #5).Then he beginz converting an enemy Grunt
into a usuable Goo Puddle .He eliminatez the remaining enemy Grunt
with explosive resultz ... no Goo left behind.He seez an Orange Up/Down Switch
 (OU/DS) in the south part of the area, and stepz on it
  . Then he goez in search of something else to break.
He demolishez a Giant Cupcake
        
|
revealing nothing but a Mound  in the (otherwise) cleared area underneath it in the (otherwise) cleared area underneath it |

|
ahead of him:
- that 'butter knife' could quickly do some serious damage ... to 'yours truly'
- if he startz chasing, he won't stop ... so don't do anything to cause him to start!
When Grunt #2 arrivez, properly equipped
for the terrain  and difficultiez ahead, they turn him into a quivering Goo Puddle
  ... not without damage to someone wearing Orange. With the undamaged Grunt taking the lead, the duo repeatz the process with the next enemy Grunt . (Both Gruntz now at half health.)
Break the nearby Cupcake
in the path of the RMB ... and wait.When the other two enemy Gruntz are removed, break the other Cupcake
in the path of the RMB and go back and release it by stepping on the Yellow Toggle Switch  (YTS).
Contrary to what you may be thinking, this is not a "horse race" ... you couldn't win anyway!
Just take a leisurely stroll, mostly following the RMB
, to where there are more thingz you can break, acquiring a Coin (Coin #8) and revealing a GooberStraw (Tool #6). When there is nothing else within reach to break, he pickz it up.
 #2 and dig it up, revealing a Coin.
You throw some dirt back in, and pick up the loot
(Coin #6).You dig up the Mound
your buddy revealed, and find "something useful" ... so you carefully throw dirt under it so it may be picked up ... later.Teamed up with Grunt #1, you bash an enemy Grunt
into a Goo Puddle ... not without damage to someone wearing Orange. With the undamaged Grunt taking the lead, the duo repeatz the process with the next enemy Grunt . (Both Gruntz now at half health.)You fill in
the nearby Hole and assess the situation.Neither of you could survive another battle, so you go back and pick up that "something useful
 " (Powerup #1) and fill in the Hole , and quickly move past the two enemy gruntz , and cross a short automatic toggling Bridge to step on a BOTS
  .
.You are rewarded with two brief yelpz of pain ... the obstaclez have been removed!
You re-cross the automatic toggling Bridge and head north and east to employ your Shovel again.
In the first three Moundz
you can reach, you dig up a Bottle of Zap Cola  (which you leave for your buddy), a Coin (Coin #7) and a Green Hold Switch
  (GHS) ... which you never need to stand upon (there is an easier way to deal with the maze below). Now you wait.
When Grunt #1 has located some assistance (Grunt
 #3 stepz on a Red Toggle Switch
  (RTS)), you are able to move down into the Red
 (RP) and Green Pyramidz
  (GP) area sprinkled with Spikez
  , Birthday Candlez and all sortz of oddz
  and endz
  .
.You stand on the Black One-Time Switch
(BOTS) and dig up the Mound and fill it back up again to acquire the Coin (Coin #8) you find.When Grunt
#3 stepz on the RTS again, you drink the Can of Zap Cola and wait a while next to the Silver Timer Switch (STS).
When GooberStraw Grunt
 #1 and Bare-handed Grunt #3 are just below the SPz
  , you step on the STS , lowering
  some to allow access.
When GooberStraw Grunt
#1 finishez sucking up the Goo ... he wantz out!You step on the STS
again, lowering some to allow him to exit. #1 your buddy dug up.Time to start sucking! The first two Goo Puddlez

 are in plain sight.
With two in the Goo Well, you trek back to where you know there is a Blue Goo Puddle
 .
.If you played wisely, there are five more Goo Puddlez
you suck up.(You may enter Gruntz #3
and #4 into the game now, and start using them.)You make the long trek back toward the SPz
, where you saw four more Goo Puddlez that you couldn't reach ... perhapz there will be a way to get to them and add them to the Goo Well.When some SPz
are lowered , you enter and move right ... and start sucking.(You may enter Grunt #5
into the game now, and start using him.)You step on the STS
, lowering some SPz to allow Grunt #3 to move to the PMGS .When some SPz
are lowered , you exit and move north to stand on a YHS below and between two Two-Way Arrowz 
 (TWA), changing both to point the opposite wayz .
As soon as the RMB
leavez the Arrow ... follow it!Step on the Arrow
 , and it will take you to a YTS .
You may be tempted to step on the TWA
that will take you to another YTS .Don't do it!!! ... Shovel Grunt
#2 will be along shortly, and he needz to go that way.Let Grunt #2 go first, so he may fill in
a Hole , making it safer for both of you.
 #3 ... and step on it !
Not far away is a RTS
, so you step on it as well.Grunt #2 yellz at you to step on it again, so you do.
That was so much fun, you step on the YTS
as well ... and leave the area.You weren't baked brainless, so quickly move out of the path of the RMB
... in case something startz it moving. You can't go back south, so you head north as far as you can go.You stop to catch your breath below a long line of Silver Pyramidz
(SP) ... out of the path.
When some SPz
are lowered , you enter and move left.When some more SPz
are lowered , you move left to stand on the PMGS  .
.Grunt #2 yellz at you to step on the Red Hold Switch
 (RHS) near you, so you do ... and he movez out and thankz you.
You move back to stand on the PMGS
(#1 of 8) ... your work is done.
 #4
#4 (BP).
(BP).When the BPz
go down  , strollz over to stand on the PMGS (#2 of 8) ... your work is done.
#5 (BP).
, strollz over to stand on the PMGS (#2 of 8) ... your work is done.
#5 (BP).When the BPz
go down , strollz over to stand on the YHS below and between two TWAz , changing both to point the opposite wayz .
Much later, he strollz to the second level of the three level plateau, and pickz up the GooberStraw
(Tool #8), revealed when a Grunt with "hard handz" breakz a cupcake .
#2 & GooberStraw
#1
#2 fillz in the dangerous Holez and digz up everything that was originally a Mound and acquirez four Coinz (Coinz #10 through #13) while in the Labyrinth.Whichever Grunt is not otherwise occupied standz on each of three YHSz
as soon as it may be reached, which releasez the RMB , activating three BOTSz .Under one of the Moundz
is a STS .Before he leavez the Labyrinth, he will step on it, and his buddy will cross over lowered
SPz.GooberStraw
#1 movez through the Labyrinth, sucking up one Goo Puddle after another (and creating one!  ), adding a Hot Pink
  and a Purple
  , for a total of five into the Goo Well. (He stepped on a BOTS along the way.)
(You may enter Grunt #6
into the game now, and start using him.)With nothing remaining to suck up, he exitz and movez down south to stand next to three SPz
. #6 ... your work is done.. #1 to stand on the Landing Dock and assess the situation.
When he seez Bridge tilez toggling from submerged
 to raised statez, he detectz a pattern that allowz him to acquire a nearby Coin (Coin #14).
Another short trip takez him to an inoperative Bridge tile
 , and Coin (Coin #15).
A longer (possibly dangerous) trip takez him to solid ground, and Coin
(Coin #16).There he findz good use for his Straw, adding four more Goo Puddlez

 to the Goo Well, releasing the RMB while standing on a YHS , sucking Goo.
(You may enter Grunt #7
into the game now, and start using him.)He crossez the Crumbling Bridge
to a Bridge tile, acquiring a Coin (Coin #17).Across a longer Crumbling Bridge
to a Landing Dock, and a Coin (Coin #18).If you don't take the shortcut back to solid ground, something surprising may happen.
You can step on the BOTS
... but can you break the Cupcake ?If not, you have missed something important, and should re-trace your stepz.
 #7
#7 as soon as he enterz the game, so findz a safe place to stand and wait for a while.
Walkz over to stand on a YHS
, releasing the RMB , then movez to activate the BOTS .When the Cupcake
is broken, strollz over to stand on the PMGS ... your work is done.
#1, and pick up the Coin (Coin #20).Walk over and stand on the second of the 'stack' of four YHSz
until the RMB passez the TWA  northeast of you.
Walk to the first level of the three-level plateau and bash two of the three enemy gruntz
into Goo Puddlez and either ignore the third one , or (carefully) turn him into an (almost) unreachable Goo Puddle .Then go up one level and bash a fourth enemy grunt
into a Goo Puddle .Break a Cupcake
, revealing a GooberStraw . Should you pick it up? Not on your life!Break another Cupcake
, revealing a PMGS .With nothing left to break in the area, and no reachable enemy Gruntz, leave the plateau and move east, then south to where there are three GPz
next to a stairway.When the GPz
lower  (temporarily!) cross into the next area and begin bashing the four enemy Gruntz into Goo Puddlez (preferably with some help from Shovel #2 and/or GooberStraw #5).
Try breaking some of the Brick stackz
 you see ...

 if you SAVE first!
Reducing one stack
to a Foundation tile allowz you to pick up a Shovel ... NOT!With the air no longer filled with lead, it is safe to go around breaking Cupcakez
small (revealing a GooberStraw ) and large (revealing a SpongeGun  ), and perhapz do some exploring.
When you are certain there is nothing left you may break (or break your Gauntletz on a Brick
 ), you may consider picking up your choice of the Toolz (Tool #13!), or you revealed ... or the Warpstone piece
  that one of your buddiez revealz.
#5
that one of your buddiez revealz.
#5 on the level.
(You may enter Grunt #8
into the game now, and start using him.)Movez down to the first level and suckz up four more Goo Puddlez
(You may enter Grunt #9
into the game now, and start using him.) #8 that Grunt #1 revealed, so startz walking.
Pickz up the Toob
(Tool #9), becoming Toob  #8.
#8
#8.
#8Either pickz up the Coin
(Coin #27), then putz on the Gauntletz  (Tool #10) ... or vice-versa (doesn't matter). #8, revealing two Toolz and pickz up the GooberStraw (Tool #11), becoming GooberStraw #8.
#8 on the island.
(Tool #10) ... or vice-versa (doesn't matter). #8, revealing two Toolz and pickz up the GooberStraw (Tool #11), becoming GooberStraw #8.
#8 on the island.(You may enter Grunt #10
into the game now, and start using him.)Pickz up the Toob
(Tool #12), once again becoming Toob #8.
#8 .
.Standz near the Arrow
and waitz for assistance to pass it.
Stepz on the Arrow
as a sponge arrivez, and is propelled to the Coin (Coin #28).Stepz on a nearby Arrow
 and "takez a ride" to become stuck ...
between two Arrowz

 . "Hey, Rube!"
The Grunt carrying the pink gun
 providez the "friendly fire" to get him moving again ... under control, so he collectz a Coin (Coin #29) and takez his place on the last PMGS .
, and collectz the last two Coinz (Coinz #30 and #31), while the Grunt carrying the Warpstone piece
providez the "friendly fire" to get him moving again ... under control, so he collectz a Coin (Coin #29) and takez his place on the last PMGS .
, and collectz the last two Coinz (Coinz #30 and #31), while the Grunt carrying the Warpstone piece  followz.
 to the King!