 Springz #4, Springz #4,
 Gauntletz #3 and Gauntletz #3 and
 Straw #1 Straw #1 |
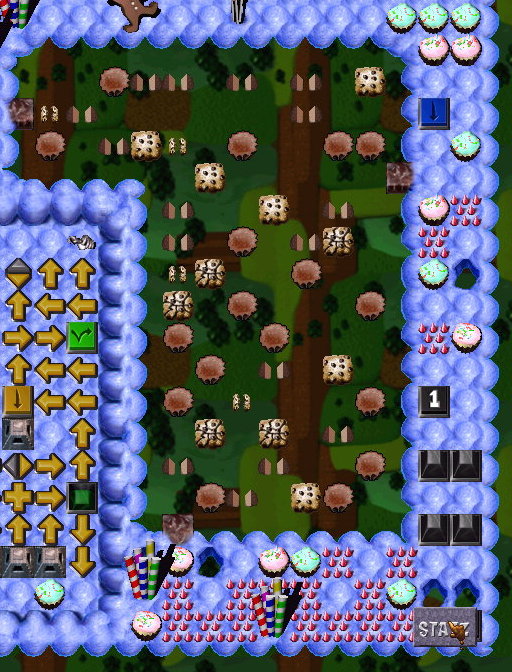
- Springz #4
- Maneuver across the Toggling Bridge Tilez
 (TBT) to the safe Bridge Tilez (TBT) to the safe Bridge Tilez  (BT). (BT).
- Plot your course carefully and don't forget Springz can jump diagonally.
- You will not use every BT
 . .
- Use the solid BTz to plan your next seriez of movez.
- First, jump to the Blue Hold Switch
 (BHS) on the side of the maze. (BHS) on the side of the maze.
- Stand there for a while to allow the other team memberz to cross.
- Then jump to the Black One-Time Switch
 (BOTS) to the south, which lowerz (BOTS) to the south, which lowerz  two Black Pyramidz two Black Pyramidz  (BP). (BP).
- Movez to the BOTS in the lower right corner, causing two more BPz to be lowered .
- Movez back up to the BHS to wait.
- Movez up alongside gruntz #3 and #1 to form a "skirmish line".
- Gauntletz #3
- Movez down the left edge to the Landing Area
 in the lower left. in the lower left.
- Breakz the two cupcakez
 and getz the Coin and getz the Coin  (#3). (#3).
- Breakz another cupcake
 ... and stepz back! ... and stepz back!
- Breakz another cupcake
 ... and stepz back (to make room for a teammate). ... and stepz back (to make room for a teammate).
- Waitz for grunt #1 to join him, and grunt #4 to remove an obstacle.
- Movez up the right edge, breaking four cupcakez (obstaclez only, no prizez)
- Breakz another cupcake ... and stepz back!
- Movez up and callz to gruntz #1 and #4 to form a "skirmish line".
- Straw #1
- Movez across to the same Landing Area .
- Movez up alongside gruntz #3 and #4 to form a "skirmish line".
|
 Previous section Next section