 7:GooberStraw Grunt:
 , with three more Goo Puddlez towardz the south. "Time to start sucking!" So you do, and complete your mission by taking your place on the Purple Multi-Grunt Switch
  .
. 2-Boomerang Grunt: and collect a Coin for all your hard work.
 6-Boxing Glovez Grunt: and collect a Coin for all your hard work.
  3-BrickLayer Grunt:) and you are "sailing, sailing over the bounding main" (no, just into the Brickyard). Since it lookz like someone has already done a lot of work in this area, your Tool doesn't seem to be needed here. So you check to see if there is something in the GruntzMachine better suited to the completion of your task.
 3-Spy Gear Grunt:
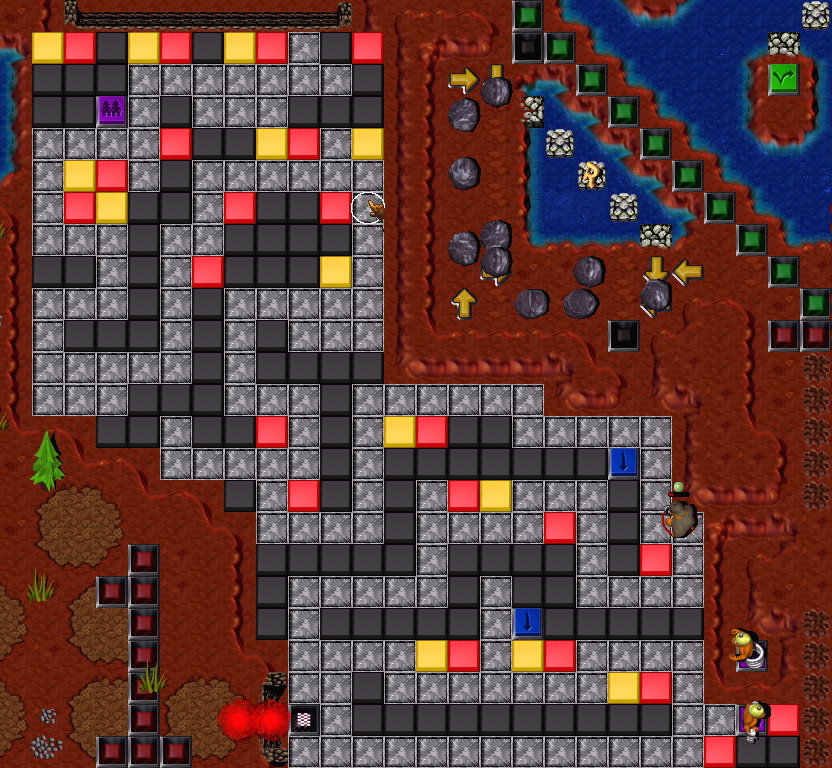 'way back near the entrance to The Brickyard. So you "hie thee" back up there to complete your mission.
 5-Gauntletz Grunt: 3-Spy Gear Grunt, you proceed with your work. Your buddy tellz where you should break thingz and (more importantly!) which thingz you should not break. When he has given you your final instructionz, he departz on a mission all his own, leaving you to finish clearing the way to your Purple Multi-Grunt Switch .
 4-Shovel Grunt:
 next to you. Remembering the Boss's (the Designer) instructionz, you put the Shovel back to work, on the Mound
  and turn up some assistance. By now you have learned that some Holez
  are simply obstaclez, and contain nothing of interest, so you just fill them in
  and do not dig them up again. All of the other Holez you first turn into Moundz , and then into ordinary Tilez
  of some kind. During the course of your exertionz, you turn up refreshmentz in various sizez, but don't touch any of them while you are healthy. You also turn up a Yellow Toggle Switch
  with a Coin on it. You know that the Boss has a devious mind, so do your best to make the entire area as safe as possible to walk around ... and you are glad you did, when you step in a certain place. Since it may be important to the success of the team's mission, you bear the pain (Ouch! These are sharp!") since your assistance has worn off, and go through the Red Warp. At your destination you find a Mound, and dig it up, to pocket a Coin. Then you may either
- Go through the return Red Warp ... or
- Just stay where you are.
, you may need to step on it again! If you did not step on it, you may have to step on it to allow the completion of the team's mission (as well as collect the Coin). 8-Gravity Bootz Grunt:
 .
. 9:Toobz Grunt:.
 _1:SuicideBomber_Grunt:
(You have SAVEd recently, haven't you? If not, now is a very good time to do so!)
If your buddy with the Shovel was very good at his task, there is a Keg of Zap Cola that you can see slightly north of due west about 13 or 14 squarez away. That spot is a rather important guide for you! When the rapidly Toggling Bridge Tilez
 reach that point, you should light your Bomb and make your charge!
You play with a Squeak Toy
 for a short while, then get back to work.
Your work? To follow the Yellow Brick Road (er, lowered Green Pyramid
 'Road') to the King's Fortress. There is no reason to rush
  , on the first part of the journey, and you just might miss something, if you do!
When you come to something Red you may need assistance from a teammate. If you arrive at something Red
 (that stayz that way), just continue your leisurely stroll. If, instead they are Red Pyramidz
  (and stay that way) you either need help from your buddy, or it is time to light that fuse.
If something Red is going up
and down , you only need to wait for a time when it is safe to pass, and continue strolling.There will come a point where a Construction Pyramid
 endz your leisurely stroll.
You see a ToyBox at the end of a looooong corridor between various Pyramidz and you light the fuse on the bomb and make your charge! When the Toy breakz, go get the Warpstone.
 1-Warpstone Grunt:
When you pick up the Warpstone, you can just waltz into the King�z Fortress, picking up the Warp letter P on your way.