Where to start: (Normal mode only)
In an ideal solution, you will pick up
 ,
,  ,
,  and
and  in that order.
This walkthrough is written assuming that Grunt #4 will pick up the first Tool.
(It is perfectly acceptable to have Grunt #5 pick it up, instead.)
Both Gruntz will revert to Goo, so it doesn't really matter which Grunt getz which Tool.

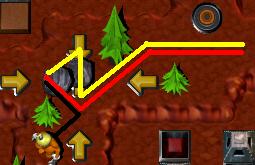
 Bridge pathz to the SpongeGun
  and wait there (patiently).
When the proper time comez, your first target will be the Arrow
 (see the Yellow line), timed to arrive at the same time a teammate
 reachez it. Later, the same Grunt (now carrying a Gooberstraw
  ) will be assisted by 'friendly fire' (see the Green line).
 southeast of where you are standing.
There are three Holez
 on a plateau east of you. You and Grunt #5 head for them!
and
Bare-handed Grunt #5
(see the red line in Figure 1) and Grunt #5 quickly runz across the  (see the Green line) before the enemy Digger digz it up again. He runz to use the Megaphone to call for a Bomb. Then go back and 'take on' that Digger! (Shovel will lend his tool to the party ... judicously, using 'hit and run' tacticz.)
 from the GruntzMachine (Resourcez) and stand on the Landing Area
  facing the Green Toggle Switch
  (GTS). The timing of this sub-puzzle is very tight, so SAVE before you try it. You are going to have to run across that Toggling
  Bridge, between the two Rolling Rockz
  and activate the GTS , so get moving!
 (GP) until the smoke clearz, and they are lowered
  .
.Then go stand immediately north of the spinning wheel (without picking it up!)
Once again, the timing is very tight, so a SAVE is in order before attempting this.
Click on the spot diagonally northwest of the
 as the Bridge racez toward the southwest corner of its path (exactly when, is a matter for you to decide), then to the
  and back. Catch the next circuit of the Bridge and follow it south, then southeast, then north (via northeast!), and finally northwest to safety. SAVE
Then head for a trap
 |
 |
|
 |
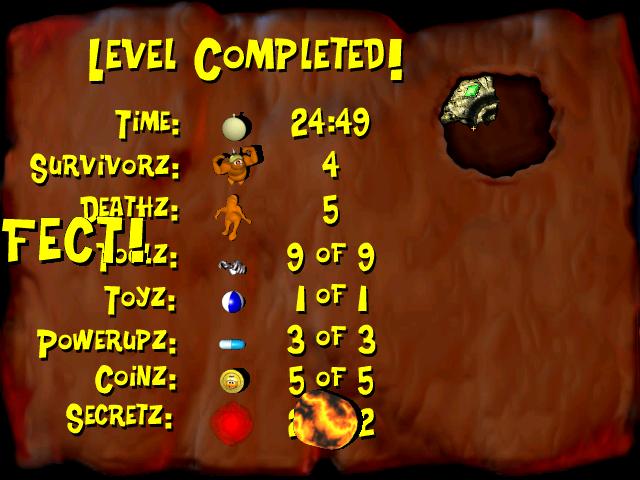
By now, it should be obvious that F5 (SAVE) is a very important part of the solution to this puzzle.
There is a Coin in view, and if a "PERFECT!" score is your goal (if not, why not?!?) you will have to go get it!
I found the easiest way to do this was to stand above the Arrow
(where the pebblez are) and click just above the as the nearest Rock beginz rolling toward the right (east), then click on the Coin before you can reach the Switch.Pay attention to whether the GPz
are now raised . You will not be able to achieve a "PERFECT!" score if they are now raised !To get back out, stand where the Coin was found, and click on the 'safe' Tile above the center of the Rolling Rockz pathz as the nearest RR beginz moving toward the west.
Pick up the GooberStraw. It's time to "start sucking!"
There is a CheckPoint Switch
 (CPS) with your name (er, tool) on it, so that is your next goal. Take a slight detour to the west of it, then onto the Switch after you dodge the missile an enemy Grunt is throwing at you.
Forge ahead to do battle with the enemy grunt
 . Put your back (to the wall) in it, and make sure the eye in the back of your head is working.
(Don't have one? Then a neck that swivelz like an owl's would be handy!)
Dodge those missilez, while you pound the Boxer into a Goo Puddle
 .
."Never turn your back on your enemy, even when bowing" (to the task of sucking up Goo).
You may have noticed that some Red Pyramidz
 are now lowered
  , allowing two of your buddiez to escape (briefly!) their prison.
Find a safe place to stand, while your buddiez do their part.
"How may you help", you say? Go stand near that Red Hold Switch
 (RHS)!
"How may you help", you say?
Go stand near that RHS
(but not in a Goo Puddle  )!
)!They gave their all (well, their Goo, at least) for the team, so go get it! Then wait, out of range of that Rock-throwing Grunt, for the new player to enter the game, and do his thing.
 you may reach (with difficulty!), so that must be your first task.
You had to pick up and use a Megaphone on your way. Can you use whatever you called for? No? There must be something else you were placed here to do! Is there anything special about this place? (I (GooRoo) found two different solutionz:
- The black and red
- The black and yellow
and
Bare-handed Grunt #2
, releasing Grunt #2. He does not pick up the Gauntletz so nearby, but headz over to pick up the Brick-laying Toolz instead (GooberStraw getz off the Switch, to allow him to get in and out). Then Grunt #2 takez Grunt #4's place on the RHS so that Grunt #4 may pick up the Gauntletz it is now possible to pass over the lowered
  BP towardz the northwest, where there are lotz of objectz to break with your new tool. You uncover (and pocket) a Coin, and then pick up the Megaphone and call for another object. "Hmmm? I wonder where someone is going to use that?!?" You find several Brown Brickz
  that turn out to be Unbreakable Brickz
  instead. "I don't like this!" (Tough! Just do what you're told, and you'll be helping the team to reach their objective: carrying the Warpstone piece to the King.)
 from the GruntzMachine, you apply it in the perfect place, then stand back and let Grunt #4 do his thing.
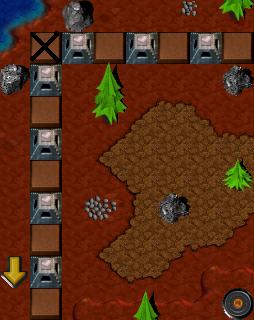
"What a blast!"
When the smoke clearz, you cannot even say "Alas, poor Yorick (or Grunt #4), I knew him well" ... no Goo for the Goo Well.
From a new vantage point, you catch a flash of light and go to investigate what it is.
The way is now clear for you to move on towardz the west.
You see some parchment fluttering in the wind, and pick it up.
"Might need a fire starter, you never know" you mumble to yourself.
There is a Coin you can pick up ... if the Rolling Rock doesn't squash you first.
"Now how am I supposed to get past this?" you say. (Try a little two-step move, called "hitch 3" ... two stepz forward, one step back (sorta).)
Trapped! You can't go back the way you came, because of an
towardz the west, and z and  z north and south, and a mud pool further to the south. After you pick up the Coin that got you into this mess, that only leavez east as a possibility ... and you can tell with one eye closed that there is nowhere to go from there. (In fact, your choicez are even more limitted if you go over that !) "Hey Rube!"
?"
z north and south, and a mud pool further to the south. After you pick up the Coin that got you into this mess, that only leavez east as a possibility ... and you can tell with one eye closed that there is nowhere to go from there. (In fact, your choicez are even more limitted if you go over that !) "Hey Rube!"
?"But you start out to see if there is some secret way you can join Bricklayer, and after the first step the enemy Gauntletz Grunt cries out and startz for Bricklayer, full of evil intent. He won't let a little thing like a
stand between him and his enemy! You dance back out of the way of the Rolling Rock that seemz to have a mind all its own ... to squash you! , you whip out your Gauntletz-breaker Brick
  and quickly slap some mortar on it.
With incredible timing, and a large dose of luck, you have the new Brick
in place just after your enemy smashez the only thing between you and him ... an ordinary Brick and before he can step forward and smash you!He recoverz much more quickly than you do, and SMASH! ... the Brick you just laid is gone. But so are your enemy's menacing Gauntletz!
He is now Bare-handed
 and much less of a threat to you. But he just keepz coming at you, and you haven't recovered yet from the effort of laying that Brick. There is little room to dodge, but you do the best you can. When you recover enough strength, you begin wielding pail and trowel against your enemy. Soon there is a Goo Puddle
  at your feet.
"Oh no!" There is another enemy grunt
 between you and your CPS
  , but he will probably just run away from you. Well, you are partly correct ... he does run away from you ... after he first takez a cheap shot! If you have luck on your side, you will be able to satisfy that Switch, without enduring another attack from the Grunt that is 'sharing your space'. What do you have that may be of use in this predicament? Your Brick-laying toolz ... and a piece of parchment. You pull that out and see something written on it. Turning it this way and that, you figure out which end is up, and read what it sayz. "Oh great!" Instead of only one enemy, the one you defeated is now back2life! Looking for a lighter weapon, you notice a stick with a sign nailed to it. "Has to be lighter than this pail and trowel!" You pick it up, and something comes over you. No longer in a fighting mood, you go up to your enemiez, one by one, and put your hand on their shoulder, saying "Peace, brother." And you slowly fade out of this plane of existence.
 ahead, and decide to take it to its rightful owner (the King).
 ahead? No problem! I'll just go down there and whop 'em alongside the head a couple timez, and show 'em who's boss."
(What have you been doing? Popping pillz?)
Using your head (and maybe an Arrow
in a convenient location), you rid the area of any opposition. Dropping out of your drug-induced euphoria, you notice something that raisez a question  in your mind. What will happen if I step on that thing? So you do! Then you make your way southward around the Holez and across the Arrow , where you pick up a Toob.
 near some Red and Black
  Pyramidz. "A little help here, please?" Grunt #6 (who has been 'cooling his heelz' for quite some time) obligez with a sponge lobbed at the Arrow. You step on the Arrow just in time to be 'nudged' past it. Success!
I know that by now that Toob is beginning to chafe a bit, but endure it for a while ... you'll be back in the water soon.
SAVE! (A word to the wise.) Now you have to cross the mud pool, where your Toob is of no use. Just four stonez to cross ... what's the big deal? No big deal at all ... but how much have you done since your last SAVE?
Into the water, and across to where Gruntz #4 and #5 started out. Past the lowered GPz
. (They are down, aren't they? If not, you have a lot of re-playing to do!)Back into the water, and down to the tiny island with a Coin in the middle of it. (Your goal is to achieve a "PERFECT!" score, isn't it?)
Now swim/waddle your way all the way back to where you 'came to' after receiving your 'peace loving' touch. Now is the time to go down and step on that BOTS
. Then go to the nearest Landing Area  you can find and paddle over to the RHS and stand on it for a little while, as your buddy getz the Warp letter . When he is safely out of the pyramidz, paddle on down to the Green wormhole. You're finished with the Toob now, so you may pick up the Magic Wand. Be a gentlegrunt, step back and let the Grunt with the heavy load go first. Wait until he is clear, and then go through it yourself.
- with your buddy's help, pick up the Warp letter

- waddle on down to the vicinity of the Red and Black Pyramidz.
- again with your buddy's help, pick up the Warp letter

- "A little help here, please?" Grunt #6 obligez with a sponge lobbed at the Arrow. You step on the Arrow just in time to be 'nudged' past it. Success!
- SAVE! Now you have to cross the mud pool, just four stonez to cross. You don't want to blow it all right here, when you can almost smell the King's Fortress, do you?
- Wait for Toobz to paddle down and pick up the Magic Wand at the entrance to the Green Wormhole
 .
. - Go through the Green Wormhole first (you have the most important job ... and you're the slowest walker, carrying that rock.)
- Walk up to the Landing Area
 and wait to be re-joined with Grunt #8.
and
Magic Wand Grunt #9

- Upper chamber (two enemy gruntz
 )
) - after crossing the Crumbling Bridge (Warpstone in the lead)
- send your gruntz to stand in the Object Guardz way.
- as they stand on the Purple Multi-Grunt Switchez
 (PMGS), freeze them.
(I took no chance and put on one switch the grunt with the warpstone). - Grunt #8 takez the Zap Cola
 , because he has to have full health.
 - Magic Wand passez over the lowered eastern Purple Pyramidz
 (PP) into the lower chamber.
 - send warpstone away from the guard and near the western PPz

- Lower chamber (enemy grunt
 ):
): - go to the far PMGS ... the guard will follow.
- as he stepz on the PMGS freeze him.
- Magic Wand standz on the second PMGS .
- warpstone can now pass the western PP and run to the Blue Wormhole

 in order to take the rock to the King�z Fortress.