
 New
New Open
Open Save
Save Print
Print Freshen REZ file ... probably only used by the game developerz
 Launch (Gruntz!)
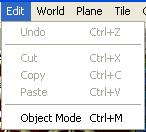
 Cut
Cut Copy
Copy Paste
Paste Undo
Undo Zoom in ... alwayz ghosted ... feature is not implemented
 Zoom out ... alwayz ghosted ... feature is not implemented
 Tile mode (Display planes) ...
  displayed here when in Object mode
 Grid lines
 Object mode ...
  displayed here when in Tile mode
 World view ... does nothing noticeable in Object Mode ... openz a dialog box in Tile Mode.
 Help topics ... useless ... the link is broken (in Vista), and the contentz often wrong, anyway
 Toolbar Icon, arrow pointing backward)
Therefore, make sure to always save your level before making any major changes.
 Toolbar Icon, pair of scissors)
The object will be moved into the clipboard so the Designer can paste (Ctrl-v) the object to a new location.
 Toolbar Icon, 2 overlapping sheets of paper)
The object will be copied into the clipboard so the Designer can paste (Ctrl-v) the duplicate object to a new location.
 Toolbar Icon, Paste jar and sheet of paper)
 Toolbar Icon, lookz (remotely) like a motor scooter)
While in Object Mode, you can add an object by double-clicking in the area where you want to place the object.
When you double-click, a dialog box will appear. Use the dialog box to add an object with a specific logic and image set.
 Toolbar Icon, three offset rectangles)
Tile mode is the default mode when opening the editor.
If you think of tiles as being similar to bathroom tiles or wallpaper, you�ve got the basic idea.
Tiles are placed together so that they create structures or patterns.
To display the tile selection window you can press Ctrl+T while in Tile Mode (or "Tile | Selection Window").