Walkthrough for "The Plot Thickens" CL by Tomalla
You start with three Gruntz with: Shovel, SpongeGun and Goober. The SpongeGunGrunt and the GooberGrunt are disabled right now, so switch to the ShovelGrunt. Pick up a Yoyo and dig up a hole next to the brick at the bottom. Hidden timebombz will destroy bricks and sugar cubes. Dig up another hole there. There is BlueToggleSwitch anc a coin. Pick it up and press the switch. Now, pass the bridge you just have toggled and press the RedHoldSwitch to the top. Now, switch to the SpongeGunGrunt. I bet your first thought is: "Oh, gosh! That's unpassable tight-timing puzzle!!". Hah, just another trick ... Shoot the ShieldGrunt to the bottom and see what will happen.
GunHatGrunt will be teleported in the area where your SpongeGun is, and will start killing every other Grunt he will sense. After he'll be done, continue:
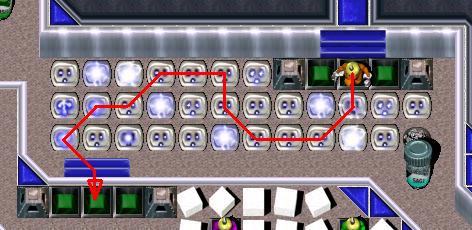
Pick up two ZapColas, press BlackOneTimeSwitch, pick up the Gauntletz and kill enemy GunHatGrunt. Now, you have to pass the SilverPyramids maze. Press SilverSwitch. Whn your Grunt will step off the RedPyramid, order your ShovelGrunt to step onto the arrow to the right. He will be attacked by enemy dark green GunHatGrunt. Now, switch to the GauntletzGrunt and continue. If you didn't disturb enemy GunHatGrunt with your ShovelGrunt, your GauntletzGrunt would be ... squashed by raising pyramids ( if you don't believe me - check it out ). You have to pick up a Megaphone to the top. So, you need to kill one of the WingzGrunt standing on your way. When you'll have Springz in your Resourcez, give it to ... your ShovelGrunt! You task is, to lure enemy dark green SpringzGrunt onto the RedHoldSwitch you used to stand and give him a Yoyo ( dark green Gruntz ignores only those Gruntz, which have stronger tools than they have ; now, when your Grunt doesn't have stronger tool, enemy will sense you! ). Now, when enemy is playing with a Yoyo, go through the arrows & the RedPyramids. Jump through the holes to the right and go, where your GauntletzGrunt is. Step on the GreenHoldSwitch, switch to the GauntletzGrunt and get out of there. Now, switch back to your SpringzGrunt and return to the area with SilverSwitch. Press GreenHoldSwitch and switch to the GauntletzGrunt again. He has to go bottom way through GreenPyramids. Follow a way, just like in the picture below:
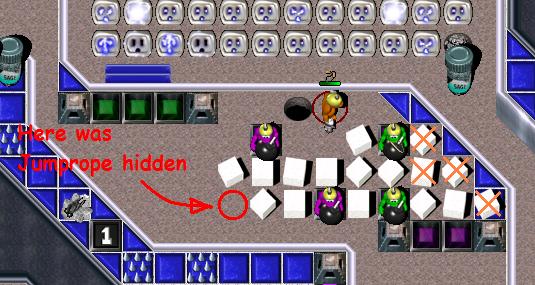
Now, a little harder part. Break the most bottom cube and pick up a JumpRope. Now, destroy cubes at the top, just like at the picture below. When you'll done, give enemy BombGrunt a JumpRope ( he's light green ) and continue - break the last 4 sugar cubez ( orange crosses on the picture ). When you'll break a cube most to the bottom, stand back and wait untill timebomb there will blow up. Then, slip quickly over the next timebomb ( one tile to the left ) and wait. When BombGrunt will get blown up, go through the PurplePyramids.
Go to the left and break few cubes, under which coins are hidden. Then - break a cube blocking an enemy SwordGrunt. He'll start to chase you, but when you'll hide behind a ShieldGrunt, he'll attack him, not you. Then, pick up a ConversionPowerup and convert enemy SwordGrunt and a ShieldGrunt ( ONE ShieldGrunt ... the first one will get killed by a SwordGrunt ). Now you have two new Gruntz. Place the ShieldGrunt on the BlueHoldSwitch in the middle and switch to the SwordGrunt.
Go through the bridge to the bottom and watch the ball. Wait ... and when the ball will hit this arrow and bounce back, press OrangeSwitch and go to the left. Pick up the ReactiveArmor, and kill every SwordGrunt there ( start from two to the right ). Every enemy is standing on the GreenToggleSwitch. When enemy dies, press switch he stood on. When you'll finish, wait for the ball. As you can see, there is still one pyramid raised. When the ball will get closer to it, press second GreenToggleSwitch from the left twice ( in other words: this switch which lies under the white shaker. When the ball will hit BlackOneTimeSwitch, pick up Shovel and quickly fill in the hole next to the GooberGrunt. Pick up Megaphone to the right and suck up all of four GooPuddlez. Also, dig up a hole hidden by two spices - there is a hole. After all of that - ShovelGrunt picks up a ZapCola few tiles near.
Place new baked Grunt on the GruntCreationPoint, near the fortress. Pick up a Sword and take a BabyWalker from the Resourcez. Go ahead, press the GreenToggleSwitch and the SilverSwitch.
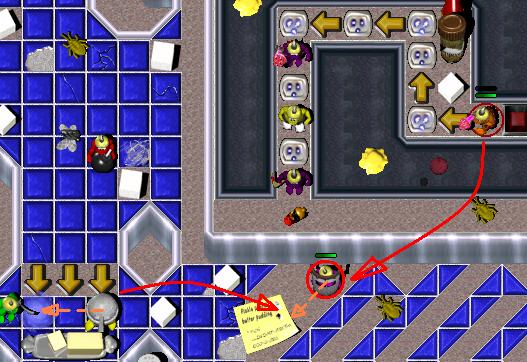
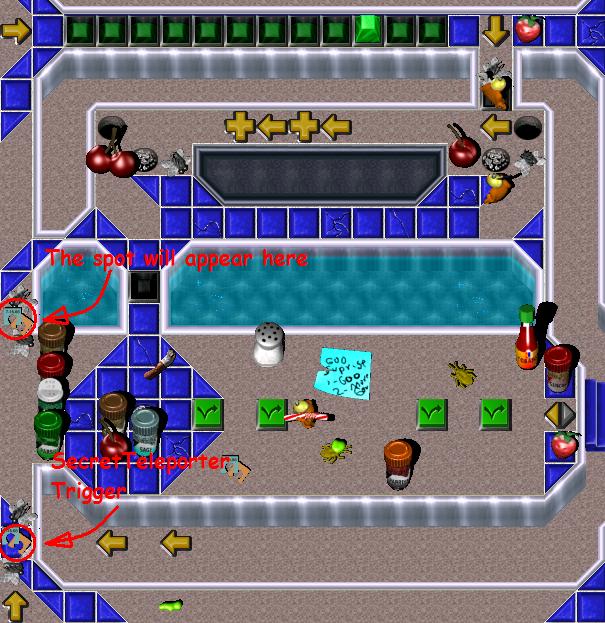
OK ... what now? Pick up a Keg of ZapCola and go to the another SilverSwitch. Lure an enemy Bomber to break a cube with a BlackOneTimeSwitch beneath. Press it and join your Shovel & GooberGruntz. It's time for our first secret - SecretTeleporter! Its trigger is placed, where two arrows point at. One of the Gruntz stays next to the GreenToggleSwitch ( this one under white shaker ), while another two goes through GreenPyramids ( first Grunt presses a switch, and makes pass for these two Gruntz ). If you activated a trigger, you would notice, that the warp is lasting for too short, so that's why you have second Grunt. Place him, where Warp will appear and then - activate a trigger. Collect coins, press two switches, and return. Get those two Grunt back the same they got in, and go through the bridge ( where your ShieldGrunt is ).
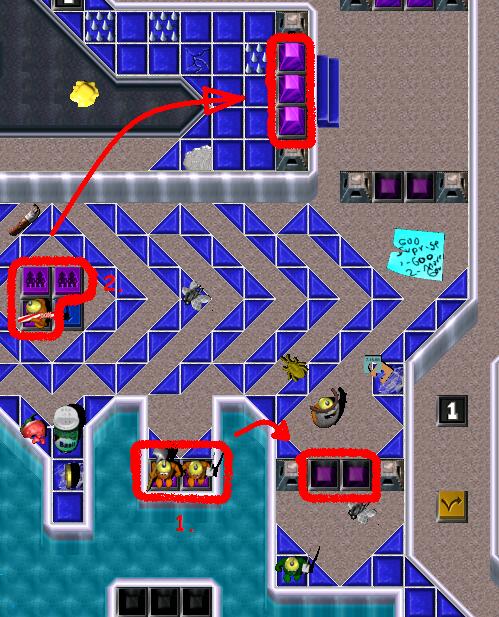
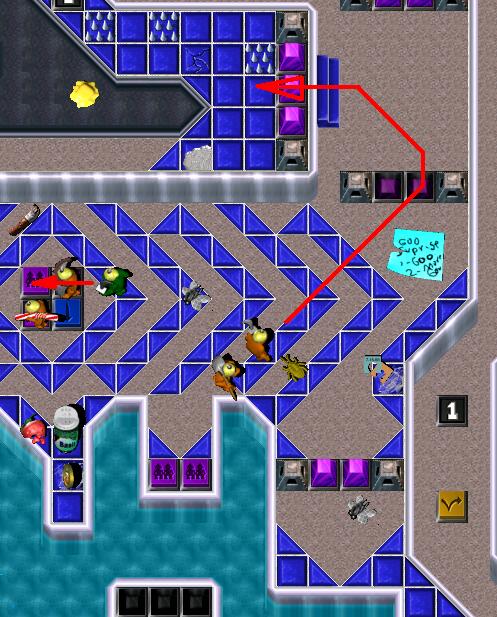
There are two sets of PurpleSwitchez. Every set controls associated set of PurplePyramids ( see below, at the picture ). Place your Gruntz as in that picture ( GooberGrunt stays in the second set, Shovel & SwordGrunt stands on the first set and ShieldGrunt stand infront of enemy SwordGrunt ). Your ShieldGrunt has to lure enemy SwordGrunt and make him chase your Grunt, to the second set. When pyramids will get lowered, switch to the Shovel & SwordGrunt. Make them pass those lowered pyramids and then - quickly switch to the GooberGrunt. Walk to the left, away from the enemy SwordGrunt. Hint: if you want to have nicer statz at the end of CL, switch to your ShieldGrunt, run towards the arrows to the left and squash the enemy chasing you! You need to have only one Grunt left, so it doesn't matter actually is ShieldGrunt alive, or not.
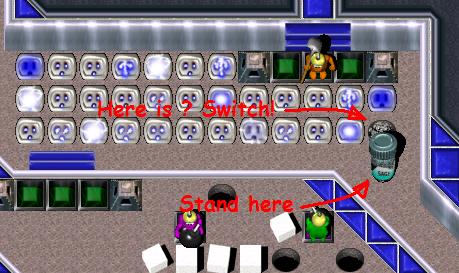
Shovel & SwordGruntz joins a SpringGrunt. Firstly, switch to ShovelGrunt and go to the outletz area ( this one under area with WingzGrunt ). There is a hole ... step on the tile with a spice, and dig it up. There is the SecretSwitch! Press it, and switch to the GooberGrunt ( or ShieldGrunt, if he's still alive - it doesn't matter ). There will appear a pass to the coins and the "R" Letter! At the end your Grunt will drown.
Switch back to the ShovelGrunt. Do you see the row of outletz at the top? There is a mound. Dig it up with your ShovelGrunt and pick up a SpongeGun ( watch out - outletz may kill you if you weren't fast enough ). Knock your Sword & SpringGrunt through the arrows to the start area. One of your Gruntz presses a BlueHoldSwitch, and another one passes the bridge and takes a TimeBombz. He destroys all of the sugar cubes around:
After all of that, there is only one thing to do ... pick up a WarpStone piece and go to the fort!
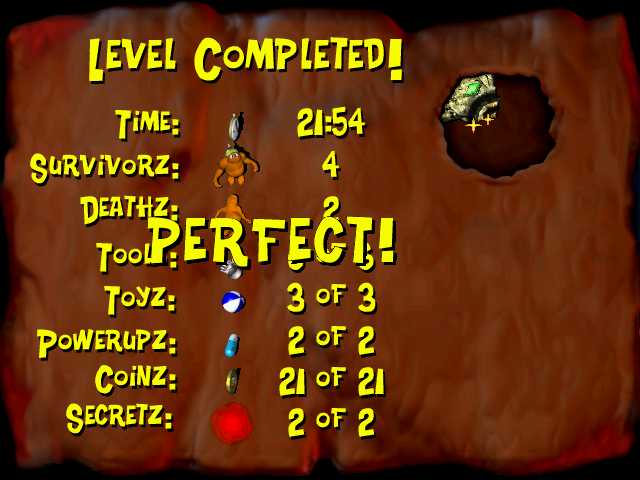
CONGRATULATIONS! YOU HAVE JUST SOLVED CL!