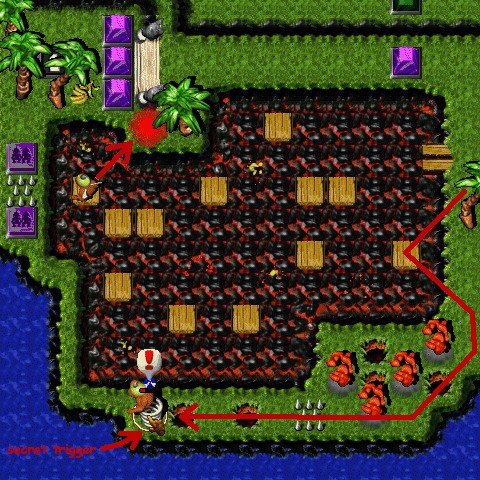
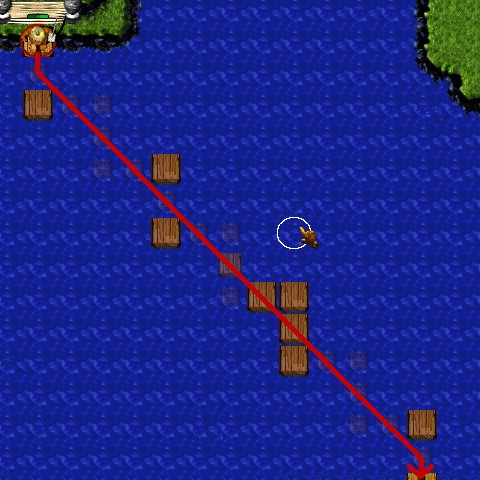
For a better understanding I numbered the islands. For a overview, look at the map.
You start with two gruntz. One of them begins with the warpstone
piece. The other one takes the straw and sucks all gruntz puddlez. Lure the
green grunt to the purple one and let them fight against each other. Then you
can get their puddlez, too.
After killing the yellow hit-and-runner and sucking his goo, you've got two new
gruntz. The second one goes to the 'distributing center' (island 2), hits the
red switch and frees the shovel grunt. The bare-handed grunt takes the
gauntletz while the other three gruntz are standing on the purple switchez. Now
you can go eastwardz over the bridge.
Be careful now. Kill all enemy gruntz and suck their goo. You get two new gruntz who cross the bridge, too, and take the swordz. The gruntz with the shovel and the gauntletz go northwardz over the bridge. The two sword gruntz and the warpstone grunt wait on the blue switchez because a seventh grunt has got to cross the bridge later.
Hit the checkpoint with the gauntletz grunt. The shovel grunt
causes the time bomberz to blow the rocks away and to uncover the coin and the
Secret Switch. Then he kills the time bomberz. Remember that you need all four
grunt puddlez to solve the level perfectly!
After that, create a new grunt and take all seven gruntz on Island 4. The gauntletz
grunt kills the enemy with the springz. Then hit the Secret Switch. The grunt
with the goober strawz takes the Warp Letter (W) and waits until the stairz
appear. He sucks the goo of the springz grunt, waits for the second stairz and
goes back to the other gruntz (screenshot).
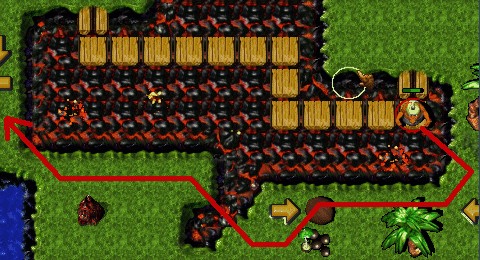
Then the grunt with the gauntletz goes right and crosses the bridge (island 6;
screenshot). He smashes the rockz, takes the cola
and hits the bridge switch in the south. The other six gruntz now can walk northwardz
over the bridge.
The sword gruntz pass the checkpoint, kill the enemiez and walk to
the purple switchez. The bare-handed grunt hits the timer switch and all the
others walk through the silver pyramidz. Having all gruntz directed through the
pyramidz, the bare-handed one hits the bridge switch and clears the way
northwardz.
Don't forget to suck the goo of the enemy sword gruntz!
The sword gruntz cross the bridge and kill the enemies. The goober
strawz (need to suck the goo) and the warpstone cross the bridge, too. All of
them pass the checkpoint. They hit the blue switch and wait.
Reactivate the gauntletz grunt on island 6. He goes back over the bridge (westwardz)
and enters the blue wormhole. Now he kills the enemiez (remember to suck later) and
waits, too.
The wizard takes the ball, passes the checkpoint and walks northwardz to the
arrow puzzle. He hits the yellow switch, walks two stepz westwardz and casts
a spell. Then he hits the switch a second time, walks into the arrow puzzle and
catches the hidden Warp Letter (A; screenshot).
He goes back and casts a spell again to hit the green switch. Now he walks
southwardz to the four grunt puddlez. He puts the toy aside, takes the wand and
casts his last spell.
Four new gruntz are resurrected (I'll call them "group 2"). Each of
them takes a tool. The goober strawz sucks the grunt puddle. One of the gruntz
(not the one with the wingz) takes the ball.
The gruntz with the springz and the wingz hit the purple switch in the south, so one
of the others can pass the purple pyramidz and hit the black switch. The switch frees
the enemy gruntz in the southeast, and they can fight against each other ...
The toob grunt swims to the little island in the southeast (island 6a), kills the
surviving enemy and hits the blue switch. Then he swims northwardz to the other little
island (island 6b) and activates the bridge so the goober straw can get the gruntz puddlez.
The straw walks back to island 6, as well as the toob. The springz activates the secret
wormhole (screenshot 1), the wingz flies in and catches
the Warp Letter (R; screenshot 2).
The gauntletz grunt smashes the rockz, the shovel grunt closes the holez underneath.
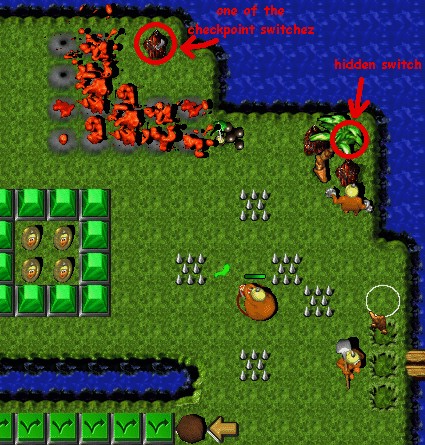
Also smash the big volcano on island 10 to collect the coin. Walk to island 7 with all
six gruntz. To go on you have to uncover the checkpoint switchez behind the little volcanoz.
Hit the black switch to allow the 'distributing grunt' (island 2) to activate the bridgez
northwardz.
To get the coinz you have to uncover the yellow switch under the palm
(screenshot).
One grunt has to cross the bridge and kill the enemy. (Hint: This enemy doesn't leave a
grunt puddle. Maybe you would like to drown him ...)
All your gruntz walk over the bridge. In your oven there waits two baked gruntz. Take one
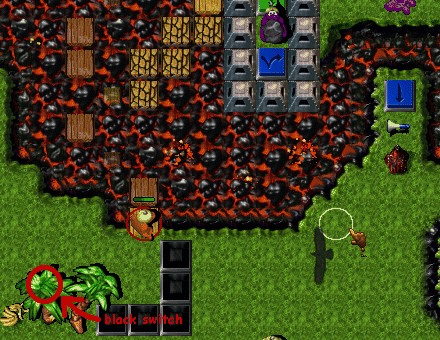
of them and lead him through the wormhole to the lake of lava. Hit the black switch
(screenshot) and cross the lava, while someone stands on the
blue switch. Take the glovez and hit the purple enemy back to the blue toggle switch.
Important: Don't kill the purple enemy! The glovez grunt has to keep standing on the green
switch and is killed there. The goober strawz crosses the lava and sucks the goo of the
glovez grunt. Then he walks back.
The sword gruntz have to hit the checkpoint switchez. Be careful: Behind the palm there
lurks a thief. Kill him and suck his goo.
Take the second grunt in the oven and give him the spy gear. Now you can free him without
risking an explosion.
A grunt has to walk eastwardz and take the megaphone. In the oven a new grunt is waiting.
Take him and give him the springz (the bomb is needed at a future time). Kill the bare-handed
enemy on the little island in the lake of lava. Now the goober strawz can suck the four
gruntz puddlez on the island.
Six gruntz walk eastwardz, cross the rolling ballz and destroy the ballz by hitting the purple switchez. Don't forget to suck the two gruntz puddlez.
Kill the enemy, suck the goo and smash your way through the
brickz. The shovel grunt hits the checkpoint switch. You need to hit the timer
switch and pass the pyramid. Only the grunt with the springz is fast enough
because he can use the holez for large jumpz. But you can also use the
superspeed from island 9.
The spy takes possession of the toy. The gruntz waiting in the oven gets the
bomb and walks to island 10 to kill the purple gun hatz. Hit the black switch.
Another grunt is waiting in the oven. He takes the time bombz and walks back to blow the
brickz away that block the way to the coinz. After collecting the coinz he goes forwardz
and removes the brick blocking the way to island 11.
Don't hit the checkpoint switch, yet. Instead, lead the two sword gruntz and the
warpstone grunt over the bridge in the south (screenshot).
One of them should carry the Baby-Walkerz. You can give the toy to the enemy, and he will
let you pass ... But in view of the end it's more simple to kill him with your
swordz and to suck his goo later.
Lead the three gruntz northwardz via island 13 back to island 11 and hit the
checkpoint switchez.
The springz and the gauntletz walk to island 12. The gauntletz smashes the great volcano.
Now the springz is able to catch the coinz (screenshot).
The time bomber needs to go to island 13 and blow some rocks away. Now you're
able to collect the coin. Lead the time bomber back to island 12, hit the checkpoint switch
and enter the wormhole. On Island 1, blow the northern brickz away, walk to the
blue switch and wait.
In the south of island 13 there is a puzzle waiting for you. Hit all black switchez one after
the other and then put one grunt on the green switch (you will still need the
gauntletz and both swordz).
One grunt has to stay behind to hit the blue switch. The others (you need the gauntletz, two
swordz, the warpstone and two more) cross the bridge and enter the final island.
Reactivate your group 2. Two of them hit the purple switchez. The third - he needs the
toy - crosses the pyramidz. To lower the green pyramidz, you need the grunt in the
'distributing center' (island 2). Lay down the toy on one of the switchez, lure the green enemy
to this switch and activate the other one. Now the other two gruntz can cross the pyramidz and
attack the enemy. Suck his goo. There is another grey puddle around.
If you still need a puddle to bake a grunt, your goober strawz has to hit the checkpoint switch
and enter the wormhole. Otherwise the three gruntz can enter the green wormhole.
Back to the waiting time bomber (island 1): Walk to the green sword grunt and kill him with a
time bomb. If you need a puddle, you have to see to it that your time bomber is killed by the
sword grunt before the time bomb explodes. If so, lead your goober strawz to the time bomberz
goo, suck it and walk back through the last existing blue wormhole.
Cross the rolling balls and put the three gruntz onto the purple switchez.
Smash the great volcano and collect the coin. Then hit the purple switches with the
gruntz without swordz. The sword gruntz are needed to activate the checkpoint.
After that, the way to the fort is free. You only need to collect the last coinz and the
fourth warp letter. Cross the arrow maze and walk to the rolling ballz. Cross them and
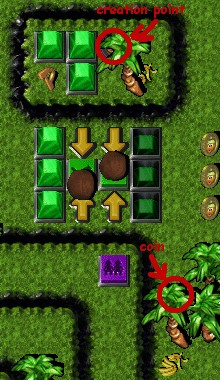
collect the four (!) coinz (screenshot).
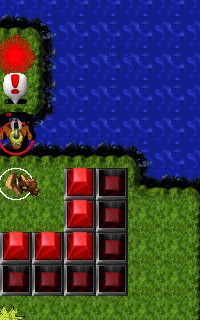
Take your last baked grunt and drop him on the creation point behind the palm. Take the warp
letter (P). Now you're ready to enter the fort.
to oldone for correcting the walkthrough :-))
to gooroo for releasing the level
to all grunterz who solved this level for not giving up :-D