 #1
#1 (Tool #1) and becomez GooberStraw
  #1.
#2
#1.
#2 (Tool #2) and becomez Bootz
  #2.
#2 and
#2.
#2 andGooberStraw
#1 and (through excellent tacticz) turn him into a Goo Puddle
  , while both manage to survive.
One Grunt should be at 1/2 health, while the other (thankz to a Can of Zap Cola
 ) is at 1/4 health (stabbed twice).
With the enemy Grunt
gone , the Green Hold Switch  (GHS) is unoccupied
  , and the Green Pyramidz
  (GP) are lowered
  .
#1 to the Goo Well.
#2 and
.
#1 to the Goo Well.
#2 andGooberStraw
#1 in the area below ... two on Spikez
  tilez.
It makez sense for
Grunt #2 (protectively shod) to use the Zap Cola on the Spikez tilez (avoiding the Rolling Coconut  ), and Grunt #1 to down the other two Kegz .
'Gang up' on each enemy Grunt


 , taking them on one at a time, wisely using the Zap Cola lying around whenever required before taking on the next opponent.
#1
, taking them on one at a time, wisely using the Zap Cola lying around whenever required before taking on the next opponent.
#1 to the Goo Well.
#2
to the Goo Well.
#2 to call for two Toyz (Toyz #1 and #2), and each Grunt takez one. (It doesn't matter which Grunt getz which Toy.)
#3
to call for two Toyz (Toyz #1 and #2), and each Grunt takez one. (It doesn't matter which Grunt getz which Toy.)
#3 .
.With the invincible arrogance of youth, walkz down and grabz the Coin
 (Coin #1) from under(!) the Rolling Coconut . #2 on the end of the path with Spikez to call for a Tool.
Goez through the Blue Wormhole
 ... to the beginning of the path!
Goez back through the path to get a Coin
(Coin #2).
Grunt #3 (Tool #3) from the Gruntzmachine, and goez exploring.
Now blow the enemy Grunt
 up, along with a hidden Rock
  - it reveals a Coin (Coin #3).
With no one holding down
 the Blue Hold Switch
  (BHS), a Bridge
  is completed to the big island in the Lava Pit
#2 and
is completed to the big island in the Lava Pit
#2 andGooberStraw
#1 , and stands on the Purple Multi-Grunt Switch
  (PMGS) to the south.
.
(PMGS) to the south.
.Now in full health, he attracts the enemy Grunt
 to the area with the other PMGS .
Go to the tile
 below the GHS , let the enemy hit you and immediately step on the GHS .
He will probably follow your movement and go below you (make sure you SAVEd the game though, because occasionally he will stand on one of the GPz
and be squished when they rise up  ).
).Now give him your mobile Toy, and as he goes to the PMGS
, move to the tile where he was before.Then get the Wingz
 (Tool #4) on the Black One-Time Switch
  (BOTS) ... which actz as if it were a One-Time Blue Switch ... while the enemy Grunt is breaking his toy.
 (just sendz them into the Lava Pit).
As for the involuntary 'assistant'
... dispose of him any way you can.

 path and waits near the Red Pyramidz
  (RP).
(Coin #4) on the Red Toggle Switch
(RP).
(Coin #4) on the Red Toggle Switch  (RTS) in the middle of the lava.
Fliez down to the Landing Dock
 due south of him.
Walkz south to collect the Coin
(Coin #5) hidden behind the Palm tree near the enemy Grunt  . (He might 'huff' and 'puff' until the enemy Grunt getz squished by a Rolling Coconut.)
Walkz (carefully) to meet his Warpstone
friend.At this point you can already finish the level if you use friendly fire with Wingz
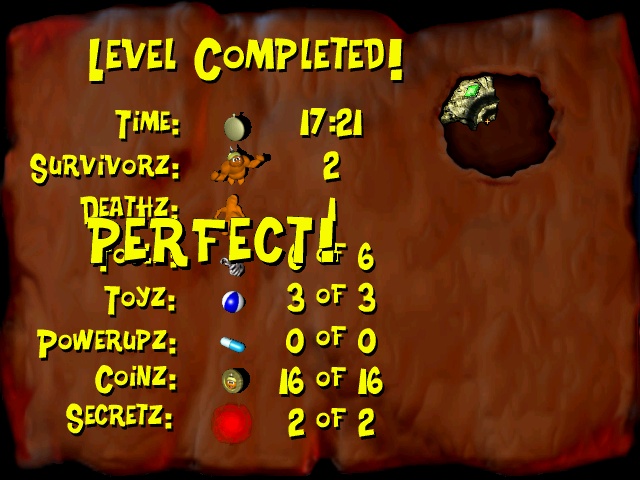
to push Warpstone to the king.But you won't get the "PERFECT!" score if you do.
andWarpstone
give Wingz his mobile Toy - this means, Wingz actually rides the Toy. But make sure to trap him so he can't move anywhere, otherwise he could get killed easily with all those enemy Gruntz around.| To do this, find two of those Construction Pyramidz with a single free tile between them. Put Wingz next to that tile and order Warpstone to place the toy there.Then move Wingz there. He'll get the toy and it should break immediately.
|
 
|
 (CPS).
to activate it again, then fly back to land, and exit the area by using the BOTS (which really is a One-Time Switch!) with a Coin (Coin #6) on it.
(CPS).
to activate it again, then fly back to land, and exit the area by using the BOTS (which really is a One-Time Switch!) with a Coin (Coin #6) on it.Fliez over the Hole
 near the CPS .
His gray bar is almost gone, so he can't fly over anything else now.
But he can still flap those Wingz
and blow tornadoez at enemy Gruntz  .
.Grabz the Yo-yo
 (Toy #3) and pressez the BOTS hidden behind a tree.
Distractz the enemy Grunt
with his lame toy , and pickz up the Sponge Gun  (Tool #5).
 and
andWarpstone
movez out of the Gully and lookz for someone (or some thing he can shoot).Warpstone
standz under one of the outside Arrowz  south of the King's Fortress, and then stepz onto the Arrow . He arrivez on the Arrow at the same time as a sponge fired by his buddy , and is pushed past the Arrow to stand NEXT TO the King.
Have him just wait there until the other Grunt finishez "policing up the area".

 (Tool #6) in the bottom right corner of the level, and start digging!
 (Coin #13) in the Mound where you picked up the Shovel.
There's a Coin
(Coin #14) near the starting area.There's a Coin
(Coin #15) protected by the pink Sword (you can easily kill him with your shovel without getting hit once).The last one
(Coin #16) you should get is the one in the Secret area.You MUST get this one last as there's no return once you go there ... unless you disposed of those enemy Gruntz.
to the King.