The solution of this puzzle is linear. That is, there is a clear-cut approach to its solution.
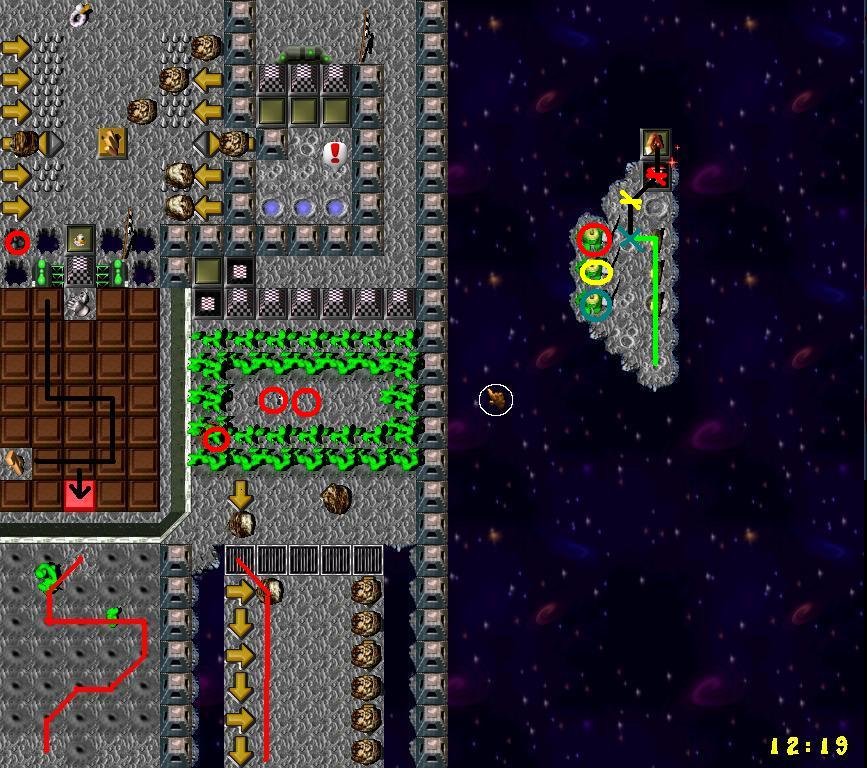
Your main concern is the ticking of the clock in the lower right-hand corner of the map!
You are given twelve minutez and twenty secondz to complete the entire puzzle.
For the purposez of this walk-through, you should assign numberz to the Gruntz, top to bottom, as #1, #2, #3 and #4.
 #1 and #2 and #3
 . That will lower
  the CPPyramidz
  , allowing all three Gruntz to pass towardz the south. #1 and becomez trapped ... end of the game, for him. #2 and #3
- Both Cross over the erupting Lava Geyserz
 and may find something surprizing.
#2 and #3
- They find themselvez standing side-by-side within the rectangle of erupting Lava Geyserz .
- It appearz that they both need to head south.
- (Let's say that Grunt #2 takez the lead.)
- Bare-handed #2
- Breathing hard, after negotiating the hazardz of the Rolling Rockz
 , he is standing on an artifical Bridge Tile
  .
. - "I'll get the Warpstone
 !" he chortlez.
- Breathing hard, after negotiating the hazardz of the Rolling Rockz
- Bare-handed #3
- Breathing hard, after also negotiating the hazardz of the Rolling Rockz , he is standing on an ordinary Tile
 just above grunt #2.
 - Complainz "that leavez me with the silly pink gun
 " (Tool #3).
- Breathing hard, after also negotiating the hazardz of the Rolling Rockz
 #2 and
 #3
#3
- SpongeGun #3
- "Now how am I supposed to get past this?"
- Isn't very happy about shooting his buddy, so he sayz "I'll shoot ... but at the Arrow
 .
. - If you want to get hit by it, that's your choice!"
- Shootz at the Arrow .
- Grunt #2 needz assistance again, but now thingz are a bit different.
- There is a certain danger here, because that next Arrow is just out of range of his SpongeGun.
So if he takez aim and shootz, he will take one step closer to his target.
That one step now putz him in the path of Rolling Rockz!
Timing is everything, and incorrect timing could well be fatal.
Or Grunt #3 could just take two stepz forward when it is safe for him to do so, and then take his shot at the Arrow. - Movez down and standz on the CPS
 , which lowerz the CPPz surrounding the Gauntletz
  ... and raising some CPPz near where Grunt #4 was imprisoned!
 - Might choose to do a little exploring.
- Warpstone #2
- Wiser now, with possession of the Warpstone, statez "we change placez, and you shoot me over that Arrow .
- Surely the game designer has provided a way for us."
- Stepz onto the Arrow just as the sponge arrivez, sending him further south.
- Seez a CPS
 , but it requirez someone carrying the Tool no one can reach (right now) standing on it.
 - He also seez a Black One-Time Switch
 (BOTS) that anyone may activate.
 - "That's where I'll go next." But he findz he cannot get there ... on his own.
- He pleadz with Grunt #3 to send him further along his way, with the same result ... Grunt #3 will only shoot at an Arrow , not at his buddy.
- Stepz onto the Arrow just as the sponge arrivez, sending him further south.
- Stepz on the BOTS (he had no choice!) and lowerz
 all the Black Pyramidz
  (BP) to the north that were trapping Grunt #4, freeing him to move out of his prison.
- Wiser now, with possession of the Warpstone, statez "we change placez, and you shoot me over that Arrow
#4
- Movez out of the BPz and CPPz .
- Exclaimz "Whew! I'm sure glad I wasn't standing on one of those!"
- Walkz over and pickz up the Gauntletz (Tool #4).
#2 and #3 and #4
#4- SpongeGun goez to stand on his part of the three CPSz
 , and Gauntletz also takez his place.
From several stepz away, Warpstone startz towardz his place, while Gauntletz is re-selected, ready to move.
Just as Warpstone arrivez, Gauntletz movez away (on the diagonal) from his Switch, making it out before the CPPz are raised , escaping entrapment. - What also workz (sometimez even better!) is to have SpongeGun and Warpstone standing in their placez.
From several stepz away, Gauntletz is directed to his place, then re-directed on the diagonal away from his place. - Whichever way workz best for you ... use!
- SpongeGun #3
- Is now trapped within Pyramidz of one kind or another ... for him it is 'game over'.
- Gauntletz #4
- Movez to step on the Silver Timer Switch
 (STS), which lowerz the long line of Silver Pyramidz
  (SP), so that he can move across one of the SPz
  nearby into the vicinity of the King's Fortress.
 - He trompz around the area he is allowed to travel in, and findz something interesting.
- Movez to step on the Silver Timer Switch
- #2
- Now stepz on the STS and crosses over one of the (now) lowered SPz into the vicinity of the King's Fortress, and waltzez right in with his prize.
- Now stepz on the STS