In an ideal solution, you will pick up
 ,
,  ,
,  and
and 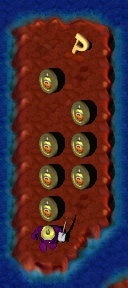 in that order.
 #1
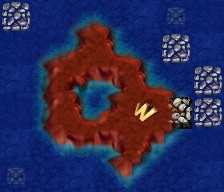
#1| That Giant Rock |         
|
is blocking your path into the playing field � so break it! |
A Coin
 ? Pick it up! (Coin #1)
A Megaphone
 ? Use it! Make note of what becomez available in your Tool Chest, and see where you can go now. Not far, eh? "Hey Rube!".
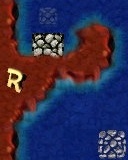
 #2 and
Gauntletz
#1 barz your path to the east, so it lookz like you need to take Horace Greeley'z advice, and "Go West, young (wo)man".
There are four Switchez


- Green Toggle Switch (GTS)
- Yellow Hold Switch (YHS)
- Green Hold Switch (GHS)
- Yellow Toggle Switch (YTS)
 (BP) blockz any further movement westward.
Step on Switchez, and see what they do. Since you can't reach the Green Pyramidz
 (GP) which the Green Switchez raise and lower
  , your task must be to control them for your buddy with the Gauntletz. Until Gauntletz is able to return to the western edge of the map and use his tool, most of these instructionz are for the Shovel Grunt.
Stand on the GHS
, and send Gauntletz into the Arrowz maze.As soon as he passez the lowered GP
, step onto the YHS (switching some Two-Way Arrowz), and Gauntletz will move to the Black One-Time Switch  (BOTS).
Now you can move past the lowered BP
 to your own BOTS .
Then return to the space
 just east of the YTS , step back onto the YTS , and back to the space .
Gauntletz can now step due east, and take the Arrowz to the lowered GP
in the south central portion of the maze.Have him step on the Arrow
 due east, and move Shovel onto the YTS as soon as Gauntletz passez the first TWA
  . Gauntletz will be led to another BOTS .
One space east of that BOTS
there is a Megaphone on the ground � have Gauntletz pick it up and use it!Next you need to have Gauntletz return to the western end of the Arrowz maze, and break the Rock
 he can now reach, pocketing Coin #2.
Move him to the GHS
, and then diagonally onto the Arrow  to the northwest. As soon as Gauntletz passez the first TWA
  , step on the YTS on your way to the YHS .
Once Gauntletz breakz the Rock
, then Shovel can fill in the Hole  so that both Gruntz can move freely through the area.
Does it look like a Mound
 ? If so, dig it up again, pocketing Coin #3!
Look around for other Holez
or Moundz you can reach.Use that Shovel to do what it does best, pocketing Coin
#4.
While Shovel is employing his "super duper pooper scooper", there is time for Gauntletz to move east and break that Rock , pocketing Coin #5.Break the Rock
 near the CheckPoint Switchez
 (CPS) ... and step away from the ticking sound.
When the smoke clearz, take your place on the CPS
that is 'yourz'.Shovel then trekz back to satisfy his CPS
, which lowerz  three CheckPoint Pyramidz
  (CPP), allowing access to the Gully.
Break Rockz
in the Gully, and fill in Holez (and dig up the Moundz ), picking up anything (#6 through #9) that is (immediately) useful.Leave the Rock
 where it is, for now. (Gauntletz should get the Toy.)
#1
where it is, for now. (Gauntletz should get the Toy.)
#1and Shovel
#2Now you need to have Gauntletz control the Switchez
below the Arrowz maze while Shovel crosses over to fill in all those Holez . #2 andGauntletz
#1 at the east end.Put both Gruntz on the CheckPoint Switchez
.That will lower
the CPPz so that Gauntletz can go get the Rockz (Tool #1).
 #1 at the enemy Grunt
  while on your way to the Rockz CPS
  .
.Move Shovel to the other CPS
southwest of where he is now.Throw a Rock
at the enemy Grunt . Move closer and wait a moment until you can throw the last Rock at the enemy Grunt , now just a Goo Puddle  .
.When you reach the CPS
nearest Shovel, a CPP is lowered .
#2 #1 in the far North. When the CPPz lower , decision time!How to deal with the enemy Grunt
 ?
?
- The hard (slow) way.
- Move about four spacez to the west of the Timebombz
 .
. - Set the cursor on the space immediately west of the Timebombz .
- Use the "T" key to select the Tool.
- When the enemy Grunt is due south of the Timebombz, throw a Rock !
- Repeat stepz 2 through 4 until the dish is done (the Grunt is turned to Goo
 ).
). - Go get the Timebombz !
- Move about four spacez to the west of the Timebombz
- The easy (fast) way.
- Give the Toy to the enemy Grunt .
- Pick up the Timebombz .
- (Compassionate/peaceful) ... Walk toward the Rockz.
- (Vengeful/murderous) ... use one ... right there!
Walk toward the Rockz and plug your earz!
- Give the Toy to the enemy Grunt
 #1 anywhere next to the Rockz
  to the south, then step back and watch the fun!!!
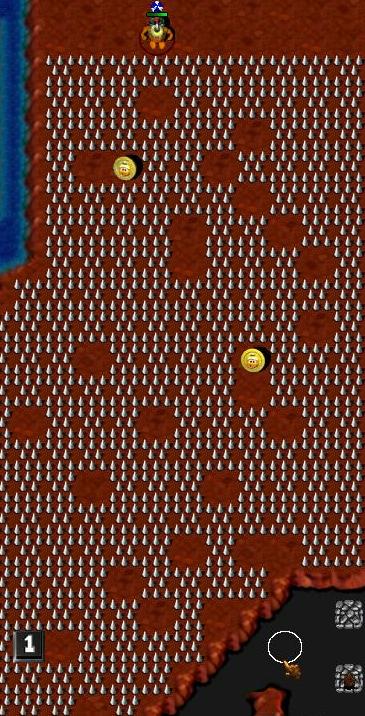
Take the Springz
 (Tool #3) any time after placing that Timebomb .
 #1
#1
 and Holez
 (collecting two Coinz
(Coinz #10 and #11) along the way)to the BOTS
, and then to the Landing Dock  to the west of the space surrounding the Island with another BOTS and a Blue Toggle Switch
  (BTS) on it.
Don't be fooled by the BTS
on a tiny Island all by itself � you can't reach it!Step on the Switchez in the central Island (collecting a Coin
(Coin #12) while there),then return to the Landing Dock
.Make your way through the Spikez
and Holez maze to the west.When you clear the maze, check your Toolchest again. Anything there you might be able to use?
What's the name of this puzzle? Right!
#1 (Coin #13) in the northern half of the big "E".Now move to the far southwestern corner of that same "E".
(Now would be a very good time to SAVE!)
Within an area bounded by Construction Pyramidz
 to the south and east, the Lake to the north and the puzzle border to the west are seven enemy Gruntz standing on Purple Multi-Grunt Switchez
  (PMGS):
- Three Sword Gruntz
- Two SpongeGun
 Gruntz
 - Two Rock-throwing
 Gruntz
and - One Rock-throwing
 Grunt (not on a PMGS)
(though four of them will send missilez your way), but the other Grunt will move around as soon as he is able to � like after you send one Enemy Grunt into the great land of Goo!Do your best to send this Grunt to his final reward
 on one of the spacez you can reach between two Construction Pyramidz .
You do see those two not-so-Secret Question Mark Switchez
 (QMS) nearby, don't you?
And that GooberStraw
 just outside the area, near the northernmost enemy Grunt ?
Yep! You're going to be going into that area to suck up the Goo left when you defeat all of those enemy Gruntz, eight
of them.
 #1 before you touch that QMS !
You may be able to suck up seven Goo puddlez inside the area with the PMGSez
, but I could never manage it � and I created the puzzle!(I did my best to make the timing as tight as possible.)
A Construction Pyramid
will change to an ordinary tile  ... briefly!
The opening will appear in the central eastern border of the area. Get over there!
Move to the far west, to a space from which you can suck up three Goo Puddlez
without moving your Grunt.Be careful that you do not touch that QMS
� you don't need it now, but you certainly will need it later!Then move toward the east to a space where you can suck up the remaining Goo Puddlez.
If you are very quick, you may wait on the YHS
for a while. (It is worth the wait.)Looks like you are trapped here, doesn't it? But that same Construction Pyramid
will change to an ordinary tile for a moment so you can get out.A few temporary Arrowz will appear leading you toward the Coin
(Coin #14) in the southern portion of the big "E" (normally unreachable.) Be quick!You have barely enough time to get the Coin and get back out again before you are permanently trapped in the "E". You made it!
Now hie thee on to one of the Blue Hold Switchez
 (BHS) north of the King's Fortress.
(SAVE before you try to pass the barrier.)
(BHS) north of the King's Fortress.
(SAVE before you try to pass the barrier.)
 #3
#3 !
!Rather handy, being right next to the Lake and the Green and Red
 Pyramidz barrier, isn't it?
Now comez the tricky part: getting the newly-baked Grunt onto one of the BHSez
north of the King's Fortress. (SAVE would be wise.)
#4 north of the King's Fortress.
#2, this doesn't look so tough!You have a clear path to the Warp letter
and to the Mound to the north, now.Go dig it up! Pocketing the prize
, you look ahead for possible problemz.Whoops! One of those Stepping Stonez
 doesn't seem to want to stay put.
"Up, no down, no up. This'll be tough!"
But there's the Warpstone piece
 , so we have to go through this, no matter the danger.
 #2
#2Not fair � they can't do that to me, can they? Sure can � and did!
Going into that Red Warp
 (RW) is a snap, but it won't be so easy coming back!
(Fortunately, you won't have to ... there's another option.)
You land in an area with three (lowered) Purple Pyramidz
 , seven (unoccupied!) PMGSez and a YHS .
Go and stand on that YHS
, until all of the Rolling Rockz  (RR) go kerplunk.
It is now just about time for you to touch that QMS
.First, call a buddy (it doesn't matter which one, #1, #3 or #4) down to stand nearby.
Step on the QMS
, and exit, while your buddy enterz (replacing you in the area).Your buddy will do some "scouting around" before he pickz up the Warp letter
.How you finish the level will depend on your luck
- if either the Red or the Green Pyramidz (or both!) are now lowered
 when the last RR disappears, you can send one of your Bare-handed Gruntz (#3 or #4), or GooberStraw #1 for the Warp letter
  and the Coinz (#15 through #21) on the Island with the enemy Grunt (now a quivering Goo puddle , since you crushed him with Rockz ).
 - If they are all raised , your heavily burdened Warpstone #2 will have to go get the prizez.
Someone should try to find it. (It's within the area where eight enemy Gruntz were standing.)
All that remains is to take the rock
to the King�z Fortress.