 Bare-handed #1
(It will save you many re-triez, and much aggravation!)
Follow the Toggling Bridge
 Tilez, using Stable Bridge
  Tilez (to 'take a breather', if you must) to the Landing Dock
  leading into the lava field.
Continue across the Toggling Bridge
 Tilez to the Landing Dock
  and diagonally southeast to the next Landing Dock .
Once again, follow the Toggling Bridge
Tilez and one set of Crumbling Bridge  Tilez and Stable Bridge
  Tilez to the Landing Dock .
Now go northwest and across the Lava Geyser
 (when it is not erupting
  ) to the Landing Dock
  .
.Just one more Toggling Bridge
to cross to get to the Landing Dock and (relative) safety.Cross over the Lava Geyser
(when it is not erupting) and head west toward the Rock  .
.You have another bridge to cross in order to activate the Blue Toggle Switch
 (BTS) and pick up your first Tool (the Gauntletz).
 Gauntletz #1 in order to return, you submerge some Tilez, so hit that switch once more before you cross back over the Bridge.
Is there anything you can break around here anywhere?
Break it! And continue breaking everything you can reach that is breakable.
Have you revealed anything?
You may pick up any Coinz
 you find.
| The one beyond the Volcano |         
|
may hurt a bit. |  
|
 (GTS) that will allow you to reach more breakable thingz.
When you reveal a Bricklayer's kit you can take a breather ... but not the Tool!
Bare-handed #3Where he continued east, you go south via Crumbling Bridge
Tilez and Toggling Bridge Tilez to the Landing Dock .There is an enemy Grunt
 southeast of you.
As much as possible, ignore him and just go get the Coinz and return to this point.
Now follow your buddy's path (except for using the remaining bridge) to join him.
He revealed a Bricklayer's kit
 . Take it! It's yourz.
 Bricklayer #3
 near the BTS with some Coconutz
  rolling across it. Does that suggest anything to you?
After you have laid a Brick
 , breaking those Coconutz, you have to return over the Bridge (because there is no room here for both you and your buddy with the Gauntletz!), and he needz to destroy your handiwork so that you both may continue onward.
Gauntletz #1.
Bricklayer #3 where it will do the most good, and step aside for your buddy to pass on to the Giant Volcano.
Gauntletz #1
, breaking those Coconutz, you have to return over the Bridge (because there is no room here for both you and your buddy with the Gauntletz!), and he needz to destroy your handiwork so that you both may continue onward.
Gauntletz #1.
Bricklayer #3 where it will do the most good, and step aside for your buddy to pass on to the Giant Volcano.
Gauntletz #1|
|
blocking your path southward, revealing |         
|
Bricklayer #3 (being careful not to step on it) and stop northwest of it.
If you have never SAVEd before
 , you'd better SAVE now!
When both of you are in place, click on a destination where Gauntletz broke the last Giant Volcano. (You will walk away from danger, and toward safety.)
Gauntletz #1 and up the stairway to break the Rock  and reveal a pair of Wingz
  .
.Pick them up and step one Tile to the east to wait for the scenery to change.
 Wingz #1 surrounded by Red Pyramidz
  (RP). If you make it safely, your Wingz will fall off. (They've done their job!)
Bare-handed #1 via the Foundation Tile by going north, east, north, west and north.
(RP). If you make it safely, your Wingz will fall off. (They've done their job!)
Bare-handed #1 via the Foundation Tile by going north, east, north, west and north.Then make your way to the Gauntletz
 and the Blue Wormhole
  (BW).
Gauntletz #1
(BW).
Gauntletz #1 (BHS) and the BTS . (Bricklayer should already be here, if he was moved while you were 'in transit'.) Gauntletz #1 and Bricklayer #3, while the other one locatez a Yellow Toggle Switch
  (YTS) partially hidden by a tree.
Step on the YTS
and then hasten down toward the BTS .You should SAVE before the Rolling Coconut
comez into view, as thingz will be happening too fast to SAVE later!You will need to step on and off that BTS
about four timez, in order to guide that Coconut across to the BTS on the other side of the pool, and into the Hole .When the Grunt getz off the BHS
, there should be complete Bridgez in four placez.Except for that Two-Way Arrow
 (TWA), it would be a snap to waltz over and pick up that Coin south of where you are standing.
What is it that controlz those thingz, anyway? Perhapz a YTS
?!?Once again, either Grunt activatez the YTS
while the other makez his way down to acquire the Coin . Then the YTS is activated (for the last time) to get the other Grunt back.Both Gruntz pass over (safely!) to stand near the Silver Timer Switch
 (STS).
I suppose it is possible to move both Gruntz through the Silver Pyramidz

 (SP) with one press of the STS .
But it is safer to send each Grunt through with his own press of the STS
.One Grunt will take the 'south fork' to the Coin, then follow the Arrow
 z to the next Coin and on to the Green Wormhole
  (GW).
(GW).The other Grunt may either take the 'south fork' (pickng up nothing, but being careful not to run over his buddy!); or take the 'north fork' to the CheckPoint Switchez
 (CPS).
It doesn't matter which Grunt standz on which CPS
, as there is plenty of room here.
Gauntletz #1 (BOTS), which lowerz
  three Black Pyramidz
  (BP). Crossing over the (now lowered) BPz , three enemy Gruntz

 begin fighting among themselvez! Only one will emerge the 'victor', the other two now nothing more than Goo Puddlez
 (joining the one
  already nearby). You break the Rock
  revealed, and that startz a chain reaction of explosionz. When the fireworkz are over, there is a GooberStraw
  left behind. Polish off the remaining enemy Grunt (be aggressive! don't let him come to you!) and break the Rock blocking your way northward. That reveals a Toy.
 Bricklayer #3.
 GooberStraw #3
 , filling the Goo Well.
Bare-handed #4 via the spacez between the Arrowz
, filling the Goo Well.
Bare-handed #4 via the spacez between the Arrowz 

 guiding the Rolling Coconutz by going southward, then east, and back north again until you activate the BOTS immediately after you pick up the Springz.
 Springz #4, Lava Geyserz and Holez by jumping on the Lava Geyserz when they are not erupting. Your goal is the BOTS . Then continue west through the area filled with Spikez and Lava Geyserz (no Holez !) to the other BOTS . Finally, go through the area filled with Spikez and Holez and RPz
  by stepping on the lowered RPz . Activate the final BOTS to clear the way for the GooberStraw Grunt to exchange his Tool for the Shovel.
 Shovel #3 into a Mound
  , so that the Springz Grunt can acquire the Coin in the northeast corner of this area. Then return south and head west, converting as many Holez into Moundz as necessary in order to acquire the three Coinz . Return to where you picked up the shovel, and convert the Hole into a Mound , and take your place on your CPS
  .
Gauntletz #1), and take your place on your CPS
.
Gauntletz #1), and take your place on your CPS  .
Springz #4, then return to take your place on your CPS
.
Springz #4, then return to take your place on your CPS  .
Springz #4, Shovel #3 and Gauntletz #1 in the section you enter, and it is pretty obvious which one of you is to get (and use!) which Tool. So get to it!
.
Springz #4, Shovel #3 and Gauntletz #1 in the section you enter, and it is pretty obvious which one of you is to get (and use!) which Tool. So get to it!Do not go through any BWz
... yet!Determine which Grunt has the poorest health status (probably Shovel #3), and send that Grunt through his BW
first. That Grunt will pick up the Bomb  .
.Take a run at the center of the three Gold topped Brick Stackz
 .
.(Game over, for that Grunt.
 This is the only Grunt you should lose.)
It should not make much (if any!) difference which Grunt takez which of the remaining Toolz; Gauntletz, Shovel or Springz. But a good 'rule of thumb' to follow is to give the strongest weapon Tool to the Grunt in the best health, down to the weakest weapon Tool to the Grunt in the worst health. Following that 'rule', the newly-baked Grunt should get the Shovel.
Bare-handed #5 . Shovel #5 GooberStraw #1. Gauntletz #1
 . SAVE!
Click on the Landing Dock
 as your destination, and make a bee-line for it!
Usually, you will find yourself on that Tile, and the five enemy Gruntz
 will have made their chargez and blown up a lot of stuff for you.
Click on the Coin
and you will cross three BTSz along the way, and raise most of a Bridge across the lava field to the south.
GooberStraw #4 . Springz #4, completing the Bridge so the otherz may cross safely. Continue on to pick up the Coin , and on to the next BTS .
Perhapz you choose to do a bit of exploring now.
You see that it is now possible to proceed further north ... so you do!
You come to a sort of 'dead-end' at a fern.
Wait there (patiently, if possible) for further developmentz.
Gauntletz #1. SAVE!When the top row of SPz
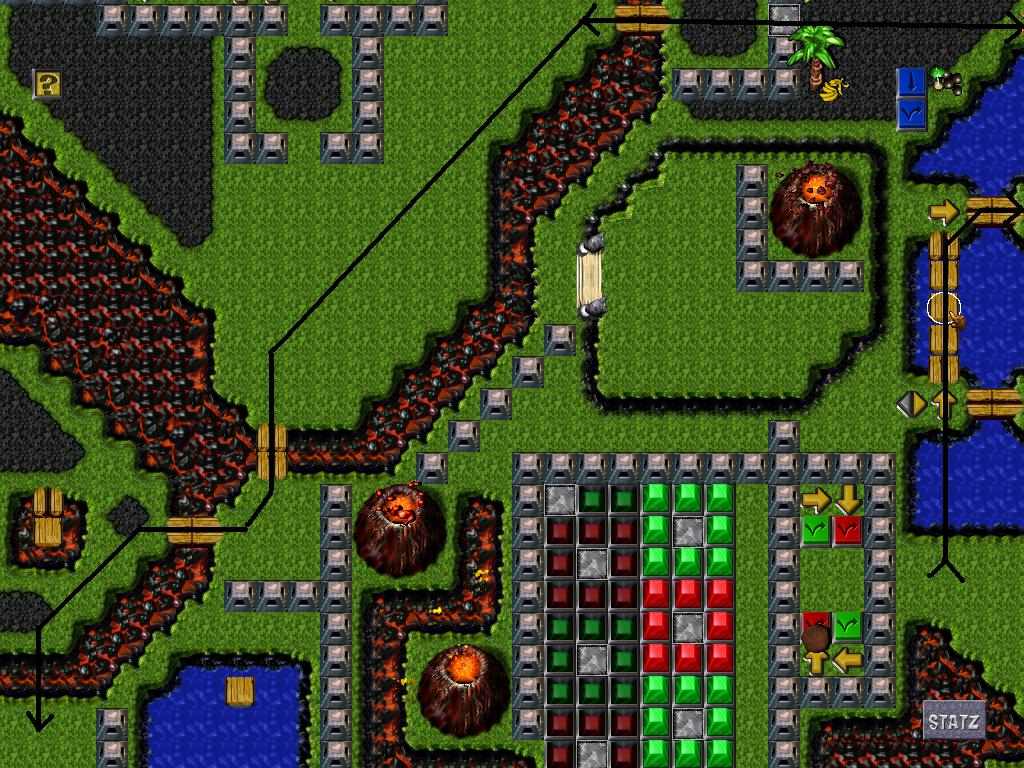
become lowered , click on the Arrow .Safely through the pyramidz, there are three Giant Volcanoez nearby.
| Breaking the one to the northwest |
|
revealing | nothing much.
|
| Then the one due east |
|
revealing |        a Lava Pit. a Lava Pit.
|
| Then the one due north of it |
|
revealing |        some water. some water.
|
To the west are several Green Pyramidz

 (GP), and something that lookz like a Race Car Wheel
  . Go get it!
It just might come in handy to help you pick up the Coin
.When you go through the BW
, you land near a fifth Giant Volcano. Break it!That third Grunt is finally freed! But how are both of you going to get back into the game?
If you try it out, you find that only one of you can go through that BW
.It's time for a little bit of 'friendly fire'.
 SpongeGun #2 firez at the Arrow and Gauntletz stepz onto the Arrow just as the sponge arrivez.
This knockz him to a place where he can easily get back to the rest of the Grunt team.
That done, you head over to one of the three Arrowz
, picking one that has not already been picked by one of your buddiez.Then you go and stand in front of an Arrow
leading away from your CPS .
SpongeGun #2, and then make your way down to join the rest of the Gruntz team. Shovel #5 and pick up the Coin . There is an Arrow slightly northeast of you. Step on it (and select the Springz Grunt for what comez next).
Springz #4 to get the two Coinz .If you thought that the three stone 'hop' was tough, wait'll you try the two stone 'hop' that is next!
Once again, there are three stonez here, but it only takez two of them to get you to that next Coin
.It just doesn't get any easier! Two more stonez take you to the last Coin
you can see.Then you re-use the last one of the stonez to get to the return Red wormhole RW
 .
.You cross the Bridge to rejoin the team, where they are waiting for you to jump across some broken Bridgez and activate the BTSz
that will 'repair' them, so that the Shovel Grunt can get the two Coinz.That done, you head over to one of the three Arrowz
, picking one that has not already been picked by one of your buddiez.Then you go and stand in front of an Arrow
leading away from your CPS .
Shovel #5z and get the two Coinz . That done, you head over to one of the three Arrowz , picking one that has not already been picked by one of your buddiez.Then you go and stand in front of an Arrow
leading away from your CPS .
SpongeGun #2, and then join the rest of the Gruntz team, all lined up with nowhere to go ... without your help. One by one, you shoot at the Arrow just past the Gruntz, and each one dutifully stepz on the Arrow in time to be hit by your sponge."Hey, guyz! Move on over to those Purple Multi-Grunt Switchez
 (PMGS), so I can get to my CPS
  , will you, please?"
When they do, the Purple Pyramid
 (PP) is lowered
  , allowing him to pass over.
With the rest of the team back in place, the CheckPoint Pyramidz
 drop
drop  , allowing them in to the next puzzle area.
SpongeGun noticez something glittering just to the north, and goez up to pick up a Coin
.
Shovel #5, Springz #4, Gauntletz #1 and SpongeGun #2Once again, it is fairly obvious which Grunt needz to enter each area.
SpongeGun Grunt assistz each of the otherz into their areaz, then enterz his own area (the three Gruntz are standing on PMGSz
, which lowered the PP so that he may enter).
Gauntletz #1 (that you can reach from here) nearest the Landing Dock , then break the Rock nearest you ... and make trackz! A BTS is revealed ... step on it.It is now much easier for you to reach the Landing Dock
, so you can break the Rock ... and step back! Another BTS is revealed ... step on it.The Coin you can see ahead of you is not yourz, so don't even think about it!
You're probably getting pretty good at crossing these Bridgez by now, so I'll just tell you to make your way to the Landing Dock
, so you can break one of the Rockz ... and step back! When it is safe, make your way to the GW .
Shovel #5 nearest you (for your own safety ... only the one northeast of you is absolutely necessary).Dodge the Rolling Coconutz to reach the safe tile
 next to the Mound .
Dig up the Mound
, then fill it in to pick up the Coin .Return to the safe place you created for yourself, then find a way to dig up the Mound
that the Rolling Coconutz are passing over, so that they 'go away'.Fill in the Hole
you created and use that spot to dig up the next Mound .When it is safe, make your way to a place in the very slowly moving Coconut's path where you can dig up the Mound
in the very fast moving Coconut's path.Retreat to another place where you can fill it in again, and use it to pass the
z.There is no more use for your Tool in this area.
Just go get the Coin
and go through the blue wormhole.Then go through the other wormhole, and take your place on your CPS
.
Springz #4z and z to get the Coin. (You jump to it as the pyramid is going down, then quickly back before it comez back up under you!) Then move on to get the Coin in plain view on a safe Tile. Then follow the Arrow z leading you to the blue wormhole.Do not take your place on your CPS
until everyone else is here!
SpongeGun #2z around you become z.(Only one shot is necessary ... don't bother turning him (or any other enemy Grunt) into Goo ... there is no use for any more Goo.)
Take one step to the west. Each time a string of three
z become z move on to the next .(A detour to pick up a Coin is perfectly acceptable.)
You will reach a place where there are two
z. To lower them, you will need to (briefly!) stand on a and take a shot at another Grunt. Then you can stand on a while waiting for an opportunity to move on to the next .With that Rolling Coconut in your path, you are going to have to move quickly to the next
. Don't dawdle ... you still need to take a pot shot at another Grunt ... from a , and back to a safe place.Once that is done, you can go through the blue wormhole and take your place on your CPS
.
Shovel #5, Springz #4, Gauntletz #1 and SpongeGun #2Now get ready for the really tough stuff!
All four Gruntz are going to take on the challenge of the large lava field!
Springz has to go all the way to the farthest south portion of the map, along the corridor running north and south, southwest of where the four Gruntz satisfied the CPSz
.The other three Gruntz only need go as far as the vicinity of the Landing Dock
.Do not click directly on that Tile in order to send them there!
A wise Gruntzer will make frequent use of the F5 (SAVE) key for quite a while.

For now, it does not matter which Grunt goez where. Only in the very last stepz is it important, and even then there is plenty of space to re-arrange Gruntz into the required order.
So (brief description, here) place one Grunt on each of the
z in order to lower the preventing Springz from advancing to the Blue Toggle Switch ahead of him.You will have to do this four timez, in order to allow Springz to reach the vicinity of the blue wormhole ahead of him.
Do not be tempted to move all three of your Gruntz onto the Stable Bridge
z raised when Springz activated the Blue Toggle Switch after the last in his path!They will not remain raised, as you maneuver your way to the next island across those Crumbling Bridge
and Toggling Bridge Bridgez! Take one Grunt at a time from his last to the safety of the island. Springz will step on the southernmost Blue Toggle Switch in order to allow a Grunt to move forward.When all three Gruntz are safe on the island, Springz is going to get a real workout! He will have to activate the three Blue Toggle Switch
to his north in the proper sequence to allow his buddiez to cross the Bridge to the peninsula where the Toob is waiting for someone (SongeGun) to pick it up.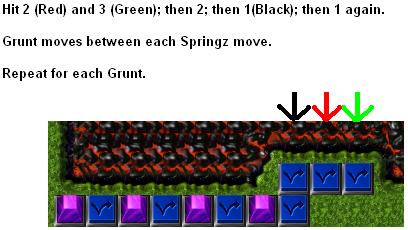
Once all three Gruntz are on that peninsula, use the space available to arrange your Gruntz for the task remaining ahead.
Gauntletz should go first, and break the Rock Rock
and Rock obstaclez. Then he can wait for Shovel to cross the small Bridge and fill in the Hole . Gauntletz and Shovel will take turnz using their Toolz to clear the path from the green wormhole to the Wingz (or vice-versa!). When Shovel makez his last trip down the edge to use the tool for the last time (here), Gauntletz movez onto the Landing Dock .When Shovel is done, he goez through the green wormhole, and continuez on to his
at the edge of the north-south corridor.While Gauntletz is going down to break the last obstaclez, SpongeGun (now Toobz) crossez the Bridge and goez through the green wormhole, and continuez on to his
at the edge of the north-south corridor.Finally, Gauntletz goez through the green wormhole, and continuez on to his
at the edge of the north-south corridor.Only Springz remainz in the area. He has his own problemz to solve, in getting out of here!
, and you just know what will happen next! That Coconut is going to start rolling in your direction. And you can tell that it will be moving faster than you can with these Springz slowing you down. There is no way you can rid of them, either ... no Spikez nearby.  Is there any chance you can get out of its path? (Even if only briefly!?!) "Don't let me die! Please, don't let me die!" There is nothing to do, but see if your solution workz. If it worked, you can now hop along towardz the blue wormhole ahead of you.
 You head toward your at the edge of the north-south corridor. You have a few 'errandz' to run before you satisfy it. It is time to go after that Warp letter W. With it in your possession, you make your way back. When the
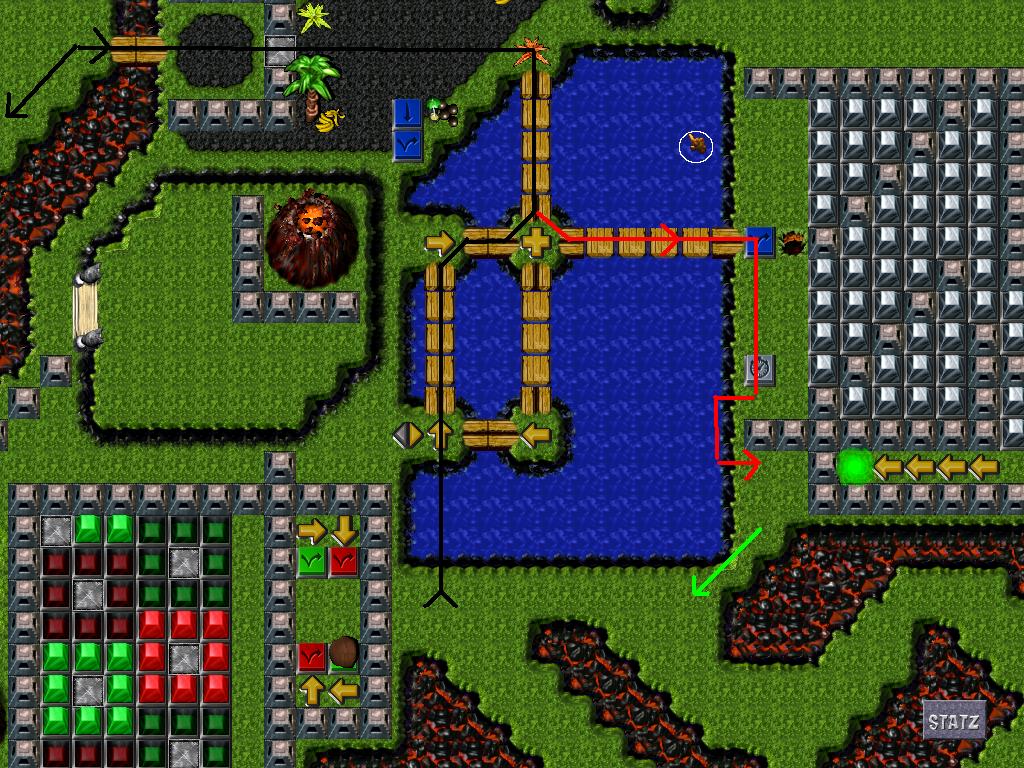
 z become z, you move forward and go through the northern blue wormhole. You are in the area where Gauntletz had to bypass a Coin because he couldn't fly (like you can). If you have to hover too long in order to get it, you will be unable to complete your journey. Perhapz it would be wise to SAVE here, in case the timing is against you! Do not save again until you manage to return to the other blue wormhole! Go through the remaining blue wormhole, and get a fresh set of Wingz. Do your best to walk rather than take wing, so that you don't use up this pair, too! Head across the Bridge and cross the small pool to pick up the Coin, using as many stepping stonez as possible to shorten your flight. Be just as efficeint on your way back (even though two of the stonez are now gone). Wait besidez the field of Arrowz. Your buddiez will clear the way for you, so that you don't have to use those fragile wingz.
, and
z become z, you move forward and go through the northern blue wormhole. You are in the area where Gauntletz had to bypass a Coin because he couldn't fly (like you can). If you have to hover too long in order to get it, you will be unable to complete your journey. Perhapz it would be wise to SAVE here, in case the timing is against you! Do not save again until you manage to return to the other blue wormhole! Go through the remaining blue wormhole, and get a fresh set of Wingz. Do your best to walk rather than take wing, so that you don't use up this pair, too! Head across the Bridge and cross the small pool to pick up the Coin, using as many stepping stonez as possible to shorten your flight. Be just as efficeint on your way back (even though two of the stonez are now gone). Wait besidez the field of Arrowz. Your buddiez will clear the way for you, so that you don't have to use those fragile wingz.
, and  without a fight. You can
- gang up on him, or
- have Shovel try to turn that Mound into a Hole before he usez that 'butter knife' twice on anyone.
z.
z (one of them is now a ). If you make it across safely, be prepared to suddenly find yourself walking (on the way back)! Get the prize, then get the Wingz; or get the Wingz and get the prize (and come back) and satisfy your . Your final(?) task is to go activate the Blue Toggle Switch by crossing the partial Bridgez over the water and lava. (You may have the honor of flying to get the Warpstone, and carrying it to the King's Fortress.)
. Your work is done!
or . Your work is done! (The other Grunt can 'arm wrestle' with the Wingz Grunt for the honor of picking up the Warpstone.)
 Warpstone.
Press it to see what happenz! When you are sure you know the route to follow, press it again.
You pick up the last Coin along the way while carrying your burden to the King�z Fortress.